18
❏
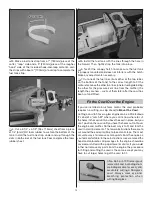
4. Finally, see the following tip, then turn the model over
and start cutting for the muffl er. The muffl er mounting bolt
holes in the engine may be used as a guide to mark the
locations of the holes in the top of the cowl for a hex wrench
to tighten the muffl er screws. The tail pipe on the muffl er
was also rotated to align the exhaust outlet with the bottom
of the fuselage.
MUFFLER INSTALLATION TIP
When fi tting the muffl er and muffl er extension (OSMG2578),
lay the model on its side so the muffl er screws and extension
won’t fall off the engine. Once the cowl has been installed,
fi t the muffl er bolts and muffl er extension to the engine.
Connect the pressure line from the fuel tank to the fi tting
on the muffl er, then fi t the muffl er and tighten the screws.
❏
5. After all the holes have been cut in the cowl, sand the
edges of the cutouts to smooth the lines and remove any
loose fi berglass fi bers.


