❏
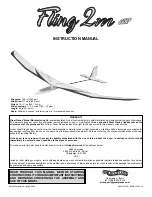
8. Using pliers, bend the pushrod wire into the shape of
a “V” as shown. This “V” can be modified after installation to
adjust trim. Do the same for the elevator pushrod.
❏
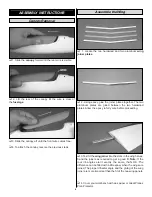
9. Make a mark on the pushrod where it crosses the
control horn. Make a 90° bend at this mark and insert the
pushrod into the second hole on the control horn.
❏
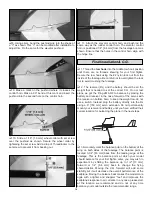
10. Slide a 1/16" [1.6 mm] wheel collar with set screw
over the pushrod as shown. Secure the wheel collar by
tightening the set screw. Add a drop of Threadlocker to the
set screw to prevent it from backing out.
❏
11. Attach the elevator control horn and pushrod the
same way as the rudder control horn. The elevator control
horn is positioned 1/4" [6.4 mm] from the fuselage boom as
shown. Ensure that the holes in the control horn align with
the hinge line.
❏
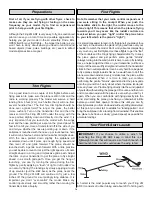
1. Thread the tow hook into the middle tow hook position
until there are no threads showing for your first flights.
Secure the tow hook using the #2 nylon lock nut from the
inside of the fuselage. Be careful not to overtighten the lock
nut to avoid crushing the fuselage.
❏
2. The receiver (Rx) and the battery should be all the
weight that is needed to set the correct C.G. On our test
plane we got the Fling 2M ARF to balance by placing the
battery and receiver in the nose, forward of the servos with
the receiver on bottom. Also, to keep the weight low, do not
use a switch. Instead, plug the battery directly into the Rx
using a 6" [153 mm] servo extension. Do not permanently
mount your receiver and battery until you have verified their
correct location for balancing the plane in the next steps.
❏
3. Accurately mark the balance point on the bottom of the
wing on both sides of the fuselage. The balance point is
located 3-1/4" [83 mm] back from the leading edge at the
fuselage. This is the balance point at which your model
should balance for your first flights. Later, you may wish to
experiment by shifting the balance up to 1/2" [13 mm]
forward or 1/4" [6.4 mm] back to change the flying
characteristics. Moving the C.G. forward will add some
stability but it will decrease the overall performance of the
sailplane. Moving the balance back makes the model more
agile with a lighter and snappier “feel” and improves the
sailplane’s response to air currents. In any case, please start
at the location we recommend and do not at any time
balance your model outside the recommended range.
Final Installation & C.G.
10


