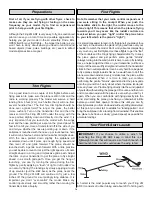
a ribbon at the end. One end of the rubber is staked down
directly upwind of the launch point. One end of the string is
attached to the other end of the rubber. The end of the string
with the ribbon has a loop or ring and is attached to the tow
hook on the sailplane. Lay the mini hi-start out with the stake
directly into the wind. Place the stake at the far upwind edge
of the flying field so the ribbon will blow back onto the flying
field. Turn on your transmitter and then your receiver and hook
the ring onto your plane’s tow hook. Pull the plane back
approximately 20 yards. More tension can be used after you
get acquainted with the launching procedure. NEVER pull
more than 30 yards. Hold the plane above your head with the
wings level and the nose pointed slightly up and directly
into the wind. Give the plane a healthy push forward to get it
flying and it will climb up like a kite. You should not have to
touch the elevator during the launch but use the rudder stick
to keep it going straight up. As the rubber relaxes, the plane
will fly off the hi-start and the ribbon will bring the end of the
string back towards you.
Thermal soaring is one of the most intriguing of all aspects
of flying and the Fling 2M ARF was designed to excel at
thermal soaring even in the hands of a novice. It can be hard
for the average person to understand how a plane can fly for
hours and gain altitude without a motor!
Thermals are natural phenomenons that happen outside, by
the millions, every single day of the year. Thermals are
responsible for many things including forming several types
of clouds, creating breezes, and distributing plant seeds and
pollen. If you have ever seen a dust devil (which is nothing
more than a thermal that has picked up some dust), you
have seen a thermal in action. Their swirling action is very
similar to that of a tornado but of course much gentler. Most
thermals have updrafts rising in the 200 to 700 feet per
minute range but they have been known to produce updrafts
of over 5,000 feet per minute (that’s over 50 miles/hour
straight up!) These strong thermals can rip a plane apart or
carry the plane out of sight before the pilot can get out of the
updraft. Thermals are formed by the uneven heating of the
earth and buildings, etc. by the sun. The darker colored
surfaces absorb heat faster than the lighter colors, which
reflect a great deal of the sun’s energy back into space.
These darker areas (plowed fields, asphalt parking lots, tar
roofs, etc.) get warmer than the lighter areas (lakes, grassy
fields, forests, etc.). This causes the air above the darker
areas to be warmer than the air over the lighter areas and
the more buoyant warm air rises as the cooler, denser air
forces its way underneath the warmer air. As this warm air is
forced upward, it contacts the cooler air of the higher
altitudes. This larger temperature difference makes the
thermal rise quicker. The thermal is gradually cooled by the
surrounding cooler air and its strength diminishes.
Eventually the thermal stops rising and any moisture
contained in the once warm air condenses and forms a puffy
cumulus cloud. These clouds, which mark the tops of
thermals, are usually between 2000 and 5000 feet high.
It takes a lot of concentration to thermal soar effectively. A
sailplane can fly along the edge of a thermal and unless the
pilot is carefully watching the model he may not realize the
opportunity to gain some altitude. Because most thermals are
relatively small (a couple hundred feet in diameter or less at
400' altitude) compared to the rest of the sky, the sailplanes will
rarely fly directly into the thermal and start rising. Generally, the
sailplane will fly into the edge or near a thermal and the effects
the thermal has on the plane may be almost unnoticeable. As
the sailplane approaches a thermal, the wing tip that reaches
the rising air first will be lifted before the opposite wing tip. This
causes the plane to “bank” and turn away from where we
would like the plane to go.
When you are thermal soaring, you should try to fly as smoothly
and straight as possible.Trim the plane to fly in a straight line and
only touch the controls when you have to. Watch the sailplane
carefully and it will tell you what it is encountering.
When the sailplane flies directly into a thermal it will either
start rising or stop sinking. Either case is reason enough to
start circling (especially in a contest where every second
counts). Fly straight ahead until you feel like you are in the
strongest lift, fly a couple of seconds farther (so your
circle will be centered in the strongest lift) and then start
circling in a fairly tight but smooth turn. When the sailplane
is low the turns have to be tighter to stay in the strongest lift.
As the plane gains altitude, the turns can be larger and
flatter. The flatter the turn, the more efficient the plane is
flying, but don’t be afraid to really “crank” it into a steep bank
when you are low. If you see the plane falling off on one side
of the turn, move your circle over into the stronger lift.
Thermals move along with the wind so as you circle you will
be swept along with it. Be careful when thermaling that you
don’t get so far downwind you can’t make it back to the field
to land.
If the sailplane is flying along straight and all of a sudden turns,
let the plane continue to bank (you may have to give it some
rudder to keep it banking) until it has turned 270° (3/4 of a full
circle). Straighten out the bank and fly into whatever turned the
plane. If you encounter lift, and you won’t every time, start
circling just as you did when flying directly into a thermal.
Thermals are generated all day long, but the strongest
thermals are produced when the sun is directly overhead.
10:00 am to 2:00 pm seems to be the best time to get those
“killer” thermals. Some of these thermals can be very large
and you may find it hard to get out of them. If you find
yourself getting too high, don’t dive the plane to get out of
the lift. Sailplanes are very efficient aircraft and they will
build up a lot of speed and could “blow up” in the rough air
Thermal Soaring
Facts About Thermals
THERMAL FLYING
15


