background image

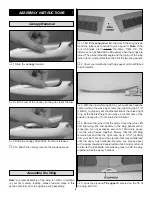
The receiver (Rx) and the battery should be all the weight
that is needed to set the correct C.G. On our test models
installing the Rx in front of the servos and the battery behind
the servos set the correct C.G. Also, to keep the weight low,
do not use a switch. Instead, plug the battery directly into
the Rx.

❏ 

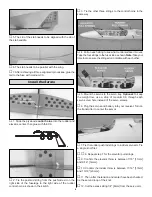
1. Secure the tow hook with a couple of drops of thin CA

applied to the threads from the inside of the plane. Note: Do
not glue the pushrod strings together.

❏ 

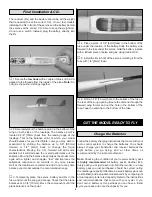
2. Accurately mark the balance point on the bottom of the

wing on both sides of the fuselage. The balance point is
located 2-3/4" [70mm] back from the leading edge at the
fuselage. This is the balance point at which your model
should balance for your first flights. Later, you may wish to
experiment by shifting the balance up to 3/8" [9.5mm]
forward or 1/4" [6mm] back to change the flying
characteristics. Moving the C.G. forward will add some
stability but it will decrease the overall performance of the
sailplane. Moving the balance back makes the model more
agile with a lighter and snappier “feel” and improves the
sailplane’s response to air currents. In any case, please
start at the location we recommend and do not at any time
balance your model outside the recommended range.

❏ 

3. Temporarily place the servos, battery and Rx in the

fuse, and mount the wing and canopy. Check that the plane
balances at 2-3/4" [70mm]. Move the components until the
plane balances on that point.

❏ 

4. Place a piece of 1/4" [6mm] foam in the bottom of the

fuse under the location of the battery. Slide the battery wire
forward in the fuse under the servos. Hold the battery in place
with a leftover piece of balsa and glue using medium CA.

❏ 

5. Install the Rx in front of the servos, isolating it from the

fuse with 1/4" [6mm] foam.

❏ 

6. Drill a 1/16" [1.5mm] hole in the bottom of the fuse in

the rear of the wing opening. Route the antenna through the
forward wing former and out the hole in the bottom of the
fuse. Tape the antenna to the bottom of the fuse.

Follow the battery charging instructions that came with your
radio control system to charge the batteries. You should
always charge your transmitter and receiver batteries the
night before you go flying, and at other times as
recommended by the radio manufacturer.

Note: Checking the condition of your receiver battery pack
is  highly recommended. All battery packs, whether it’s a
trusty pack you’ve just taken out of another model, or a new
battery pack you just purchased, should be cycled, noting
the discharge capacity. Oftentimes, a weak battery pack can
be identified (and a valuable model saved!) by comparing its
actual capacity to its rated capacity. Refer to the instructions
and recommendations that come with your cycler. If you
don’t own a battery cycler, perhaps you can have a friend
cycle your pack and note the capacity for you.

Charge the Batteries

GET THE MODEL READY TO FLY

Final Installation & C.G.

9

Summary of Contents for FLING

Page 1: ...mediately in new and unused condition to the place of purchase To make a warranty claim send the defective part or item to Hobby Services at the address below Hobby Services 3002 N Apollo Dr Suite 1 C...

Page 2: ...odel a tech notice box will appear in the upper left corner of the page We urge you to join the AMA Academy of Model Aeronautics and a local R C club The AMA is the governing body of model aviation an...

Page 3: ...d Low band receiver crystal for Great Planes mini receivers channels 11 to 35 FUTL62 High band receiver crystal for Great Planes mini receivers channels 36 to 60 FUTL63 2 Futaba S3108 micro servos FUT...

Page 4: ...page to locate a U S Canadian or International dealer If a hobby shop is not available replacement parts may also be ordered from Tower Hobbies at www towerhobbies com or by calling toll free 800 637...

Page 5: ...arts to make sure they are of acceptable quality If any parts are missing or are not of acceptable quality or if you need assistance with assembly contact Product Support When reporting defective or m...

Page 6: ...nes Plan Protector 3 With the inner left wing flat on your workbench and the center joint on the wax paper raise the right wing tip 5 1 2 140mm to properly set the dihedral Block the raised right wing...

Page 7: ...o apply more pressure thus cutting into the wood 3 Glue the fin to the top of the stab keeping it vertical and perpendicular to the elevator hinge line Note The elevator hinge pivot is on the top of t...

Page 8: ...e the four strings to the fuse side as shown Note Take your time to make sure the strings don t interfere with each other 5 Mount the servos to the servo tray Optional To keep the weight low use a dro...

Page 9: ...lane balances at 2 3 4 70mm Move the components until the plane balances on that point 4 Place a piece of 1 4 6mm foam in the bottom of the fuse under the location of the battery Slide the battery wir...

Page 10: ...nd check before the first flight of a new or repaired model 2 I will not fly my model aircraft in the presence of spectators until I become a qualified flier unless assisted by an experienced helper 3...

Page 11: ...ver control the model Make any control inputs slowly and smoothly rather than moving the transmitter sticks abruptly Note Remember that your radio control responds as if you were sitting in the cockpi...

Page 12: ...picked up some dust you have seen a thermal in action Their swirling action is very similar to that of a tornado but of course much gentler Most thermals have updrafts rising in the 200 700 feet per...

Page 13: ...sailplane pilot s nightmare that can really make soaring challenging Sink is usually not as strong as the thermals in the same area but it can be very strong Down drafts of many hundreds of feet per...

Page 14: ...ingle conversion receiver and two S3108 micro servos Single stick simplicity makes the 3FR very user friendly and the case is ergonomically designed for comfort and easy access to controls Performance...

Page 15: ...15 FLYING NOTES...
Page 16: ...____________ Where Purchased _________________________ Date Construction Started __________________ Date Construction Finished _________________ Finished Weight __________________________ Date of Firs...

Reviews: