10
❏
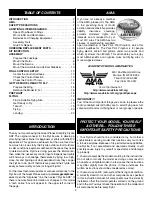
7. Unplug the elevator servo from the receiver. Guide
the elevator servo wire down through the servo tray and
reconnect the servo wire to the receiver. Do the same with
the rudder servo, and then just let the servos hang by the
wires over the side of the fuselage for now.
❏
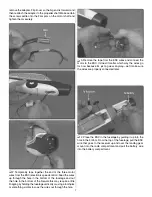
8. Add a drop of glue to the four screw holes in the servo tray
(or, simply glue the servos into postition)—just about any kind
of glue is suitable as long as it will stick to wood. This will help
the servo mounting screws stay secure in the balsa. Proceed
immediately to the next step before the glue hardens.
❏
9. Fit the servos in the tray and carefully screw them down
with the included 1.6mm x 4mm Phillips screws (or you may
use the longer wood screws that came with the ES40 Pico
servos)—use care not to over tighten the screws because it
is easy to strip out the balsa. If you do strip out the balsa the
glue you added will hold the screws.
Hint:
If the servo arm is
in the way of one of the screws, turn on your radio and use
the transmitter to rotate the servo arm to accommodate your
screwdriver.
❏
10. Install the receiver in the fuselage. If preferred, the
receiver could be mounted to the inside of the fuselage using
the included double-sided foam mounting tape. But on an
electric-powered model this small, it’s okay to just drop the
receiver down in there without mounting it to anything. The
same applies to the ESC.
NOTE:
If you’re using a 72mHz
receiver that has a long antenna, you can guide the antenna
out the hole in the bottom of the fuselage and tape the end
under the tail.
Mount the Horizontal and
Vertical Stabilizers
90° Pushrod connector
❏
1. Remove the 90° pushrod connectors from the pushrods
in the fuselage and set the connectors aside.
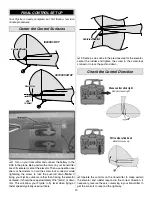
Rudder horn
Middle hole
Elevator horn
Outer hole
❏
2. Slide one of the pushrods out of the fuselage and test
fi t it into the
middle
hole in the rudder control horn and into


