9
Mount the Servos
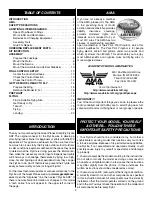
It’s okay to cut out this
part to make it easier
to fit larger servos.
Servo Tray
❏
1. If
not
using the recommended ES40 Pico servos, test fi t
the servos you will be using in the servo tray in the fuselage.
If your servos don’t fi t, use a hobby knife to carefully trim the
tray as necessary—if it makes the trimming job easier you
can cut out the center part of the tray.
Cut off
Trim the corners
ES40 Pico Servos
Make two
3/8" [9.5mm]
“Other” Servo Arm
❏
2. If you are using the recommended ElectriFly ES40 Pico
servos, prepare the servo arms that came with the servos by
cutting them as illustrated. If
not
using Pico servos, prepare
two servo arms so the pushrod mounting holes will be 3/8"
[9.5mm] from the arm mounting screw.
❏
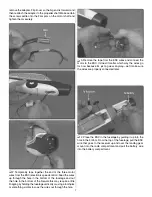
3. Mount a screw-lock connector to each servo arm using
the small, black nylon retainer—if the screw-lock connectors
don’t fi t in the servo arm holes use a #55 drill or a hobby
knife to carefully enlarge the holes
just enough
to fi t the
micro screw-lock connector. Thread a 2mm x 4mm Phillips
machine screw into each screw-lock connector.
Use this photo for the next two steps:
❏
4. Connect the rudder and elevator servos to the
receiver—the servo on the right is the rudder servo and goes
to
channel 1
in the receiver and the servo on the left is the
elevator servo and goes to
channel 2
in the receiver.
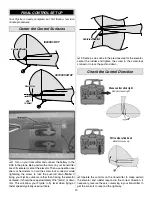
Not Good
Too far from 90°
Acceptable
Close enough to 90°
99°
95°
90°
90°
95°
99°
Perfect
90°
❏
5. Turn on your transmitter and make sure the trims are
centered. Connect the battery to the ESC. This will “center”
the servos. Fit the servo arms onto the servos so they will be
as close as you can get them to 90° to the pushrods—it may
not be possible to get the servo arms
precisely
90°, so just
get them as close as you can. This will provide symmetrical
control surface throw (discussed on page 14).
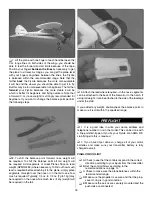
Pressed all the way down
NO
YES
❏
6. Make sure the servo arms are fi rmly pressed
all the
way down
onto the splined shafts and install the screws that
hold on the arms.


