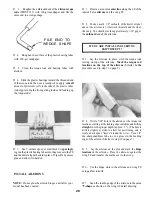
the inside of the airfoil shape you just drew. Try to stay
approximately 1/8" inside the line. Glue the wing tips in
place with med CA.
GLUE THE HINGES
D 1. Lay the rudder, elevators and ailerons on the
plans and mark on the leading edge of each part the
locations of the hinges, torque rods and tailgear. Now use
a sharp Xacto knife to cut slits in the covering at the hinge
locations. Trial fit the hinges to make sure you have
"found" the slots which you previously cut. In the same
manner, slit the covering at the hinge locations in the wing,
stab and fin TE. Also cut the covering away from the
torque rod and tailgear slots.
D 2. The proper method for installing the "Laminated
Hinges" is as follows (elevator is used as an example):
1. Slide all hinges halfway into the elevator hinge
slots, then insert the hinges into the hinge slots in
the stabilizer.
2. Adjust the position of the elevators so they match
the stab at the tips. Pull the elevators away from
the stab a tiny bit (approximately 1/64", or the
thickness of 4 sheets of paper).
3. Verify that the elevators will move up and down
without binding.
4. With a pointed applicator tip, apply several drops
of thin CA glue to the top and bottom of each
hinge.
5. Using a folded tissue, immediately absorb any
excess CA glue that may have gotten onto the
covering material.
6. After the glue hardens, the elevators will seem
quite stiff. Working the elevators fully up and
down several limes will loosen them up.
D 3. Using coarse sandpaper, roughen the part of the
aileron torque rods that will be glued into the ailerons, then
clean off the sanded portion of the rods with alcohol or a
degreasing solvent. Roughen and clean the tailgear wire
in the same manner. Using a toothpick, apply a small
amount of Vaseline where the torque rods and tailgear
wire enters the nylon bearing tubes (to prevent glue from
getting inside and locking them up).
epoxy. Now carefully position the rudder with respect to
the fin, and glue the hinges with thin CA, in the same
manner as the elevator hinges.
D 5. Using a small stick, work a generous amount of
epoxy into the aileron torque rod holes. Push the ailerons
and aileron hinges into place and wipe off all excess
epoxy. Now carefully position the ailerons with respect to
the wing, and glue the hinges with thin CA, in the same
manner as the elevator hinges.
GLUE CANOPY IN PLACE
NOTICE: The canopy in this kit may have a thin protec-
tive coating on both sides. Peel off this film before
attempting to tint or glue the canopy.
D 1. Some modelers prefer to tint their canopies. You
may tint your canopy by immersing it in a concentrated
mixture of Rit powdered dye and hot tap water. Remove
the canopy every 5 minutes and rinse it off to check the
amount of tint. The hotter the water and the longer you
leave it in the dye solution the darker it will tint. CAU-
TION: Do not heat the dye water above tap water tem-
perature, as this could deform the canopy.
D 2. Paint or trim the cockpit area as desired. 400 grit
wet-or-dry sandpaper glued to the canopy base and back
makes a simple but nice looking cockpit floor.
D 3. Lightly sand the inside of the canopy around the
edge (sand a strip approximately 1/8" wide). NOTE: To
avoid sanding more than you want, it is helpful to first
apply strips of masking tape on the inside of the canopy,
1/8" in from the edges.
D 4. Using a small stick, work a generous amount of
epoxy into the tailgear hole in the rudder and the tailgear
bearing slot in the aft end of the fuselage, push the rudder
and rudder hinges into place and wipe off all excess
D 4. Hold the canopy in place on the fuselage and very
carefully apply medium viscosity CA glue around the
edges. To control the amount of CA, it is very helpful to
use the small diameter teflon applicator tubing which is
supplied with most CA glues, or use a "Z-End" applicator
tip.
35
Summary of Contents for FUN-ONE
Page 5: ...5...


