sides of the stabilizer. Be careful not to cut into the wood
structure as this could weaken the stabilizer.
❏
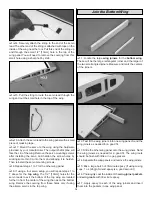
7. Mix approximately 1/2 oz. [14g] of epoxy. Insert the
stabilizer until the bare wood where you removed the covering
is almost ready to enter the fuselage. Apply epoxy to the bare
wood on both sides of the stabilizer and slide it into place.
❏
8. Recheck your measurements to make sure the
stabilizer is in position; carefully wipe away any excess epoxy
with a paper towel and alcohol. Allow the epoxy to fully cure
before proceeding.
❏
9. Attach the elevators to the stabilizer using point hinges
following the same procedure as the ailerons.
❏
10. Locate the fin and rudder. Remove the rudder from
the fin and set it aside.
❏
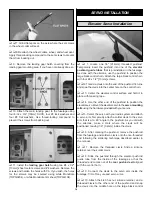
11. Insert the fin into the fuselage slot above the stabilizer.
Trace an outline of where the fin enters the fuselage.
Remove the fin and cut away the covering using the same
method as the stabilizer.
❏
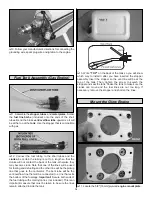
12. Glue the fin in place using epoxy. Use a Builder’s
Triangle to check the alignment of the fin. It should be at a
90° angle to the stabilizer as shown in the photo. If it is not,
sand the fin slot as needed.
❏
1. Locate the 3/32" [2.4mm] pre-bent tail gear wire,
3/32" [2.4mm] wheel collar, 1" [25mm] tailwheel, and 4-40
x 1/8" [3.2mm] set screw. Attach the tailwheel to the tail gear
wire as shown, using the 3/32" [2.4mm] wheel collar.
❏
2. Remove the wheel collar and grind a flat spot where the
set screw will seat using a rotary tool such as a Dremel or a
Attach the Rudder & Tailwheel
HOW TO CUT COVERING FROM BALSA
Use a soldering iron to cut the covering from the stab. The
tip of the soldering iron doesn’t have to be sharp, but a
fine-tip does work best. Allow the iron to heat fully. Use a
straightedge to guide the soldering iron at a rate that will
just melt the covering and not burn into the wood. The
hotter the soldering iron, the faster it must travel to melt a
fine cut. Seal down the edges of the covering afterward
using a covering iron.
14


