❏
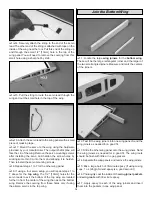
5. Apply a piece of masking tape to each block. Measure
3" [76mm] back from the center point of each cowl mounting
block and mark that point on the tape.
❏
6. Tape a piece of paper or cardboard to the side of the fuse.
Make a template of the areas to be removed from the cowl.
❏
7. Remove the engine and test fit the cowl. Be sure that
the paper template remains taped in place and it is on the
outside of the cowl. Align the cowl so that the drive washer
is centered in the cowl opening and that the cowl is 1/4"
[6.4mm] behind the drive washer.
❏
8. Trace the cutouts from your paper templates onto the
cowl. Remove the cowl from the fuselage and use a rotary
tool to remove the areas needed to clear the engine.
❏
9. Reposition the cowl and measure from the 3" [76mm]
mark on the tape forward and drill 5/64" [2mm] holes
through the cowl and cowl mounting blocks. Remove the
cowl and enlarge the holes in the cowl only to 3/32" [2.4mm]
to prevent the cowl from splitting. Harden the holes in the
cowl mounting blocks with thin CA and allow it to fully
harden before proceeding.
❏
10. Reinstall the engine and fuel lines. Mount the cowl to
the fuselage using four #4 x 1/2" [13mm] screws and #4
flat washers.
❏
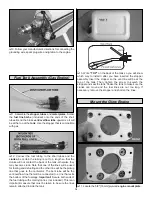
1. Attach the bottom wing to the fuselage with the 1/4-20
nylon wing bolts.
❏
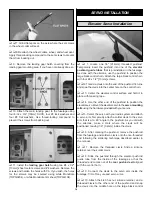
2. Locate eight metal interplane or “N” strut mounting
brackets. Set four of the brackets for the top wing aside. We
will be installing the brackets on the bottom wing first.
Do the left wing first so your work matches the photos
the first time through.
❏ ❏
3. Look closely on the top of the bottom wing and you
will find small holes under the covering locating the blind
nuts for the “N” strut mounting bolts. Cut the covering
from each of the holes. Note: 4-40 Blind nuts have been
installed in the wing for all of the “N” struts and cabane
mounting bolts. All of the blind nuts are glued into the wing
and have a small wood plate backing them up. It is possible
that a blind nut could have a bit of glue in the threads. In
most cases the installation of the bolt should free the glue.
If not, run a 4-40 tap through the threads to clear the glue.
❏ ❏
4. Mount the bottom wing interplane or “N” strut brackets
in each of the holes in the right wing panel with a 4-40 x 1/2"
[13mm] SHCS, #4 flat washer and a #4 lock washer. Do not
fully tighten the bracket to the wing yet.
ATTACH THE WINGS & CABANES
23


