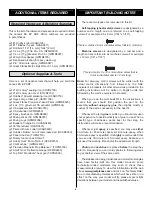
slot. The forward hole should be inline with the leading edge
of the stab and 5/8" [16 mm] below it as shown in the picture.
Use a hobby knife to carve out the material between the
holes to finish the pushrod exit slot. Test fit the rudder
pushrod through the fuselage exiting out of the slot and
make any adjustments to the slot as necessary to prevent
the pushrod from rubbing.
❏
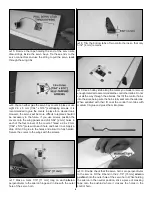
10. Remove the control horn from the rudder. Trim off the
outer two holes so that the control horn will clear the elevator. If
you made a mark on the backplate to trim it, do so now.
❏
11. Slide the rudder pushrod through the fuselage with
the Z-bend exiting out of the slot. Connect the Z-bend in the
pushrod to the outer hole on the control horn. Reinsert the
control horn into the rudder adding a bit of medium CA to the
base of the control horn tab. Press on the control horn
backplate and add a drop of CA to secure it in place.
❏
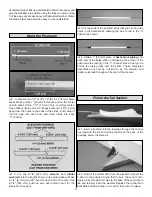
1. Glue the carbon wing joiner tube evenly spaced into
the fuselage. Test fit the wings onto the tube before gluing it
to be sure the tube is centered.
❏
2. Use sandpaper to roughen up the portion of the wing
joiner rod that is inside of the fuse. Use alcohol to clean the
rod. Glue the radio tray brace to the top of the wing joiner
tube as shown.
❏
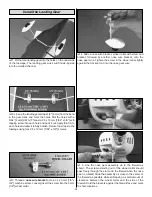
3. Press the tab on the vertical radio tray support into
the slot between the circle cutouts in the radio tray and glue
it into place.
❏
4. As you did with the wing joiner rod, sand the inside of the
fuselage where the radio tray is going to be installed. Use
alcohol to thoroughly clean the area. Epoxy the radio tray
assembly into the fuselage. The vertical radio tray support
should be positioned just behind the wing leading edge.
Install the Radio Tray & Wing Joiner Tube
ASSEMBLE THE FUSELAGE
13


