❏
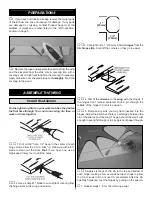
14. Mount the tail wheel onto the tail wheel wire. Secure
it to the wire with a 3/32" [2.4mm] wheel collar and a 4-40
set screw with a drop of threadlocker.
This completes the installation of the tail surfaces. You will
finish the installation of the control horns and pushrods
when you do the radio installation.
❏
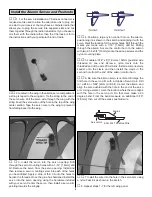
1. Cut the covering from the mounting holes for the
landing gear. Bolt the landing gear to the fuselage with four
6-32 x 5/8” [16mm] socket head cap screws, #6 lock washers
and #6 flat washers. Apply a drop of threadlock to the threads
before screwing them into the fuselage. When installing the
gear, the taper should be to the back of the fuselage.
❏
2. Cut the landing gear axles to a length of 1-3/16" [30mm].
❏
3. File a flat spot on the end of the axles.
(A high speed
rotary tool works well for this also).
❏
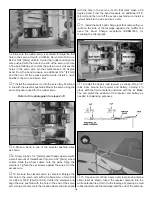
4. Install an aluminum spacer
(it looks just like a wheel
collar without the hole for the set screw) followed by a wheel
and then a 5/32" [4mm] wheel collar. Secure the wheel collar
by tightening a 6-32 set screw onto the flat spot on the axle.
Do this for both wheels.
❏
5. Slide the wheel pants over the wheels. Attach the
wheel pant to the landing gear with two 4-40 x 3/8” [9.5mm]
machine screws, #4 flat washers and #4 lock washers.
❏
1. Cut out the engine mounting pattern on page 23 of this
manual. Tape it on the firewall, aligning the lines on the
pattern with the lines on the firewall.
Install the Engine, Fuel Tank
and Throttle Servo
Install the Landing Gear and Wheel Pants
12


