8
Mount the Fan in the Fuselage
Installation of the fan unit may takes a little “fi ne tuning” to
get the parts into position. Once glued in it is permanent, but
the motor and fan may still be removed if ever required later.
❏
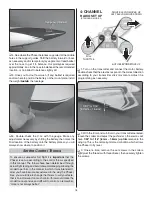
1. Test fi t the plywood
fan housing mount
over the fan
housing to make sure it fi ts—it should fi t slightly snug, but not
too tight because you’ll be installing the housing through the
mount while both parts are in the fuselage. If the mount fi ts too
tightly over the housing sand the inside of the mount so it fi ts.
❏
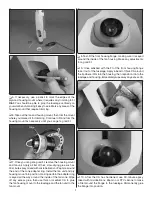
2. Carefully bend the motor wires upward toward the hole in
the fi berglass cone adapter, then connect the motor extension
wires through the hole. While you’re at it, position the plywood
housing mount and guide the motor wires through it.
❏
3. Test fi t the
front housing fl ange
into the fan housing
just to make sure it fi ts—if necessary, trim or sand a slight
bevel inside the edge of the housing to easily accommodate
the fl ange.
❏
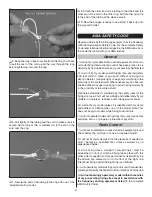
4. Remove the fl ange and housing mount from the fan unit,
but don’t take the wires out of the housing mount. With the
housing mount off the fan unit but the motor wires running
through the mount, fi t the mount and fan unit through the
cheater hole in the bottom of the fuselage. Key the fi berglass
adapter ring on the back of the fan unit around the inside of
the fi berglass tail cone in the fuselage, then fi t the plywood
housing mount over the fan housing. If you cannot get the
housing mount all the way into position do not force it. Proceed
to the next step.


