❏ ❏ ❏ ❏
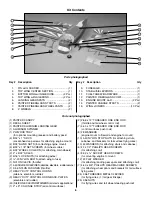
14.Place the push rod assembly from step 13 on
the aileron control horn. Center the servo arm on the servo
and align the aileron with the trailing edge of the wing. Place
a 4-40 Metal Solder Clevis onto the servo arm and mark the
location of the push rod as shown in the sketch above with
a felt tip pen. Cut the push rod off at this point and solder
the clevis into place.
NOTE
: In the above step you are asked to perform a
soldering task. Please refer to the following tips to make
these solder joints as strong as possible:
❏
15. Return to step 4 and do the other 3 wing halves.
❏
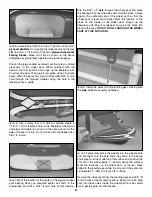
1. Locate the six die-cut ply
wing joiners
for the bottom
wing. Note that there are two different sizes of wing joiners
for the front and back of the bottom wing.
❏
2. Use epoxy to glue the joiners together to form two
plywood joiners as shown.
❏
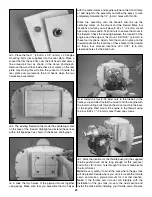
3. After the epoxy has cured, sand off any excess glue
and test fit the two lower wing joiners into the two wing
halves as shown above. Note that the two 3/8" (9.5mm)
wood dowels will be placed into the front of the wing. Test fit
them into the wing at this time also. Make sure the wing
halves fit together properly and form a good fitting joint. If
the wing does not fit properly, carefully sand the tips of the
wing joiners until you get the proper fit.
Note
: The wing joiners are not designed to fit as tightly as
possible in order to allow epoxy to flow around the joiners
for a more secure and stronger joint.
Join the Bottom Wing
HOW TO SOLDER
A
. Use denatured alcohol or other solvent to remove
residual oil from the pushrod.
B
. Use coarse sandpaper to thoroughly roughen the end
of the pushrod where it is to be soldered.
C
. Apply a few drops of soldering flux to the end of the
pushrod, then use a soldering iron or a torch to heat
it. Coat the end of the pushrod with silver solder
(GPMR8070) by touching the solder to it. The heat of
the pushrod should melt the solder – not the flame of
the torch or soldering iron – thus allowing the solder
to flow.
Note
: Do not use silver solder for electrical soldering.
D
. Join the clevis to the pushrod. Add another drop of
flux, then heat and add solder. The same as before,
the heat of the parts being soldered should melt the
solder, thus allowing it to flow. Allow the joint to cool
without disturbing it. Avoid excess blobs, but make
certain the joint is thoroughly soldered. The solder
should be shiny, not rough. If necessary, heat the joint
again and allow to cool slowly without disturbing it.
E
. After the joint has solidified but while it is still hot,
carefully use a damp cloth to wipe away the excess
soldering flux. Important: After the joint cools, coat it
with oil to protect it from rusting.
11


