18
SET THE CONTROL THROWS &
DIRECTION OF TRAVEL
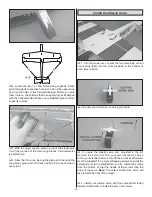
Check the Control Directions
❏
1. Turn on the transmitter and receiver and center the
trims. If necessary, remove the servo arms from the servos
and reposition them so they are centered. Reinstall the
screws that hold on the servo arms.
❏
2. With the transmitter and receiver still on, check all the
control surfaces to see if they are centered. If necessary, adjust
the clevises on the pushrods to center the control surfaces.
❏
3. Make certain that the control surfaces and the motor
respond in the correct direction as shown in the diagram.
If any of the controls respond in the wrong direction, use
the servo reversing in the transmitter to reverse the servos
connected to those controls. Be certain the control surfaces
have remained centered. Adjust if necessary.
Set the Control Throws
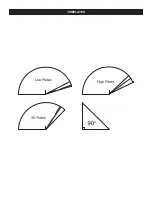
Use a ruler or the templates provided in the back of this
manual to accurately measure and set the control throw of
each control surface as indicated in the chart that follows. If
your radio does not have dual rates, we recommend setting
the throws at the low rate setting. Note: The throws are
measured at the widest part (inboard or lowest part) of the
elevators, ailerons, and rudder.
These are the recommended control surface throws:
HIGH RATE
ELEVATOR:
1-3/8" [35mm], 26° up
1-3/8" [35mm], 26° down
RUDDER:
2-3/4" [70mm], 36° left
2-3/4" [70mm], 36° right
AILERONS:
2-3/8" [60mm], 43° up
2-3/8" [60mm], 43° down
LOW RATE
ELEVATOR:
1" [25mm], 17° up
1" [25mm], 17° down
RUDDER:
1-9/16" [40mm], 19° left
1-9/16" [40mm], 19° right
AILERONS:
1-9/16" [40mm], 27° up
1-9/16" [40mm], 27° down
3D RATE
ELEVATOR:
2-1/8" [55mm], 46° up
2-1/8" [55mm], 46° down
RUDDER:
3-7/8" [100mm], 56° left
3-7/8" [100mm], 56° right
AILERONS:
2-7/8" [75mm], 58° up
2-7/8" [75mm], 58° down
PREFLIGHT
Identify Your Model
No matter if you fl y at an AMA sanctioned R/C club site or if
you fl y somewhere on your own, you should always have your
name, address, telephone number and AMA number on or
inside your model. It is required at all AMA R/C club fl ying sites
and AMA sanctioned fl ying events. Fill out the identifi cation
tag on page 21 and place it on or inside your model.
Summary of Contents for Pluma
Page 23: ...23...
Page 24: ...TEMPLATES TEMPLATES...


