❏
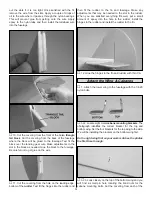
3. Fit the box cover to the box. Drill a 1/16" [1.6mm] hole
at the locations shown. Install and then remove a #2 x 3/8"
[9.5mm] sheet metal screw into each hole. Remove the
cover, and then apply a couple of drops of thin CA into the
holes in the box to harden the threads.
❏
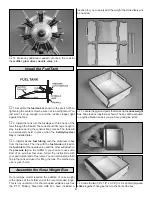
4. Referring to the photo on the following page, locate
two 1/2" x 11/16" x 2-1/2" [13 x 18 x 64mm] hardwood
blocks. Position one of the blocks on the bottom of the
engine mount. The block should be resting against the
engine mount rail and the socket head cap screw that holds
the engine mount to the firewall. You will see that the block
cannot sit on the rail because one of the engine mount bolts
is extending through the rail. Mark the location of this screw
on the block. Where you have marked the block, cut away
enough of the wood to provide clearance for the screw,
allowing the block to rest against the rail. Repeat this for the
remaining block.
❏
5. Glue the blocks to the engine mount rails with CA. Drill
two 3/32" [2.4mm] holes through each of the blocks and the
engine mount. Drill a 1/8" [3mm] clearance hole through
the block only! Do not drill into the engine mount with the
1/8" [3mm] bit! Countersink the top of each of the holes you
have drilled so that the screw heads will sit flush with the top
of the hardwood blocks. Install a #4 x 1" [25mm] screw into
each of the four holes, making sure that the head of the screw
is flush or slightly below the top of the wood block.
❏
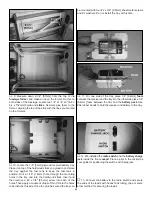
6. Place the box on top of the rails and between the
triangle stock located on the firewall. Drill four 1/16" [1.6mm]
holes through the inside of the box and into the hardwood
rails. Install and then remove a #2 x 3/8" [9.5mm] wood
screw into each of the holes. Remove the box. Apply a
couple of drops of thin CA into each of the holes to harden
the threads. Allow the glue to cure.
❏
7. Attach the box to the hardwood blocks. Secure the top
of the box with two #2 x 3/8" [9.5mm] screws and a two #2
washers. Fuelproof the box and rails.
That’s it for now for our box for lead. When you get the plane
ready for flight you will install the appropriate amount of
ballast to balance the plane. Hint: You may wish to consider
using the receiver battery for additional weight instead of
mounting the battery in the fuselage.
Did you know?...Over the years the PT-17 Military
Stearman has seen duty as a primary trainer, a
reconnaissance plane, a crop duster, and an air show
performer. In 1934 Argentina, Brazil and the Philippines
used Stearmans featuring wing-mounted .30 caliber
machine guns, a bomb rack between the landing struts and
a single machine gun for the rear!
❏
1. Install the tailwheel onto the tailwheel wire, securing it
with a 3/32" [2.4mm] wheel collar and a 4-40 set screw.
❏ ❏
2. Cut the 2" [51mm] axles to a length of 1-1/2"
[38mm]. Install the axle and axle nut onto both sides of the
landing gear. File a flat spot at the end of the axle as shown.
Install the Wheels
22


