INSTALL THE CENTER RIBS AND
BOTTOM SHEETING
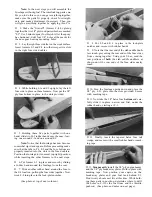
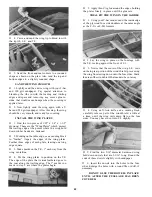
LI 1. After building the wing, you have two ribs
remaining. Lay these ribs, one at a time, on the draw-
ing in the lower left comer of the wing plan. With a
straight edge and a pen, mark the four cut-off lines,
using the arrows as a guide.
D 2. Cut the ribs at the cut-off lines using a razor
saw.
D 3. Place the two "front parts" together and the
two "aft parts" together, and apply thin CA glue
around the edges.
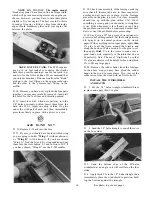
D 4. Position these center rib parts in place in the
center of the wing and glue them to the L.E..spars
and T.E. You may use thin CA if the ribs fit perfectly;
otherwise use thick CA or epoxy.
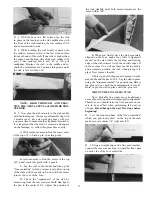
D 5. From the sheet of 1/8" x 3" x 13" balsa, cut
rectangles to fit between the center rib and the 2nd
rib in both wing panels The easiest way to do this
is to lay the wing right on the 1/8" balsa sheet and
trace around the inside edge of the ribs and spars as
shown here.
Note: The grain of this bottom sheeting must
run in the same direction as the spars.
19
D 6. Working on waxed paper, glue the bottom
sheeting to the inside edges of the ribs and dihedral
braces.
D 7. Turn the wing upside down and inspect the
bottom of the center section. If there are any major
gaps between parts, fill them with balsa dust (from
sanding) and apply thin CA.
D 8. Sand the bottom of the center section smooth
with a sanding block and 100 grit sandpaper.
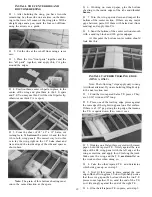
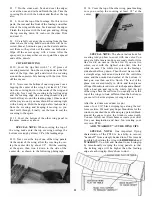
At this point the bottom center section should
look like this:
INSTALL TAPERED TRAILING EDGE
(WING A ONLY)
Note: The following 7 steps apply only to wing
A (without ailerons). If you are building Wing B, skip
to the next section now.
D 1. Find the two tapered balsa T.E. pieces. They
are 1-3/16" wide and 30" long.
D 2. Place one of the trailing edge pieces against
the rear edge of the right wing panel on a flat surface.
If there is a 3/32" gap along the top edge, that means
the T.E. is upside down If so, turn it over.
D 3. Working on a flat surface covered with waxed
paper, hold the tapered T.E. firmly against the rear
edge of the Rt. wing panel with the left edge at the
wing centerline, and apply thin CA along the joint.
Make sure the wing and the T.E. are down flat on
the work surface when doing so.
D 4. Take the other tapered T.E. and determine
which side goes up, as in step 2.
D 5. Trial fit this piece in place against the rear
edge of the Left wing panel. You will probably notice
that there is a gap on the bottom, where the two T.E.
pieces come together. If so, sand the end of the T.E.
so it fits snugly against the end of the right T.E.
D 6. Glue the left tapered T.E. in place, as in step 3.


