22
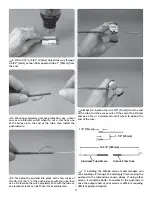
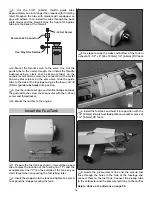
Screw-Lock Connector
4-40 Set Screw
One-Way Star Retainer
❏
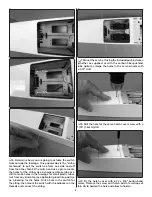
12. Mount the fuel-cut servo to the servo tray with a
servo arm cut down to the correct length. Cut the guide
tube so it won’t interfere with the throttle servo arm when
the arm rotates all the way forward, then install the fuel
cut wire with a screw-lock connector with a metal one-
way
star
retainer on the servo arm.
❏
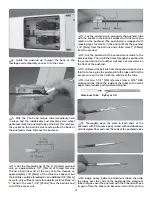
13. Glue the guide tube to the side of the fuselage and
glue the laser-cut 1/8" [3.2mm]
guide tube holder
into
position. Balsa scraps (not included) can be used to help
secure the guide tube to the side of the fuselage so it
won’t become dislodged or interfere with the fuel tank.
❏
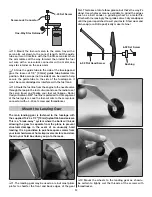
14. Route the fuel line from the engine to the needle valve
through the loop in the fuel cut wire and use the radio to set
the servo travel and fi nalize your fuel cut linkage—Darrol
Cady or Sullivan 3/32" fuel line is preferred for this segment
of the fuel system. Lock the fuel-cut wire to the screw-lock
connector with a 4-40 set screw and threadlocker.
Mount the Landing Gear
The main landing gear is fastened to the fuselage with
the supplied 10-24 x 1/2" [13mm]
nylon fl at-head screws
.
This is a “break-away” system where the bolts will break
allowing the gear to separate from the plane to prevent
structural damage in the event of an unusually hard
landing. It is a good idea to purchase spare screws from
your local hardware or home improvement store and store
them in your fi eld box when you go to the races.
❏
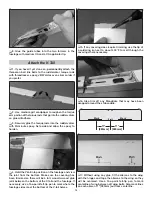
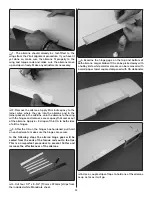
1. The landing gear may be used as-is, but most pilots
prefer to chamfer the front and back edges of the gear
fi rst. This takes a lot of elbow grease, but that’s the way it’s
done! Use whatever means available to grind the edges
such as a belt sander, a grinding wheel or a metal fi le.
Finish with increasingly fi ner grades of wet-dry sandpaper
until the gear is polished to suit your taste. Steel wool and
dish soap (or a Brillo pad) really make it shine!
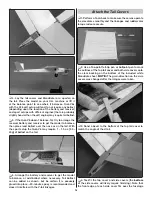
6-32 Flat Head Screw
6-32 Set Screw
Bushing
❏
2. Mount the wheels to the landing gear as shown—
be certain to lightly wet the threads of the screws with
threadlocker.


