background image

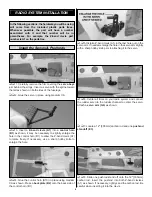
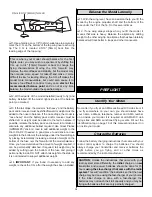
3. Temporarily attach a 1" [25mm] main wheel to the

landing gear wire. Align a wheel pant as shown. Mark on the
wheel pant where the landing gear wire enters the pant. Drill
a 1/16" [1.6mm] hole in the wheel pant.

4. Slide the wheel pant onto the landing gear wire along

with a wheel retainer (D6) as shown. Glue the wheel pant
and wheel retainer (D6) in place using medium CA.

5. Attach a main wheel and center it in the wheel pant

opening. Use the included white plastic retainers to hold
the wheel in place. Secure the white plastic retainers with a
drop of medium CA. Be very careful NOT to glue the
wheel to the wire.

6. Final gear installation will resemble the photo above.

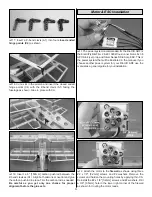
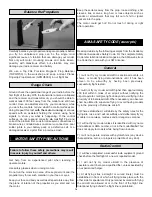
1. Connect the propeller to the motor as shown using the

rubber O-rings supplied with the motor. Be sure the screws
holding the O-rings are held in place with Threadlocker.
Propeller installation will resemble the inset photo
shown above.

1. Use scissors or a sharp hobby knife to cut the decals from
the sheet.

2. Be certain the model is clean and free from oily
fingerprints and dust. Prepare a dishpan or small bucket with
a mixture of liquid dish soap and warm water–about one
teaspoon of soap per gallon of water. Submerse the decal in
the soap and water and peel off the paper backing. Note:
Even though the decals have a “sticky-back” and are not the
water transfer type, submersing them in soap & water allows
accurate positioning and reduces air bubbles underneath.

3. Position the decal on the model where desired. Holding the
decal down, use a paper towel to wipe most of the water away.

4. Use a piece of soft balsa or something similar to
squeegee remaining water from under the decal. Apply the
rest of the decals the same way.

1. Turn on the transmitter and receiver and center the

trims. If necessary, remove the servo arms from the servos
and reposition them so they are centered. Reinstall the
screws that hold on the servo arms.

2. With the transmitter and receiver still on, check all the

control surfaces to see if they are centered. If necessary, adjust
the clevises on the pushrods to center the control surfaces.

Check the Control Directions

GET THE MODEL READY TO FLY

APPLY THE  DECALS

ATTACH THE  PROPELLER

13

Summary of Contents for Riot 3D

Page 1: ...ediately in new and unused condition to the place of purchase To make a warranty claim send the defective part or item to Hobby Services at the address below Hobby Services 3002 N Apollo Dr Suite 1 Ch...

Page 2: ...s required to fly at AMA clubs Though joining the AMA provides many benefits one of the primary reasons to join is liability protection Coverage is not limited to flying at contests or on the club fie...

Page 3: ...EEP OUT OF REACH OF CHILDREN 4 channel radio with 3 micro servos such as the Futaba S3110M with micro plugs FUTM0702 R124F Micro Receiver FUTL0438 for Low Band FUTL0439 for high band with single conve...

Page 4: ...sketches are placed before the step they refer to Frequently you can study photos in following steps to get another view of the same parts Fuse Fuselage Stab Horizontal Stabilizer Fin Vertical Fin LE...

Page 5: ...llo Drive Suite 1 Champaign IL 61822 Telephone 217 398 8970 ext 5 Fax 217 398 7721 E mail airsupport greatplanes com KIT INSPECTION 1 Hardware Bag 2 12 305mm Carbon Rods 4 6 153mm Carbon Rods 3 2 x 3...

Page 6: ...should be equal Sand the slot in the rear of the fuse as needed for a proper fit 5 Using a piece of string measure the distance from the center of the nose of the fuselage to each of the stab tips The...

Page 7: ...using clear strips of tape or use canopy glue Do not use CA as this will distort the plastic or cause it to fog over 1 Attach each of the ailerons to the wings using three CA hinges 2 On the bottom w...

Page 8: ...ng struts and center cabane There are slots in the top of the bottom wing and the bottom of the top wing for these wing struts to slide into Carefully remove the covering from these slots using a shar...

Page 9: ...d enlarge the hole in the servo arm slightly with a sharp hobby knife prior to attaching it to the servo 6 Center all trims on your radio system and connect the rudder servo to the rudder channel to c...

Page 10: ...uble servo arm G4 that fits your servo Enlarge the outer holes in the double servo arm G4 before installing the arm on the servo 15 Install Z bend clevises A1 into two control horns B1 and glue them i...

Page 11: ...The power system recommended for the Riot 3D ARF is the ElectriFly RimFire 28 22 1380kV out runner motor 8x3 8 APC Slo Flyer prop and Silver Series SS 8 Amp ESC This is the power system that will be...

Page 12: ...inside of the fuselage near the nose of the aircraft as shown The loop soft side of the hook and loop material is attached to the battery Do not connect the battery to the ESC until ready to fly 3 Dr...

Page 13: ...e model is clean and free from oily fingerprints and dust Prepare a dishpan or small bucket with a mixture of liquid dish soap and warm water about one teaspoon of soap per gallon of water Submerse th...

Page 14: ...ow a model flies and may determine whether or not your first flight will be successful If you value this model and wish to enjoy it for many flights DO NOT OVERLOOK THIS IMPORTANT PROCEDURE A model th...

Page 15: ...ding weight to the other wing tip An airplane that has been laterally balanced will track better in loops and other maneuvers No matter if you fly at an AMA sanctioned R C club site or if you fly some...

Page 16: ...hot Do not touch it during or right after operation Read and abide by the following excerpts from the Academy of Model Aeronautics Safety Code For the complete Safety Code refer to Model Aviation maga...

Page 17: ...ottle back to a lower power setting This plane flies great at about half throttle when in standard forward flight The Riot 3D ARF is also capable of rise off the ground R O G takeoffs Since the Riot 3...

Page 18: ...l is a foot or so off the deck cut your throttle and smoothly increase up elevator until it gently touches down on its belly Make sure that you cut your power completely before touchdown or propeller...

Page 19: ...two keys and a lever But the 4EXA s biggest benefit is this room to grow With the 4EXA EPA for servos expo wing mixing for V tail and elevon are at your fingertips whenever you want them Includes an R...

Page 20: ...____________ Where Purchased _________________________ Date Construction Started __________________ Date Construction Finished _________________ Finished Weight __________________________ Date of Firs...

Reviews: