❏
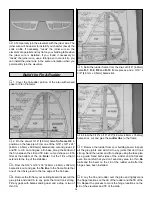
6. From the remaining 1/8" x 3" x 30" [3.2mm x 76.2mm
x 762mm] sheet cut in step 5, trim and glue a forward
bottom deck to formers F1A, F2A and the lower forward
sheeting.
❏
7. Trim the bottom deck flush with the lower sheeting.
❏
8.
Congratulations! You have half of the fuselage built.
Remove the fuse from your building board and let’s get
started on the top of the fuse.
❏
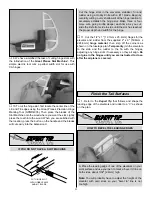
1. Cut the gray plastic outer pushrod tube in half. Use
320-grit sandpaper to roughen the pushrod tube.
❏
2. Insert the outer pushrod tubes through formers F6A,
F7A and up to F8A. Use a T-pin to locate the notch in F8A.
Then, carefully cut slots for the outer pushrod to exit. A
sharpened 3/16" [4.8mm] brass tube can also be used to
cut the slot.
❏
3. Adjust the pushrod tubes so that the ends are
protruding 1/8" [3.2mm] in front of former F6A. Glue the
pushrod tubes to the formers and the lower sheeting. The
slots in the side of the fuse for the pushrod tube exit can be
filled with Hobbico balsa filler or a 50/50 mixture of
microballoons and epoxy. After the filler has cured, cut off
the excess pushrod tube and sand the tube and filler flush
with the fuselage sheeting. Save the excess tubes for use in
attaching the battery hatch.
❏
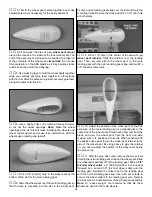
1. Glue 3/16" x 3/16" [4.8mm x 4.8mm] stringers between
formers F8A and F9.
❏
2. Sand the stringers so that they match the contour of
formers F8A and F9.
❏
3. Glue the die-cut 3/32" [2.4mm] balsa former F6C to the
back of F6B.
❏
4. Glue the die-cut 3/32" [2.4mm] balsa formers F2B,
F6B, F7B and F8B, perpendicular to the fuselage base.
Note: F6B should be positioned so that F6C is toward the
tail of the plane.
Finish the Top of the Fuselage
Install the Outer Pushrod Tubes
24
Summary of Contents for Ryan STA EP
Page 7: ...7 DIE CUT PATTERNS...
Page 48: ...TWO VIEW DRAWING Use copies of this page to plan your trim scheme...
Page 49: ...B C...
Page 50: ...D A...


