❏
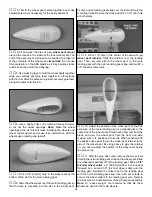
4. Glue the other two hatch pin doublers to the top of the
battery hatch base.
❏
5. Center the battery hatch base on the fuselage base.
The opening in the battery hatch base goes towards the
front of the fuselage. Use T-pins to hold the hatch base in
position.
❏
6. Drill a 3/16" [4.8mm] hole at both punch marks in the
hatch pin doublers, perpendicular to the battery hatch base.
The hole goes through the hatch pin doubler, battery hatch
base, fuselage base and the second hatch pin doubler.
❏
7. Cut the remaining 3/16" [4.8mm] hardwood dowel in
half. Round one end of each dowel. Remove the battery
hatch base and insert the two dowels in the bottom of the
battery hatch base and hatch pin doublers.
❏
8. Place a piece of plan protector or waxed paper in the
battery hatch area and make a hole in the protector at both
pin holes. Reinstall the battery hatch base, centered in the
opening. Glue the hatch pins to the hatch base and hatch
pin doublers.
❏
9. Glue the die-cut 3/32" [2.4mm] balsa backrest front
(BRF) to the front of the back rest (BR).
❏
10. With the battery hatch base flat against the fuselage
base, glue the back rest in the slot at the aft end of the
battery hatch base. Make sure the back rest is against
former F6B.
❏
11. Drill a 3/16" hole at the punch mark in the backrest
front, perpendicular to the backrest front. The hole should
go through the backrest front, backrest, F6B and F6C.
❏
12. Remove the battery hatch and glue a piece of remaining
gray outer pushrod tube in former F6B and F6C. Also, glue
a piece of tubing in the backrest. Sand the tubing flush with
the back of the backrest and the front of former F6B.
❏
13. Cut a 3/4" [19mm] long retainer pin from the 6-1/2"
[165mm] white inner pushrod tube. Place a #2 washer on a
#2 x 3/8" sheet metal screw. Thread the screw into the
plastic retainer pin.
❏
14. With the plan protector under the battery hatch,
reinstall the hatch on the fuse. Secure the battery hatch to
26
Summary of Contents for Ryan STA EP
Page 7: ...7 DIE CUT PATTERNS...
Page 48: ...TWO VIEW DRAWING Use copies of this page to plan your trim scheme...
Page 49: ...B C...
Page 50: ...D A...


