❏ ❏
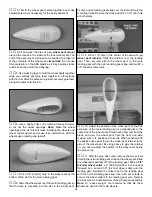
3. Test fit the wheel pant halves together and make
adjustments where necessary for the best possible fit.
❏ ❏
4. Fit and glue the die-cut 3-ply wheel pant mount
around the recess in the inside of the inner wheel pant. The
end of the pant mount will need to be sanded to a taper to
fit the curvature of the wheel pant. Important: Do not use
CA accelerator on the ABS plastic as it may develop cracks
and/or keep the paint from adhering.
❏ ❏
5. Use masking tape to hold the wheel pants together
while you carefully spot glue them together in a few places
with thin CA. After the halves are joined, securely glue them
along all seams with thin CA.
❏ ❏
6. Use a hobby knife or Curved-tip Canopy Scissors
to cut out the wheel openings. Note: Make the wheel
openings wide, as this will make installing the wheels and
wheel collars easier and cause less interference with the
wheels upon landing and takeoff.
❏ ❏
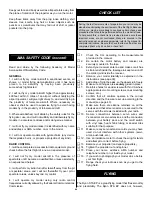
7. Drill a 1/8" [3.2mm] hole in the wheel pant at the
bottom of the slot for the main landing gear.
❏ ❏
8. Slide the wheel pant over the main landing gear so
that the wire is recessed into the slot in the wheel pant.
Center a nylon landing gear strap over the slot and mark the
mounting holes. Remove the strap and drill a 1/16" pilot hole
at both marks.
❏ ❏
9. Drill a 1/8" hole in the center of the die-cut 3-ply
wheel pant retainer. Slide the retainer over the landing
gear. Then, securely attach the wheel pant to the main
landing gear with the nylon landing gear strap and two #2 x
3/8" sheet metal screws.
❏ ❏
10. Adjust the position of the wheel pant so that the
axle wire of the main landing gear is perpendicular to the
centerline of the wheel pant. Stand back a few feet from the
plane and view the wheel pant from the front and side,
making sure it is positioned correctly. When satisfied with
the position use epoxy to glue the wheel pant retainer to the
side of the wheel pant. By using epoxy to glue the retainer
on, you can re-adjust the position of the wheel pant before
the glue cures.
❏ ❏
11. After the glue has cured, remove the two screws
holding the nylon landing gear strap on the wheel pant. Slide
the wheel pant partially off of the landing gear. Slide a 1/8"
[3.2mm] wheel collar, a 2" [50.8mm] wheel (not included)
followed by a second 1/8" [3.2mm] wheel collar onto the
landing gear. Reinstall the wheel pant to the landing gear
with the nylon landing gear strap. Use 4-40 set screws to
secure the wheel collars to the landing gear wire. Refer to
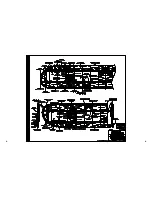
the fuse plan for a detailed view of the wheel pant assembly.
Note: To reduce weight, we recommend that lite foam
wheels be used for the main wheels.
36
Summary of Contents for Ryan STA EP
Page 7: ...7 DIE CUT PATTERNS...
Page 48: ...TWO VIEW DRAWING Use copies of this page to plan your trim scheme...
Page 49: ...B C...
Page 50: ...D A...


