❏
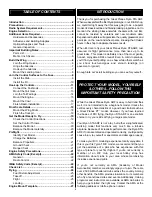
6. Make the
throttle pushrod
from a 2-56 x 12" threaded
one-end pushrod and connect it to the throttle servo with a
nylon clevis. Cut the other end to the correct length and fasten
it to the Quick Connector body with a 4-40 x 1/8" SHCS.
❏
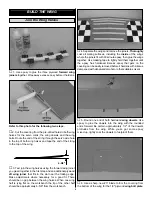
1. Cut the holes in the front of the cowl for the engine crank
shaft and for the main air inlet. A Dremel with a carbide cutter,
followed by a drum sander, works the best. Use protective
goggles and a particle mask when cutting fiberglass. Follow-
up by sanding the openings to remove sharp edges.
❏
2. Use 30-minute epoxy mixed with lightweight Top Flite
Microballoons Filler (optional, TOPR1090) to glue the 1/8"
plywood
cowl ring
inside the cowl 1" from the aft edge.
❏
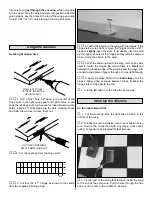
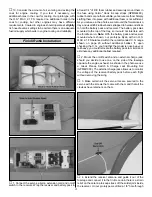
3. Refer to the following photo, then use 30-minute epoxy
to glue the three 9/16" x 9/16" x 1"
cowl mount blocks
to
the fuselage as shown.
Note:
The end-grain of the wood
blocks readily absorbs epoxy, so first coat one end of each
block with epoxy and let them sit for a few minutes. Apply a
second, then a third coat of epoxy before positioning the
blocks on the fuse and clamping them into position.
❏
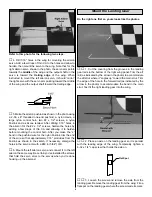
4. Position the cowl over the cowl mount blocks on the
fuse. If necessary, trim the blocks to accurately fit the cowl.
As you can see in the photo, 1/8" leftover plywood glued to
the ends of the two side cowl mount blocks was required.
Refer to the following photos while mounting the cowl.
❏
5. Position the cowl on the fuse and mount the spinner.
Align the front of the cowl with the spinner and the back of the
cowl with the fuse. With the cowl in alignment, drill 3/32" holes
through the cowl into the cowl mount blocks. Remove the
cowl and enlarge the holes
in the cowl only
with a 1/8" drill.
❏
6. Screw a #4 x 5/8" screw into each cowl mount block,
then remove. Add a few drops of thin CA to the holes and
allow to harden. Test fit the cowl to the fuse with three #4 x
5/8" screws and #4 washers.
❏
7. Fashion a mount for a fuel filler valve, should you
decide to use one, from 1/8" plywood (not included). As
shown in the photo, we used a Great Planes Easy-Fueler
™
for glow fuel (not included with this kit, GPMQ4160). We
also used a Model Products #021 Remote Single Lock
remote glow plug adapter (MODP1221). Note that the filler
valve is positioned behind the ply cowl ring and the front of
the fuse to allow easy installation of the cowl.
❏
8. Cut holes in the cowl where necessary for the engine
exhaust/muffler, needle valve, glow plug igniter (or remote
glow plug hook up) and fuel filler.
❏
9. Use epoxy or fuelproof paint to coat bare wood such
as the cowl ring, the cowl mounting blocks and the mount for
the fuel filler valve.
Mount the Cowl
16

