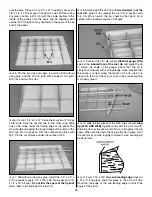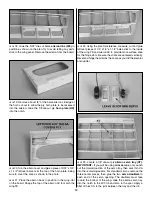
over the plan. Place a 1/4” x 1/4” x 24” auxiliary spar and a
1/8” x 1/4” x 24” rear spar in position as well. Without using
any glue, position a W-3 rib (with the single doubler to the
inside of the panel) onto the spars and LE sheeting. Add
another W-3 rib (without any doublers) to the spars at the tip
end of the panel.
❏ ❏
5. Pin the two ribs and spars in position. Still without
using glue, add the W-3 rib (with both doublers), two plain
W-3 ribs and two W-4 ribs.
❏ ❏
6. From a 1/16” x 3” x 12” balsa sheet cut two 12” strips
1-3/8” wide. Save the second one for the other wing. Slide
one of the strips under the trailing edge of the panel. The
strip should butt against the forward edge of the notch in the
W-3 ribs. Pin it in position. Trim the outboard end flush with
W-3. Pin the cut off piece under the outboard W-3.
❏ ❏
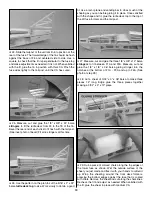
7. Still without using any glue, install the 1/4” x 1/4” x
30” top auxiliary spars, 1/2” x 3/8” x 36” main spar and 1/8”
x 1/4” x 30” aft spar.
Do not trim the spars at the tip end!
Allow them to protrude past the last rib.
❏ ❏
8. Starting with the W-3 rib with
two doublers
(
not the
root rib
), glue all ribs (except the root rib) in position with
thin CA. Work toward the tip, checking that each rib is
vertical with a builders square or triangle.
❏ ❏
9. Position the 1/8” die-cut ply
dihedral gauge (DG)
against the
inboard face of the root rib
and angle the rib
to match the angle of the gauge. Check that the rib is
straight (chordwise) with a straightedge. Once satisfied that
the angle is correct along the length of the rib, glue it in
place with thin CA. Check your work to be sure everything
is properly glued.
❏ ❏
10. Glue the two pieces of the 3/32” die-cut balsa
wing
tip (W5A AND W5B)
together and sand the joint smooth.
Slide the tip over the spars and tilt it up to fit against the top
spars. When satisfied with the fit, glue the tip in place. All of
the spars may now be roughly trimmed to size; sanding will
be done later.
❏ ❏
11. From 1/16” x 3/4” balsa
sub leading edge
stock cut
a 24-1/2” long piece. Glue this piece to the LE of all ribs.
Sand the top edge of the sub leading edge to match the
angle of the airfoil.
12
Summary of Contents for SlowPoke Sport 40
Page 4: ...4 D I E C U T P L Y P A T T E R N S...
Page 5: ...5 Use this drawing or photocopy it and use the copy to design your trim scheme...
Page 29: ...B C...
Page 30: ...D A...


