14
❏
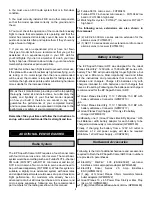
9. Mount the other aileron servo to the other hatch the
same way. If you haven’t done so already, be sure to mount
the servo arms to the servos with the screws.
❏
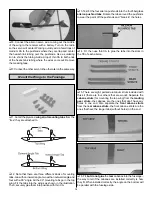
10. Connect an 8" to 12" [200 to 300mm] servo extension
wire to one of the aileron servos. (A Futaba 300mm J-series
extension w/slim lead was used in this model–FUTM4507.)
Tie the string coming from the aileron hatch to the connector
on the end of the servo wire. Pull the wire through and out
the hole in the middle of the wing.
❏
11. Mount the aileron hatch cover in the wing with four
#2 x 3/8" [10mm] fl at head Phillips screws.
❏
12. Mount the other aileron servo hatch in the wing the
same way.
Hook Up the Bottom Ailerons
❏
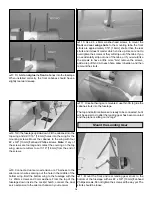
1. Same as was done for the elevator and rudder horns
and pushrods, fi t one of the aileron pushrods into the outer
hole in one of the fi berglass control horns. Spin the horn
around the pushrod several times to wear the paint off the
wire and loosen the fi t in the hole.
Refer to this photo for the next two steps.
❏
2. Fit the horn into the slot in the bottom of the right aileron.
Glue the horn into place with a few drops of thin CA followed
by a few drops of medium CA.
❏
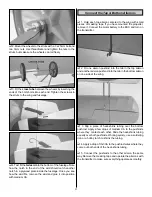
3. Fit a second aileron pushrod into the servo arm. The
pushrods should be parallel with each other. If they are not
parallel, remove the pushrod from the servo arm. Use long
nose pliers to bend the part of the pushrod that goes into the
servo arm so the pushrod will be parallel with the pushrod in
the aileron control horn as shown in the photo.
❏
4. Temporarily unscrew the aileron hatch from the wing
so you can slide a piece of the 1" [25mm] heat-shrink tubing
over both pushrods. Reinstall the hatch.
❏
5. Hold the aileron centered to the wing with a small piece
of masking tape.


