❏
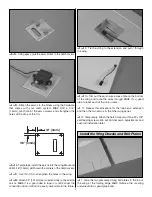
3. Epoxy the plywood tow hook plates into the fuselage
so the middle hole of the plate lines up with the mark you
made. Use plenty of epoxy here due to the high stress
induced by a Hi-start or winch.
❏
4. Drill out the three holes using a 5/32" [4mm] drill bit.
Drill completely through the bottom of the fuselage. Be
careful not to drill into your table.
❏
5. Gently tap the three 4-40 blind nuts into the holes.
Place a couple of drops of CA around the blind nut flanges
to hold them in place. Do not get glue on the threads.
❏
6. Install the 4-40 hex nut onto the tow hook followed by
the #4 flat washer. Install the tow hook into the front hole and
tighten. This is the preferred location for your initial flights.
❏
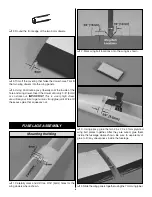
1. Attach four clevises with retainers onto the 4 short
wire pushrods. Attach them to the four remaining control
horns as shown.
❏
2. Plug the ailerons into the extensions and the flaps into
the “Y” harness.
❏
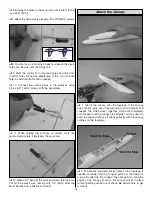
3. Remove the wing servo hatch covers and remove the
servo arms from the four servos.
❏
4. Turn on your radio system and center the servos. Make
sure the trims are centered as well. The flaps should be
connected to your throttle channel. With the stick full up, the
flaps should be even with the bottom of the wing.
❏
5. Attach a servo arm to the four servos as shown.
NOTE:
The flap servo arm will be offset differently than the
ailerons. Be sure to install the servo arm screws.
Hook Up the Wing Servos
15


