3
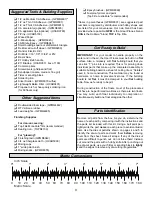
0"
1"
2"
3"
4"
5"
6"
7"
0
10
20
30
40
50
60
70
80
90
100 110 120 130 140 150 160 170 180
Inch Scale
Metric Scale
Metric Conversions
❏
1/2 oz. Medium CA Adhesive - (GPMR6007)*
❏
1/2 oz. Thin CA Adhesive - (GPMR6001)
❏
1/2 oz. Thick CA Adhesive - (GPMR6013)
❏
CA accelerator (optional) - (GPMR6035)
❏
CA applicator tips (optional) - (HCAR3780)
❏
T-Pins - (HCAR5150)
❏
Waxed Paper
❏
6-Minute Epoxy - (GPMR6045)
❏
30-Minute Epoxy - (GPMR6047)
❏
Small building square or draftsman's triangle
❏
Reinforced cut-off wheel - (GPMR8200)
❏
Hand or Electric Drill
❏
Drill Bits: 1/16", 1/8",13/64" or #12
❏
Razor Saw
❏
#1 Hobby knife handle
❏
#11 Blades - (HCAR0311, box of 100)
❏
Common pliers
❏
Screwdrivers (phillips and flat)
❏
Sandpaper (coarse, medium, fine grit)
❏
T-Bar or sanding block
❏
Soldering iron
❏
Silver Solder - (GPMR8070 w/flux)
❏
Lightweight Balsa Filler - (HCAR3401)
❏
Propane torch or heavy-duty soldering iron
(for 60 floats only)
❏
Double-sided foam tape - (GPMQ4442)
❏
RTV silicone rubber
❏
Lead weights - (GPMQ4485)
Finishing Supplies
For iron-on covering:
❏
Top Flite MonoKote
®
film (recommended)
❏
Sealing Iron - (TOPR2100)
For “glassing”:
❏
Finishing resin (GPMR6049)
❏
3/4 oz. fiberglass cloth - (HCAR5000)
❏
Mixing cups
❏
1" wide paint brush
❏
Mixing sticks - (GPMR8055)
❏
Epoxy brushes - (GPMR8060)
❏
Fuelproof primer and paint
(Top Flite LustreKote
®
recommended)
*Items in parentheses (GPMR6007) are suggested part
numbers recognized by distributors and hobby shops and
are listed for your convenience. Our own brand has been
provided where possible: GPM is the Great Planes brand,
HCA is the Hobbico
®
brand, TOP is Top Flite.
IMPORTANT: For your model to handle properly on the
water and in the air, the Sport Floats must be built on a flat
surface. Also, a relatively soft, flat building board that you
can stick “T” pins into is required. This is for pinning down
individual parts that make up the completed assembly. A
suitable building board is a sheet of ceiling tile or “Celotex”
used in home construction. This material may be found at
hardware or home improvement stores. If the building
board is not flat, it must be clamped to your flat building
table. Now we're ready to begin!
During construction of the floats, most of the procedures
will have to be performed two times as there are two floats.
You may build each float individually to completion or
simultaneously build one float alongside the other.
Remove all parts from the box. As you do, determine the
name of each part by comparing it with the instructions and
the parts list included with this kit. Using a ball point pen,
lightly write the part name on each piece to avoid confusion
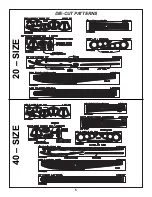
later. Use the die-cut patterns shown on pages 4 and 5 to
identify the die-cut parts and mark them before removing
them from the sheet. Save all scraps. If any of the die-cut
parts are difficult to punch out, do not force them! Instead,
cut around the parts with a hobby knife. After punching out
the die-cut parts, use your T-Bar or sanding block to lightly
sand the edges to remove any die-cutting irregularities.
Parts Identification
Get Ready to Build
Other Suggested Items
Suggested Tools & Building Supplies
Summary of Contents for Sport Floats
Page 4: ...4 DIE CUT PATTERNS 60 SIZE...
Page 5: ...5 DIE CUT PATTERNS 20 SIZE 40 SIZE...
Page 21: ......


