❏
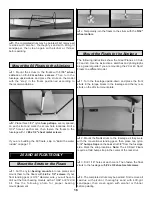
1. Cut the 3/16" x 3/16" aft stringers to length. Then
use thick CA to glue them to the formers only in the
notches of formers E, G, and H.
❏
2. Remove the float from the building board once and for
all, then glue the sides to the aft stringers with thin CA.
Hint: hold the stringer to the sides with clothespins and
apply the thin CA from the
inside.
❏
1. Install former A to the forward keel and spine, making
sure it is perpendicular. Then glue it in position with
medium CA.
❏
2. Use medium CA to securely glue the deck to former
A, then the sides to the deck between formers A and B.
Inspect all glue joints and add CA where necessary. See
the following photo.
❏ ❏
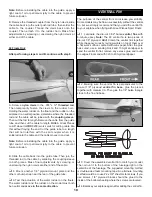
3. Cut a 3/16" x 3/16" forward stringer to fit in the
notches of formers E to A (do not attempt to bend the
stringer down to the notches in former A at this time). Use a
pen to make marks every 1/2" between formers C and A.
❏ ❏
4. Take the stringer out of the notches in the float and
use a razor saw to cut a 1/16" deep notch at every mark
you just made. Hint: use a piece of 1/8" thick scrap
plywood as a gauge so the saw will cut every notch the
same depth.
❏ ❏
5. With the notches in the forward stringer facing the
deck, first glue the stringer to the formers only with
medium CA. Then glue the side to the forward stringer in
the same manner that you glued the side to the
rear stringer.
❏
6. Add the other forward stringer in the same manner.
The photo at step 2 (next page) shows the stringers glued
to the sides.
Forward Stringers
Aft Stringers
8
Summary of Contents for Sport Floats
Page 4: ...4 DIE CUT PATTERNS 60 SIZE...
Page 5: ...5 DIE CUT PATTERNS 20 SIZE 40 SIZE...
Page 21: ......


