❏
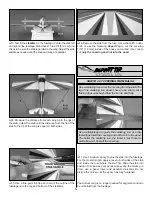
3. Slide the three aluminum fuel tubes into the
rubber stopper.
❏
4. Cut the fill line and carb line tubes such that the tubes
extend 1/2" [13 mm] out from both ends of the stopper. The
vent line should be bent upwards and left uncut.
❏
5. Attach silicone fuel tubing 4-1/2" [115 mm] in length
to the carb line and fill line in the stopper. Install the included
fuel clunks onto these lines.
❏
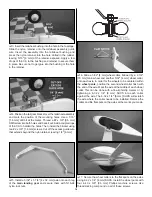
6. Insert the stopper into the tank and check the length of
the carb line and fill lines. The clunks should almost rest
against the back of the tank when the stopper is in place but
move freely. Adjust the length of the fuel line until the proper
length has been reached. Once you are satisfied with the fit,
secure the stopper using the Phillips head screw in the
stopper assembly. Be careful not to overtighten the screw as
the fuel tank could split.
❏
7. Connect a piece of 10" [254 mm] long fuel tubing onto
each of the three lines on the tank. Mark the vent line, and
temporarily tape the ends of the tubing together in order to
feed them through the hole in the firewall.
❏
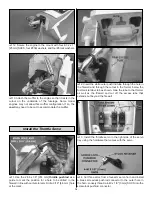
8. Slide the tank into the fuselage, being sure the fuel
tubing exits out of the front of the firewall. Secure the tank by
hooking two rubber bands around the fuel tank retainer tabs
as shown.
❏
9. Install the engine mount onto the firewall on its side
using four 8-32 x 1" [25 mm] SHCS, four #8 flat washers,
and four #8 lock washers.
❏
10. Position the engine onto the mount so the front of the
drive washer is 5-7/8" [149 mm] from the firewall. Use a
Great Planes Engine Hole Locator or a small drill bit to mark
the engine mounting holes onto the engine mounts.
❏
11. Take the engine off the mount, and then drill 9/64"
[3.6 mm] holes at the marks. Use an 8-32 tap to cut threads
into the holes.
18


