9. D SAND FUSELAGE TAIL; GLUE BULKHEADS #2
AND #3 TO THE RIGHT FUSELAGE SIDE
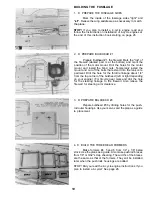
Slightly relieve the inside edges of the fuse sides at
the tail for a better glue joint. Notch a hole for the throttle
linkage in the side of bulkhead #2 first before gluing it to
the fuselage side. Align and glue bulkheads #2 and #3 to
the inside of the right fuse side which you have pinned
down to your work surface. Make sure the bulkheads are
90 degrees to the fuselage side and that the tops of the
bulkheads are toward the straight edge of the fuselage
sides. Bulkhead #2 has an angled cut on the bottom edge
in the 40 and 60 models. (The straight edge of the fuselage
side is called the Fuselage Reference Line and will be used
later to align the wing and stab to the fuselage.)
* Be careful to locate Bulkhead #2 1/8" forward of the wing
saddle opening in the Sportster 20.
10. D GLUE LEFT FUSELAGE SIDE TO BULKHEADS
Align the fuselage side/bulkhead assembly upside
down over the top view of the plans. Make sure the flat side
is resting flat on the building board and that the bulkheads
are aligned to the plans. Pin in place. Glue the other fuse
side to bulkheads #2 and #3 making sure the second side
is also flat on the building board. Clamp or pin the fuse-
lage in place until the glue is dry.
11. D GLUE IN THE HOLD DOWN PLATES
Add the 1/4" plywood front and rear wing hold
down plates and the 1/4" tri stock braces on the bottom of
the plates in the servo compartment as shown on the
plans. Use epoxy to glue in the plates. You may want to
saw or grind away the pushrod clearance area shown on
the rear plate now. Otherwise do this in step 23.
* The 20 size model has a rear hold down plate only and
uses 1/4" x 1/4" bracing.
12. D GLUE IN THE 1/4" BRACING
Turn the fuselage over and add the 1/4" triangle
stock (or 1/4" x 1/4" for the 20) on the front and rear hold
down plates. Add the 1/4" tri stock behind bulkhead #2. (40
and 60 only).
12
Summary of Contents for Super Sportster 20
Page 33: ...33...
Page 34: ...34...
Page 35: ...35...
Page 36: ...36...
Page 37: ...37...
Page 41: ...Use trim MonoKote and these letters to create your trim scheme on your Sportster 41...
Page 43: ...PUSHROD LINKAGES 43...

