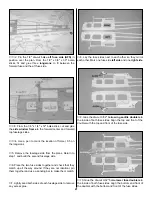
Center a nylon landing gear strap centered over the slot in
the wheel pant. Mark the mounting holes, remove the strap
and drill a 1/16" pilot hole at both marks.
❏ ❏
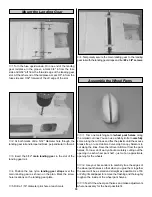
10. Drill a 5/32" hole in the center of the die-cut 1/8"
plywood wheel pant retainer. Slide the die-cut 1/8" plywood
wheel pant retainer over the landing gear. Then, securely
attach the wheel pant to the landing gear with the nylon
landing gear strap and two #2 x 3/8" sheet metal screws.
❏ ❏
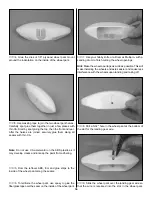
11. Adjust the position of the wheel pant so that the axle
part of the landing gear is perpendicular to the centerline of
the wheel pant. Stand back a few feet from the plane and
view the wheel pant from the front and side, making sure it is
positioned correctly. When satisfied with the position use
epoxy to glue the wheel pant retainer to the side of the wheel
pant. By using epoxy to glue the retainer on, you can re-
adjust the position of the wheel pant before the glue cures.
❏ ❏
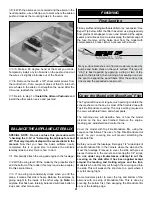
12. Remove the two screws holding the nylon landing
gear strap on the wheel pant. Slide the wheel pant partially
off of the landing gear. Slide a 5/32" wheel collar, a 2-1/2"
wheel followed by a second 5/32" wheel collar onto the
landing gear. Reinstall the wheel pant to the landing gear
with the nylon landing gear strap. Refer to the fuse plan for
a detailed view of the wheel pant assembly.
❏ ❏
13. Adjust and tighten the wheel collars on the landing
gear so that the wheel rotates freely.
❏
14. Return to step 1 of Assemble the Wheel Pants and
assemble the other wheel pant.
❏
15. Before painting the wheel pants, fill the seams with a
filler such as Bondo
®
Auto Body Filler or an automotive
scratch and dent glazing compound. We use Bondo most of
the time as it cures quickly and sands easily, but it is
normally sold in large quantities. Automotive glazing
compound usually comes in small tubes, dries quickly and
sands easily, but for proper drying can only be applied in
thin layers.
❏
16. After the filler cures, wet sand the wheel pants with
400-grit sandpaper to prepare them for primer.
❏
1. The cowl is assembled the same as the wheel pants.
Cut the cowl along the cut lines, use a bar sander to true the
edges. Roughly cut out the openings in the front of the cowl
and roughen the inside of the cowl along all the seams.
Note: The top and bottom cowl halves use a butt joint to join
the two halves. On the front of the two halves is a lip that the
front cowl is glued over.
❏
2. Tape the top and bottom cowl halves together. Wick thin
CA along the joints. Then, reinforce the joint by gluing
leftover ABS along the inside of the joints.
Assemble the Cowl
35

