background image

BUILD THE WING PANELS

NOTE: If you will be installing a retractable landing gear,

disregard Steps 6 and 7.

NOTE: It will be helpful to build the wing on a piece of

"Celotex" or other semi-soft (and flat) surface, into which

you may easily stick pins to firmly hold down the wing parts
while building, to avoid warps.

1. Tape the plan to your flat work surface, and cover

the wing drawing with waxed paper (so you won't glue the
wing to the plan!). NOTE; If your work space is limited, you
may cut the left and right wing half drawings apart.

6. Note that the wing plan shows two alternate loca-

tions for the main landing gear blocks. Note also that Ribs

W-2, W-3 and W-4 have partial cutouts for each of the two

locations. If you are building your plane as a taildragger, cut

out the front notches in these ribs. If you are building your
plane with a tricycle gear, cut out the rear notches. (If you I

|will be installing retracts, do not cut out any of the notches).

7. Glue the die-cut 1/16" ply landing gear doublers to

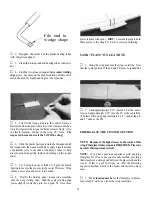
2. The shaped and notched wing leading edges (LE)

and trailing edges (TE) are fastened together by thin strips of
balsa. Separate them by folding until the balsa breaks. Sand
away the excess balsa that remains along the edges after
breaking them apart, using a T-bar with 100-grit sandpaper.

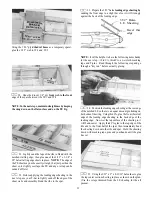
3. Before using the 1/4" x 1/2" x 30" hard balsa spars,

ribs W-2, W-3 and W-4. Be sure to glue them to the correct
side of the ribs, as shown on the plan (make a right and a left
set). Sand the doublers even with the edge of the ribs.

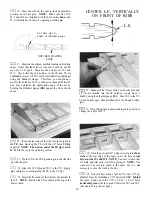
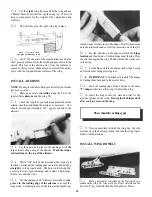
8. Prepare the leading edge sheeting as follows: Edge

glue the 3/32" x 1" x 13" balsa sheets to the 3/32" x 3" x 30"
balsa sheets as shown here ...

examine them carefully for possible imperfections. Look for
knots, soft spots, diagonal grain and any other imperfections.

If possible, position each spar so the imperfections (if any) are
on the outer half of the wing panel (toward the tip), where they
will be least affected by high stress. If the spars are warped
slightly, try to "balance them out" by installing the warped
spars in opposite directions (see sketch).

TWO WARPED SPARS INSTALLED

THIS  W A Y WILL RESULT IN A

STRAIGHT WING

Now measure and mark the balsa sheeting (see sketch

below), then cut the angle in the sheeting, cutting along a
metal straightedge for accuracy.

TWO WARPED SPARS INSTALLED

THIS  W A Y WILL RESULT IN A

WARPED WING

NOTE: Follow steps 9 through 34 to build the RIGHT
wing panel, then repeat these steps to build the LEFT wing

panel

4. Find the four 1/8" x 1/2" x 14-1/2" balsa spar

doublers. Sand one end of each spar doubler to a taper as
shown in the "Wing Spar Detail" on the plan. Glue the spar
doublers to the spars, and sand off any excess glue.

T-Pins

Spar

5. Carefully punch out all the die-cut 3/32" balsa wing

ribs. Sand the edges slightly to remove any die-cutting
irregularities.

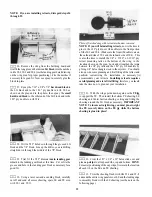
9. Pin one of the spars to the plan with the spar

doubler up and toward the root NOTE: The spars are cut

slightly too long. Center the spar on the plan so an equal
amount protrudes on both ends.

9

Summary of Contents for ULTRA SPORT 60

Page 1: ...shrods etc and to test the model and fly it only with experienced competent help using common sense and in accordance with all safety standards as set down in the Academy of Model Aeronautics Safety C...

Page 2: ...Tubes 22 Mount the Wing to the Fuse 23 Fit Fuel Tank Fuelproofing 25 Install Turtle Deck 25 Assemble Nose Section 27 FINAL ASSEMBLY 30 Sand Fuselage 30 Install Wing Fairings 30 Install Wing Fillets 3...

Page 3: ...Sport 60 is an excellent choice 4 You mustproperly install allR C and othercomponents so that the model operates properly on the ground and in the air 5 You must test theoperation ofthe model before t...

Page 4: ...dragger configuration OTHER ITEMS REQUIRED Four channel radio with 4 servos additional channel and retract servo required if retracts are being used Propellers see engine instructions and above engine...

Page 5: ...5 DIE DRAWINGS Use this drawing to help you identify the die cut parts...

Page 6: ...block sand both sides of the fin smooth Then sand the leading edge and top edge to a rounded shape as shown on the plan Draw a centerline along the trailing edge of the fin to mark the hinge line 5 G...

Page 7: ...the 1 8 wire elevator joiner 2 Glue the stab front to the stab rear Then glue on the stab tips Sand the frontofthe stab tips to blend with the stab 3 Glue the elevator ends to the elevators and sand t...

Page 8: ...e the slot it in using 5 minute or 30 minute epoxy Work plenty of epoxy into the holes with a toothpick then lay the elevator leading edges along a straightedge to insure perfect align ment by folding...

Page 9: ...t side ofthe ribs as shown on the plan make a right and a left set Sand the doublers even with the edge of the ribs 8 Prepare the leadingedgesheeting as follows Edge glue the 3 32 x 1 x 13 balsa sheet...

Page 10: ...lied NOTE The narrow end of the TE jig is at rib W ll Pin the jig to the building surface all ribs are inserted into the LE notches Angle rib W l slightly using the dihedral gauge DG Glue W 1 to the T...

Page 11: ...a wet cloth masking tape and T pins Read through the following step and go through a dry run before actually gluing 24 Position the leading edge sheeting at the rear edge of the notched LE so there is...

Page 12: ...plan out your installation the LG block and to the 1 16 ply doubler on rib W 2 as shown on the plan and in the photo then epoxy the small hardwood block to the other end of the LG block and to the 1...

Page 13: ...f the 1 16 ply dihedral brace Slide the dihedral brace in place push the wing panels together and immediately proceed to the next step 35 Now go back and repeat Steps 9 through 34 to build 4 With the...

Page 14: ...The torque rod horns must exit the TOP of the wing FIBERGLASS THE CENTER SECTION 6 Slide the plastic bearings toward the threaded end of the torque rods then use a toothpick to apply a small amount o...

Page 15: ...spray adhesive should hold the cloth down to the surface but will permit you to lift and reposition the cloth if you make a mistake Keep working forward along the top of the wing around the leading ed...

Page 16: ...g edge of the ailerons to the same 1 Draw an accurate centerline along the LE of the tapered balsa ailerons and the wing TE 2 Check the length of your ailerons against the actual 10 Insert the hinges...

Page 17: ...webs NOTE Try to drill straight in 5 Sand one end of each wing dowel to a rounded or pointed shape This is the end that will be inserted Do not sand the other end at this time notched LG blocks and sa...

Page 18: ...retracts making sure they operate freely and reliably Also make sure 2 Carefully position the die cut 3 16 balsa lower front fuse side so the rear edge lines up with the front of the wing saddle open...

Page 19: ...o the aft end ofone of the fuse sides and sand it even with the top and bottom edges 6 Find the two die cut 1 8 ply fuselage doublers and 10 From the 1 4 balsa triangle cut pieces to fit be 7 Edge glu...

Page 20: ...installed perpendicular to the building surface 8 Once you have everything fitting properly re as semble the above parts using clamps pins tape and weights toholdeverything togetherand flaton the work...

Page 21: ...it to make sure it will fit correctly before proceeding to the next step 14 Before installing the firewall F l you may drill F l for your engine mountand install the 6 32 blind nuts You may cut out th...

Page 22: ...rmers F 6 F 5 and F 4 1 inch high 2 Trim the 3 16 x 1 2 x 3 5 8 ply servo rails to fit between the fuse side doublers in the locations shown on the plan Temporarily mount your servos to the rails then...

Page 23: ...es flush with the front of F l 13 Cut the pushrod wires supplied to the required lengths and temporarily install the throttle and nose gear pushrods NOTE A 34 wire threaded one end is supplied for the...

Page 24: ...els for easier insertion into F 2A Mix up a batch of 30 minute epoxy use a long stick to work some epoxy into the dowel holes smear epoxy on the dowels then re insert the dowels into the wing leaving...

Page 25: ...ll the tank be sure tocushion itfrom vibration and prevent it from moving by surrounding the tank on all sides and front with latex foam rubber Leave a few inches ofextra fuel tubing in front of F l y...

Page 26: ...around the formers and onto the stringers HINT This requires about 5 sets of hands so use several long pieces of masking tape to pull the sheering together then working a small section at a time add C...

Page 27: ...ine from the centerline of F 3A to F 6A 1 Find the 1 4 x 1 4 x 10 balsa cockpit sides Cut offone end ofeach stick at an angle to fit the front edge of the backrest F 3A 2 Glue the cockpit sides to the...

Reviews: