Fiberglass the Wing Center Section
OUTER
LAYER
INNER
LAYER
Fold the cloth at
the LE of the wing
along this line.
9" [228mm]
16" [406mm]
4-1/2" [114mm]
11-1/2" [292mm]
10"
[254mm]
10"
[254mm]
❏
1. Cut out the following pieces for the wing from 3/4oz
[21g] fi berglass cloth:
A.
One 9" x 20" [229 x 508mm] piece (center wing,
inner layer)
B.
One 16" x 20" [406 x 508mm] piece (center wing,
outer layer)
❏
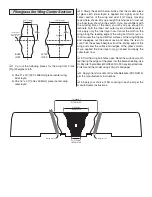
2. Study the sketch below. Notice that the smaller piece
of glass cloth (inner layer) is applied fi rst. Lightly sand the
center section of the wing and dust it off. Apply masking
tape where shown. Mix up enough fi nishing resin to wet out
the inner layer shown in the sketch. If you are confi dent with
the working time of the resin, you may mix up enough to
laminate both the inner and outer layers simultaneously. If
not, apply only the inner layer now. Center the cloth on the
wing along the leading edge of the wing and fold it over so
that it covers the top and bottom surfaces of the wing. Stipple
and squeegee out the excess resin and allow the resin to
cure. Trim the excess fi berglass from the trailing edge of the
wing and sand the surface and edges of the glass smooth.
If you applied the inner layer only, go ahead and apply the
outer layer now.
❏
3. Trim the wing bolt holes open. Sand the surface smooth
feathering the edges of the glass into the balsa sheeting. Use
HobbyLite
™
balsa fi ller (HCAR3400) to fi ll in any imperfections.
Finish-sand the model using 400-grit sandpaper.
❏
4. Apply one or two coats of Coverite Balsarite (COVR2515)
per the manufacturer’s instructions.
❏
5. Apply your choice of fi lm covering to each part per the
manufacturer’s instructions.
16" [406mm]
OUTER LAYER
9" [228mm]
INNER LAYER
4-1/2" [114mm]
INNER LAYER
Masking tape here
Masking tape here


