background image


Owner's Manual 

Original Instructions 

Air Conditioners 


DC Inverter U-match Series Duct Type Unit 
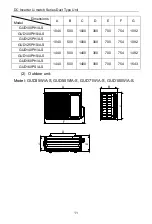
Models:   

Indoor Unit 


Outdoor Unit 

GUD35PS/A-S 

GUD50PS/A-S 

GUD71PS/A-S


GUD35P/A-S 

GUD50P/A-S 

GUD71P/A-S


GUD35W/A-S 

GUD50W/A-S 

GUD71W/A-S


GUD100PHS/A-S  GUD100PH/A-S  GUD100W/A-S 

GUD125PHS/A-S


GUD125PH/A-S


GUD125W/A-S    GUD125W/A-X


GUD140PHS/A-S


GUD140PH/A-S


GUD140W/A-S  GUD140W/A-X


GUD160PHS/A-S  GUD160PH/A-S


GUD160W/A-S  GUD160W/A-X 


Summary of Contents for DC Inverter U-match Series

Page 1: ...Unit Outdoor Unit GUD35PS A S GUD50PS A S GUD71PS A S GUD35P A S GUD50P A S GUD71P A S GUD35W A S GUD50W A S GUD71W A S GUD100PHS A S GUD100PH A S GUD100W A S GUD125PHS A S GUD125PH A S GUD125W A S GUD125W A X GUD140PHS A S GUD140PH A S GUD140W A S GUD140W A X GUD160PHS A S GUD160PH A S GUD160W A S GUD160W A X ...

Page 2: ...ay with the appliance 2 In order to ensure reliability of product the product may consume some power under stand by status for maintaining normal communication of system and preheating refrigerant and lubricant If the product is not to be used for long cut off the power supply please energize and preheat the unit in advance before reusing it 3 Please properly select the model according to actual u...

Page 3: ... to the reason of sales or production and reserve the right to revise the contents without further notice 7 Indoor unit must not be installed in a laundry 8 If the supply cord is damaged it must be replaced by the manufacturer its service agent or similarly qualified persons in order to avoid a hazard 9 Gree Electric Appliances Inc of Zhuhai assumes no responsibility for personal injury property l...

Page 4: ...cturer 3 After verification the defect of product is directly caused by corrosive gas 4 After verification defects are due to improper operation during transportation of product 5 Operate repair maintain the unit without abiding by instruction manual or related regulations 6 After verification the problem or dispute is caused by the quality specification or performance of parts and components that...

Page 5: ... Accessories 7 3 Installation 8 3 1 Installation Preparation 8 3 2 Unit Installation 17 3 3 Electrical Installation 38 3 4 Check after Installation 51 3 5 Test Running 51 4 Operation specification 52 5 Maintenance 53 5 1 Failures Not Caused by Faults of the AC 53 5 2 Error Code 55 5 3 Unit Maintenance 57 5 4 After sales Services 59 ...

Page 6: ...tly it may cause severe damage to the unit or the people NOTICE If not abide strictly it may cause slight or medium damage to the unit or the people OBSERVED This sign indicates that the items must be observed Improper operation may cause damage to people or property WARNING This product can t be installed at corrosive inflammable or explosive environment or the place with special requirements suc...

Page 7: ...ration 3 The appliance shall be stored in a room without continuously operating open flames for example an operating gas appliance and ignition sources for example an operating electric heater 4 According to federal state local laws and regulations all packages and transportation materials including nails metal or wooden parts and plastic packing material must be treated in a safe way WARNING 1 Pl...

Page 8: ...f and power disconnected otherwise electric shock may occur 12 The air conditioner is not intended to be cleaned or maintained by children without supervision 13 Do not alter the setting of pressure sensor or other protective devices If the protective devices are short circuited or changed against rules fire hazard or even explosion may occur 14 Do not operate the air conditioner with wet hands Do...

Page 9: ...y cutting off the power 5 Please select the proper copper pipe according to the requirement for pipe thickness 6 Indoor unit can only be installed indoors while outdoor unit can be installed either indoors or outdoors Never install the air conditioner in the following places 1 Places with oil smoke or volatile liquid plastic parts may deteriorate and fall off or even cause water leakage 2 Places w...

Page 10: ...en installing the indoor unit keep it away from television wireless waves and fluorescent 3 Only use soft dry cloth or slightly wet cloth with neutral detergent to clean the casing of the air conditioner 4 Before operating the unit under low temperature connect it to power for 8 hours If it is stopped for a short time for example one night do not cut off the power This is to protect the compressor...

Page 11: ...eries Duct Type Unit 6 2 Product Introduction 2 1 Overall Layout NOTICE 1 The connection pipe drain pipe power cord and duct for this unit should be prepared by the user 2 The unit is standard equipped with rectangular duct ...

Page 12: ... To insulate the liquid pipe 4 Fastener 8 To fasten the sponge 5 Nut with Washer 4 To fix the hook on the cabinet of the unit 6 Nut 4 To be used together with the hanger bolt for installing the unit 7 Washer 4 To be used together with the hanger bolt for installing the unit 8 Sponge 2 To insulate the drain pipe 10 Nut 1 To connect gas pipe 11 Nut 1 To connect liquid pipe Outdoor Unit Accessories N...

Page 13: ...ndoor Unit Select a location pursuant to the following condition 1 Air inlet and outlet of the indoor unit should be away from obstacles to make sure the unit s air flow can reach the entire room Do not install the unit in a kitchen or a laundry 2 Select a location that can withstand 4 times the unit weight without increasing operating noise and vibration 3 The installation location must be level ...

Page 14: ...ke sure the outdoor unit stays at a well ventilated place with no obstacles nearby that may obstruct the air inlet and outlet 4 The installation location should be able to withstand the weight and vibration of outdoor unit and allow the installation to be carried out safely 5 Avoid installing at a place with leakage of inflammable gas oil smoke or corrosive gas 6 Keep it away from strong wind beca...

Page 15: ...g enough the indoor unit may fall and cause injuries If the job is done with the panel frame only there is a risk that the unit will come loose Please take care 1 Indoor unit NOTICE Drilling of ceiling opening and installation of air conditioner must be performed by professionals Unit mm Dimensions Model A B C D E F G GUD35P A S 760 415 700 200 450 474 768 GUD35PS A S GUD50P A S 1060 415 1000 200 ...

Page 16: ...0 500 1000 300 700 754 1092 GUD100PHS A S GUD125PH A S 1040 500 1000 300 700 754 1092 GUD125PHS A S GUD140PH A S 1440 500 1400 300 700 754 1492 GUD140PHS A S GUD160PH A S 1440 500 1400 300 700 754 1543 GUD160PS A S 2 Outdoor unit Model GUD35W A S GUD50W A S GUD71W A S GUD100W A S A F D E G C B ...

Page 17: ... GUD35W A S 818 378 596 550 348 887 302 GUD50W A S 818 378 596 550 348 887 302 GUD71W A S 892 396 698 560 364 952 340 GUD100W A S 920 427 790 610 395 1002 370 GUD125W A S 940 530 820 610 486 460 GUD125W A X 940 530 820 610 486 460 GUD140W A S 940 530 820 610 486 460 GUD140W A X 940 530 820 610 486 460 GUD160W A S 940 530 820 610 486 460 GUD160W A X 940 530 820 610 486 460 ...

Page 18: ...e its installation space conforms to the following installation dimensions 1 When one outdoor unit is to be installed A E Hb Hd H mm a b c d e B 100 A B C 300 100 100 B E 100 1000 A B C E 300 150 150 1000 D 1000 D E 1000 1000 B D Hb Hd Hd H 100 1000 Hb Hd Hd H 100 1000 B D E Hb Hd Hb 1 2 H 250 2000 1000 1 2 H Hb H 250 2000 1000 Hb H Prohibited Hb Hd Hd 1 2 H 100 2000 1000 1 2 H Hd H 200 2000 1000 ...

Page 19: ...e A E Hb Hd H mm a b c d e A B C 300 300 1000 A B C E 300 300 1000 1000 D 2000 D E 2000 1000 B D Hb Hd Hd H 300 2000 Hb Hd Hd 1 2 H 250 2000 1 2 H Hd H 300 2500 B D E Hb Hd Hb 1 2 H 300 2000 1000 1 2 H Hb H 300 2500 1000 Hb H Prohibited Hb Hd Hd 1 2 H 250 2500 1000 1 2 H Hd H 300 2500 1000 Hd 1 2 H Prohibited ...

Page 20: ...DC Inverter U match Series Duct Type Unit 15 3 When outdoor units are installed in rows 200 4000 200 2000 400 400 4500 2000 600 Hb H b Hb H mm Hb 1 2 H b 250 1 2 H Hb H b 300 Hb H Prohibited ...

Page 21: ...DC Inverter U match Series Duct Type Unit 16 4 When outdoor units are installed one above another Unit mm 400 500 2000 400 500 300 ...

Page 22: ...ke sure its installation space conforms to the following installation dimensions 3 2 Unit Installation 3 2 1 Indoor Unit Installation 3 2 1 1 Preparation for Installing the Indoor Unit NOTICE Please tighten the nut and bolt to prevent the air conditioner from falling down The unit might be loose if fixing the panel rack only Be careful during installation ...

Page 23: ...olt positions from the installation template With a concrete drill for 12 7mm diameter holes See the following figure 60 to 70mm Ф12 7mm 2 Insert the anchor bolts into the drilled holes and drive the pins completely into the anchor bolts with a hammer See the following figure 3 Install the hanger to the unit See the following figure ...

Page 24: ... is installed on a solid ground such as concrete use M10 screw bolts and nuts to secure the unit and make sure the unit stands erect and level 2 Do not install it on top of the building 3 If it vibrates and causes noise please add rubber cushion between the outdoor unit and the installation base 4 When the outdoor unit is in heating or defrosting it needs to drain water When installing the drain p...

Page 25: ...e screw nut otherwise leakage will occur Besides the outside of connection pipe should be added with a layer of insulating cotton to protect it from mechanical damage during installation maintenance and transportation Item Model Size of Fitting Pipe in Maximum Pipe Length m Biggest Drop between Indoor and Outdoor Units m Liquid Pipe Gas Pipe GUD35P A S GUD35PS A S 1 4 3 8 30 15 GUD50P A S GUD50PS ...

Page 26: ...and heating performance it has When the drop between indoor and outdoor units is larger than 10m an oil return bend should be added every 6 meters The requirement on the adding of oil return bend is as below 1 Outdoor unit is beneath the indoor unit There s no need to add non return bend at the lowest or highest position of the vertical pipe as shown below Indoor unit System gas pipe Oil return be...

Page 27: ... oil return bend every 6m Indoor unit Dimensions for the making of oil return bend are as follows C B A A B mm C mm mm In Ф9 3 8 20 150 Ф12 1 2 26 150 Ф16 5 8 33 150 3 2 3 2 Pipe Flaring 1 Cut the connection pipe with a pipe cutter 2 The mouth of connection pipe should face downward Remove burrs with the cut surface so that the chips do not enter the pipe 3 Remove the cut off valve of outdoor unit...

Page 28: ...n an angle more than 90 3 If the pipe is repeatedly bent or extended it will become hard and difficult to be bent or extended So do not bend or extend the pipe for more than 3 times 4 When bending the pipe do not bend it excessively otherwise it will get broken As shown beside use a sharp cutter to cut the heat insulating pipe and bend it after the pipe is exposed After bending place the heat insu...

Page 29: ... by referring to the following table If the screw nut is over tristed it may be damaged and cause leakage Check whether gas leakage occurs to the connection pipe and then apply thermal insulation as shown below Wind sponge around the joint of gas pipe and heat insulation sheath of gas collecting pipe Be sure to connect gas pipe after liquid pipe is connected Sponge Threaded fastener 4 Heat insulat...

Page 30: ...e A Coupler heat insulation large on the pipe Front outlet Reference A Cover this portion with heat insulating material also without fail Coupler heat insulation small on the pipe No gap Heat insulation pipe Liquid pipe Gas pipe 3 2 3 6 Sealing of the Knock off Hole As for the built in valve model during the installation process for connection pipe when the connection pipe is passing through the k...

Page 31: ... meanwhile the gas and liquid valves should be kept closed in case of refrigerant leak 3 Connect the hose used for evacuation to the vacuum pump 4 Open the switch at the lower pressure side of the manifold valve assembly and start the vacuum pump Meanwhile the switch at the high pressure side of the manifold valve assembly should be kept closed otherwise evacuation would fail 5 The evacuation dura...

Page 32: ...nnection pipe when removing the hose Note that the gas and liquid valve can be opened fully only after the manifold valve assembly is removed 8 Place back the caps of the liquid valve gas valve and also the service port Pressure gauge Low pressure Switch Low pressure Connection pipe to indoor unit Liquid valve Gas valve Service port gauge manifold Pressure gauge Hi pressure Switch Hi pressure Conn...

Page 33: ...pe into waste pipe or other pipelines which are likely to produce corrosive or peculiar smell to prevent the smell from entering indoors or corrupt the unit 2 It is not allowed to connect the condensate drain pipe into rain pipe to prevent rain water from pouring in and cause property loss or personal injury 3 Condensate drain pipe should be connected into special drain system for air conditioner ...

Page 34: ... of air pocket See the following figure 3 When the hose is long install supporters See the following figure 4 Always use the drain hose which has been insulated properly 5 Use a suitable drain hose 6 There is a drain port on both the left and right sides Select the drain port to match the local conditions See the following figure 7 When the unit is shipped from the factory the drain port is ...

Page 35: ... the following figure 10 The unused drain port also should be insulated properly See the following figure 11 There is adhesive on one side of the insulation so that after removing the protective paper over it the insulation can be directly attached to the drain hose 3 2 6 2 Outdoor Side Drainage Pipe 1 If the outdoor unit is underneath the indoor unit arrange the pipeline according to the followin...

Page 36: ...hould be wound with insulating tape and fixed onto the wall with saddles 2 If the outdoor unit is above the indoor unit arrange the pipeline according to the following diagram 1 Wind the insulating tape from bottom to top 2 The whole pipeline should be wound together to avoid water returning to the room 3 Use saddles to fix the whole pipeline onto the wall ...

Page 37: ...UD35PS A S Ф26 2 5 GUD50P A S GUD50PS A S GUD71P A S GUD71PS A S GUD100PH A S GUD100PHS A S GUD125PH A S GUD125PHS A S GUD140PH A S GUD140PHS A S GUD160PH A S GUD160PHS A S 2 For the unit with the condensate pump two drain ports at the bottom are defaulted to be factory plugged with drain caps After the installation of the drain hose these two drain ports also need to be insulated properly with th...

Page 38: ... force Drain hose 75mm 1000mm When multiple drain hoses are used their installation should be performed as shown in the figure below Notice The specification of the selected merged drainage pipe shall be appropriate for the operation capacity of the unit 4 Drain branch should be connected to the vertical or horizontal part of the main drain pipe 5 Horizontal pipe should not be connected to the ver...

Page 39: ...f the drainage pipe joint 2 Attach the drain elbow 3 Attach the horizontal pipe 3 2 6 4 Check Drainage After piping work is finished check if drainage flows smoothly As shown in the figure add approximately 1liter of water slowly into the drain pan and check drainage flow during COOL running ...

Page 40: ...S A S 122 585 700 200 GUD50P A S GUD50PS A S 122 885 1000 200 GUD71P A S GUD71PS A S 142 1185 1300 220 GUD100PH A S GUD100PHS A S 195 746 960 264 GUD125PH A S GUD125PHS A S 195 746 960 264 GUD140PH A S GUD140PHS A S 195 1150 1360 264 GUD160PH A S GUD160PHS A S 195 1150 1360 264 3 2 7 2 Return Air Method 1 The default ex factory return air method is from the back The return air cover shall be insta...

Page 41: ...stment canvas duct can be made and reinforced with iron wire to a folding shape 4 The noise of downward return air is obvious bigger than that of rear return air For downward return air silencer and static pressure carton shall be added to conduct noise reduction treatment 3 2 7 3 Installation of Air Supply Duct and Air Return Supply Installation method shall be selected by entirely considering th...

Page 42: ...nd flange duct shall be concealed and kept warm well 4 The fresh air is the air after filtration Notice The supply air duct return air duct and fresh air duct shall have thermal insulation layer to prevent heat leakage and condensation Stick the plastic nail to the air duct then attach the heat preservation cotton with tinfoil and fix it with plastic nail cover finally seal the connection joint wi...

Page 43: ...Wired Control Please refer to the instruction manual of the wired control 3 3 Electrical Installation 3 3 1 Requirement and Notice on Electrical Installation WARNING The electrical installation for the air conditioner should observe the following requirements The electrical installation must be conducted by professionals in compliance with local laws and regulations and the instructions in this ma...

Page 44: ...t collide with any metal beam or edge on the ceiling or touch any metal burrs or sharp metal edge around Connect wires correspondingly by referring to the circuit diagram labeled on the unit or electric box Screws must be tightened up Slipped screws must be replaced by specialized flat head screws Please use the power cables that are delivered along with the air conditioner Do not change the power...

Page 45: ... 1 0 Model Power supply Circuit breaker capacity Min sectional area of power cord V Ph Hz A mm2 GUD35W A S 220 240V 50 60Hz 16 1 5 GUD50W A S 16 1 5 GUD71W A S 20 2 5 GUD100W A S 25 2 5 GUD125W A S 32 4 0 GUD140W A S 32 4 0 GUD160W A S 40 6 0 GUD125W A X 380 415V 3N 50 60Hz 16 1 5 GUD140W A X 16 1 5 GUD160W A X 16 1 5 NOTICE Fuse is located on the main board Install a circuit breaker at every powe...

Page 46: ...t not be twisted together To be in compliance EN 55014 it is necessary to use 8 meters long wire Adopt 2pc of 0 75mm power cords to be the communication cords between wired control and indoor unit The maximum length is 30m Please select a proper length according to local conditions Communication cords must not be twisted together To be in compliance EN 55014 it is necessary to use 7 5 meters long ...

Page 47: ... Use wire cutters to cut off the wire end and then peel away about 10mm of the insulation layer 2 Use a screwdriver to unscrew the terminal screw on the terminal board 3 Use a round terminal fastener or clamp to fix the round terminal firmly on the peeled wire end 4 Locate the round terminal conduit Use a screwdriver to replace it and tighten up the terminal screw as shown below 10mm 3 8inch A Sol...

Page 48: ...ck whether the indoor and outdoor units are powered on Match the terminal numbers and wire colors with the colors indicated in the indoor unit Wrong wire connection may burn the electrical components Connect the wires firmly to the wiring box Incomplete installation may lead to fire hazard Please use wire clamps to secure the external covers of connecting wires Insulators must be clamped securely ...

Page 49: ...35W A S GUD35PS A S GUD35W A S GUD50P A S GUD50W A S GUD50PS A S GUD50W A S Power cord 3 1 5mm Power cord 3 1 0mm Communication Cords 2 0 75mm Communication Cords 2 0 75mm GUD71P A S GUD71W A S GUD71PS A S GUD71W A S GUD100PH A S GUD100W A S GUD100PHS A S GUD100W A S Power cord 3 2 5mm Power cord 3 1 0mm Communication Cords 2 0 75mm Communication Cords 2 0 75mm ...

Page 50: ... S GUD125PHS A S GUD125W A S GUD140PH A S GUD140W A S GUD140PHS A S GUD140W A S Power cord 3 4 0mm Power cord 3 1 0mm Communication Cords 2 0 75mm Communication Cords 2 0 75mm GUD160PH A S GUD160W A S GUD160PHS A S GUD160W A S Power cord 3 6 0mm Power cord 3 1 0mm Communication Cords 2 0 75mm Communication Cords 2 0 75mm ...

Page 51: ...80 415V 3N 50 60Hz Power 220 240V 50 60Hz Outdoor Unit Indoor Unit Wired Breaker Controller Power 380 415V 3N 50 60Hz Power 220 240V 50 60Hz GUD125PH A T GUD125W A X GUD125PHS A T GUD125W A X GUD140PH A T GUD140W A X GUD140PHS A T GUD140W A X GUD160PH A T GUD160W A X GUD160PHS A T GUD160W A X Power cord 5 1 5mm Power cord 3 1 0mm Communication Cords 2 0 75mm Communication Cords 2 0 75mm ...

Page 52: ...inal board Wrong connection may lead to fire hazard If the connection wires of indoor unit outdoor unit and power cords are not correctly connected the air conditioner may get damaged Ground the indoor and outdoor units through connecting the ground wire The units should comply with applicable local and national rules and regulations on power consumption When connecting the power cord make sure th...

Page 53: ...door side Remove the big handle front panel of the outdoor unit and insert one end of the communication cord and the power cord to the terminal board Single phase GUD35W A S GUD50W A S GUD71W A S GUD100W A S a Wire routing of separated power supply b Wire routing of unified power supply ...

Page 54: ...A S GUD140W A S GUD160W A S a Wire routing of separated power supply for single phase The communication wire gets in from the upper hole The power cords of outdoor unit and indoor unit get in from the lower hole b Wire routing of unified power supply for single phase ...

Page 55: ...A X GUD160W A X a Wire routing of separated power supply for three phase b Wire routing of unified power supply for three phase Power cord should be secured along with the right side plate and fixed to the hook with a wire clamp so as to avoid contacting the pipeline The communication line between indoor and outdoor units should also be laid along with the right side plate but away from the power ...

Page 56: ...s may get burned Has the unit been safely grounded Risk of electric leakage Do the specifications of wires comply with the requirement The unit may fail or its components may get burned Is there any obstacle blocking the air inlet and outlet of the indoor or outdoor units Cooling capacity may become unsatisfactory Have you recorded the length of refrigerant pipe and the refrigerant charging amount...

Page 57: ...conditioner 5 Feel the air flow of the indoor unit to see if it is normal 6 Press the swing button or speed control button on remote control or wired control to see if the fan can run normally Notice If you use remote control to turn off the unit and then immediately turn the unit on again compressor will need 3min to restart Even if you press ON OFF button on the remote control it won t be starte...

Page 58: ... resumed Power plug is loose Re insert the power plug Remote control has low battery Replace the batteries Bad cooling or heating effect Air inlet and outlet of indoor or outdoor units have been blocked Clear the obstacles and keep the room for indoor and outdoor units well ventilated Improper temperature setting Reset a proper temperature Fan speed is too low Reset a proper fan speed Air flow dir...

Page 59: ...irst enables the heating mode or there is refrigerant brushing sound when defrosting under heating It s the sound of 4 way valve switching direction The sound will disappear after the valve changes its direction There is hissing sound when the unit is started or stopped and a slight hissing sound during and after operation It s the sound of gaseous refrigerant that stops flowing and the sound of d...

Page 60: ...ir the air conditioner by yourself Improper maintenance will cause electric shock or fire hazard Please contact Gree s authorized service center and send for professional service staff to repair If the display panel or wired control displays an error code please refer to the error code meaning stated in the following table Number Error code Error 1 E1 Compressor high pressure protection 2 E2 Indoo...

Page 61: ...c protection 23 Lc Startup failure 24 Ld Compressor phase sequence protection 25 LF Power protection 26 Lp IDU and ODU unmatched 27 U7 4 way valve switch over error 28 P0 Driver reset protection 29 P5 Over current protection 30 P6 Master control and driver communication error 31 P7 Driver module sensor error 32 P8 Driver module high temperature protection 33 P9 Zero crossing protection 34 PA AC cu...

Page 62: ...uency of cleaning if the unit is installed in a room where the air is extremely contaminated As a yardstick for yourself consider cleaning the filter once a half year If dirt becomes impossible to clean change the air filter Air filter for exchange is optional 1 Removing the air filter from the duct 2 Cleaning the air filter Remove dust from the air filter using a vacuum cleaner and gently rinse t...

Page 63: ...e condensate water 5 3 4 Notices at the Beginning of the Using Season 1 Check if the air inlet outlet of indoor outdoor unit is blocked 2 Check if the ground connection is reliable 3 Check if the battery of remote controller is replaced 4 Check if the air filter screen is properly installed 5 If starting up again after long term shut down preset the power switch of air conditioner to ON status bef...

Page 64: ...s rusty coat the rusty location with paint to prevent it from expanding 5 3 6 Components Replacement Components are available in Gree agency or Gree distributors nearby 5 4 After sales Services Any quality or other issues encountered in the purchased air conditioner please contact the local Gree after sales service department ...

Page 65: ......

Reviews: