background image

38

 Maintenance

Service Manual

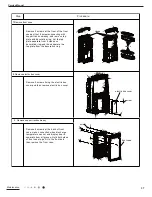
  10.Remove display board

  11.Remove electric box

12.Remove air duct

Remove 2 screws inside the electric box

connecting the water tray, pull out all 

wires connecting all electric parts

inside the electric box, and then

remove the electric box.

Remove 2 screws fixing the water tray and

3 screws fixing condenser and evaporator,

lift up the air duct and then remove it.

Remove 2 screws at both sides of display

board, pull out clasps at both sides and 

then remove the display board.

clasp

screw

screw

screw

electric box

air duct

Step

Procedure

Summary of Contents for GDN40AU-K3EBA1A

Page 1: ...Service Manual GREE ELECTRIC APPLIANCES INC OF ZHUHAI Change for Life Service Manual Models GDN40AU K3EBA1A GDN40AW K3EBA1A Refrigerant R410A ...

Page 2: ...ical Part 5 5 1 Wiring Diagram 5 5 2 PCB Printed Diagram 7 6 Function and Control 10 Part ė Maintenance 14 7 Notes Maintenance 14 8 Maintenance 16 9 Exploded View and Parts List 21 10 Removal Procedure 27 Appendix 43 Appendix 1 Reference Sheet of Celsius and Fahrenheit 43 Appendix 2 Resistance Table of Temperature Sensor 44 Appendix 3 Resistance Value Table of Humidity Sensor 47 ...

Page 3: ...1 Technical Information Service Manual GDN40AU K3EBA1A GDN40AW K3EBA1A 1 Summary Part Ė Technical Information ...

Page 4: ... mm 390X628X286 396X625X286 Dimension of Carton Box LXWXH mm 348X461X655 448X338X638 Dimension of Package LXWXH mm 351X464X670 451X341X653 Application Area m2 48 48 Net Weight kg 22 23 Gross Weight kg 23 5 24 5 Refrigerant R410A R410A Refrigerant Charge kg 0 31 0 31 Bucket Capacity L 6 5 7 6 5 7 Control Type Electronic Electronic Evaporator Evaporator Form Aluminum Fin copper Tube Aluminum Fin cop...

Page 5: ...3 Technical Information Service Manual 3 Outline Dimension Diagram Unit mm Unit mm GDN40AU K3EBA1A GDN40AW K3EBA1A ...

Page 6: ...orator and condenser in turn and then be discharged due to centrifugal blade When the air is passing through evaporator refrigerant will absorb the heat in air to let its temperature decrease to the temperature point of dew water vapor in air will condensate Condensate water comes into water tank through water tray or is discharged directly through drainage hose The saturated low temperature air p...

Page 7: ...umper cap YE Yellow BN Brown COMP Compressor RD Red BU Blue Grounding wire YEGN Yellow Green BK Black VT Violet OG Orange 6 5 0 8 8 1 8 1 12 20 6 203 57 48 9 3 1 1 3 1 80 7 1 6 1625 7 03 6 1625 78 1 02725 6 7 67 1 0 1 3 0 1 3 203 1 203 5 1 3 32 5 1 1 1 8 1 02725 67 33 1 1 5 5 1 Wiring Diagram Ɣ QVWUXFWLRQ GDN40AU K3EBA1A 63610000380 ...

Page 8: ... 203 57 48 9 3 1 1 3 1 80 7 1 6 1625 7 03 6 1625 78 1 02725 6 7 67 1 0 1 3 0 1 3 203 1 203 5 1 3 32 5 1 1 1 8 1 02725 67 33 1 1 5 GDN40AW K3EBA1A These wiring diagrams are subject to change without notice please refer to the one supplied with the unit 63610000330 ...

Page 9: ...ed Diagram Ɣ Top view Ɣ Bottom view No Name 1 Fuse 2 Interface of display board 3 Compressor interface without overcurrent 4 Compressor interface withovercurrent 5 Current mutual inductor 6 Fan interface 7 Connect neutral wire 8 Piezoresistor 9 Drive relay of compressor 10 High frequency transformer ...

Page 10: ...ttom view No Name 1 Interface of main board 2 Interface of stepping motor 3 Interface of temperature sensor 4 Reserved interface of discharge temperature sensor 5 Nixie tube 6 Interface of inspection board for temperature and environment 7 Water level inspection port GDN40AU K3EBA1A GDN40AU K3EBA1A ...

Page 11: ...Bottom view GDN40AW K3EBA1A GDN40AW K3EBA1A No Name 1 Boards connection interface for connection board 2 Interface of stepping motor 3 Interface of tube temperature sensor 4 Nixie tube 5 Interface of temperature and humidity sensor 6 Water level inspection interface ...

Page 12: ...or will be on 3 Humidity Button Press Humidity button to set your required humidity If hold Humiditybutton humidity can be set in 10 increment among 30 80 circularly After that the set humidity will be displayed for 5s 4 Mode Button Press Mode button can set 3 kinds of dehumidify mode Smart Cont and Dry Ɣ I VPDUW LQGLFDWRU LV RQ LW LQGLFDWHV WKH XQLW HQWHUV LQWR VPDUW PRGH 7KH XQLW ZLOO LQWHOOLJHQ...

Page 13: ... among 30 80 circularly After that the set humidity will be displayed for 5s 5 Mode Button Press Mode button can set 4 kinds of dehumidify mode Smart Cont Quiet and Dry If smart indicator is on it indicates the unit enters into smart mode The unit will intelligently select the comfortable humidity for human according to current temperature If cont indicator is on it indicates the unit enter into c...

Page 14: ...re point the unit will operate as below Set humidity is 50 which can t be adjusted The complete unit operates according to below mode D KHQ VHW KXPLGLW DPELHQW KXPLGLW FRPSUHVVRU VWDUWV RSHUDWLRQ DQG WKHQ IDQ RSHUDWHV DW KLJK IDQ VSHHG E KHQ VHW KXPLGLW DPELHQW KXPLGW FRPSUHVVRU VWRSV RSHUDWLRQ 7KH IDQ ZLOO RSHUDWH DW KLJK IDQ VSHHG IRU 3mins and then stop operation F PELHQW KXPLGLW VHW KXPLGLW DP...

Page 15: ...smart continuous quiet clothes drying Speed indicator display current fan speed high medium low fan speed won t be displayed under quiet or clothes drying mode Timer indicator this indicator is ON when timer function is set this indicator is OFF when there s no timer setting LOWHU FOHDQ LQGLFDWRU WKLV LQGLFDWRU ZLOO EH RQ ZKHQ WKH IDQ KDV RSHUDWHG IRU K DFFXPXODWLYHO KHQ SUHVV OWHU FRPELQH EXWWRQ ...

Page 16: ...ough please get the specialized power cord or con nection wire from the manufacture or distributor Prohibit prolong the wire by yourself 5HSODFH WKH IXVH ZLWK D QHZ RQH RI WKH VDPH VSHFL FD tion if it is burnt down don t replace it with a cooper wire or conducting wire 8 Use the power supply with same voltage and frequen cy as shown in rating label 9 Do not pull out the power plug when the unit is...

Page 17: ...anual Main Tools for Maintenance 5 Vacuum pump 7 Universal meter 4 Electronic leakage detector 1 Electroprobe 2 Screw driver 6 Pressure meter 8 Soldering appliance refrigerant container 3 Open end wrench inner hexagon spanner ...

Page 18: ... F2 1 The wiring terminal between evaporator temperature sensor and main board is loosened or poorly contacted 2 There s short circuit due to the trip over of the parts on controller 3 Evaporator temperature sensor is damaged Please check it by referring to the resistance table for temperature sensor 4 Main board is broken 3 Malfunction of humidity sensor L1 1 Humidity sensor is short circuit 2 Hu...

Page 19: ...d no no no no yes yes Malfunction is removed no yes yes no Is the wiring terminal between temperature sensor and the controller loosened or poorly contacted Is there short circuit due to trip over of the par ts Is the temperature sensor normal according to the Resistance Table Replace it with a temperature sensor of the same model 1 Malfunction of temperature sensor F1 F2 8 2 Malfunction Detection...

Page 20: ...es yes no no no no no no End check the connection Is malfunction eliminated Is malfunction Is malfunction eliminated eliminated Replace the display board with the same model Replace the humidity sensor board Is the humidity sensor normal according to the Resistance Table Eliminate short circuit phenomenon The foot of humidity sensor is short circuit or the display board is short circuit ...

Page 21: ...DQ WKH OWHU Placing position of water tank is improper Check whether there re obstacles around the GHKXPLGL HU EORFNHG WKH DLU RXWOHW Make sure there re no obstacles around the GHKXPLGL HUV Refrigerant is leaking Air outlet temperature is lower than normal temperature during dehumidifying period Find out the cause of leakage and solve the problem charge refrigerant Malfunction of capillary Air out...

Page 22: ...nage channel Possible causes Discriminating method GHKXPLGL HU VWDWXV Troubleshooting Wrong wire connection or poor connection Check the wiring status according to circuit diagram Connect wires according to wiring diagram to make sure all wiring terminals are connected UPO Compressor relay on the mainboard is broken or the compressor needle stand is loosened Check if the relay is sucked in cooling...

Page 23: ...21 Maintenance Service Manual 9 Exploded View and Parts List GDN40AU K3EBA1A The component picture is only for reference please refer to the actual product ...

Page 24: ...dity Sensor 20126511 1 24 Detecting Plate 30110104 1 25 Cover Plate 22436074 1 26 Centrifugal Fan 10316074 1 27 Fan Motor 15016072 1 28 Propeller Housing 22206559 1 29 Rear Cover Assy 22206572 1 30 Rear Cover 22206567 1 31 Cover of drainage hole 22246533 1 32 Water Tank Assy 20186566 1 33 Float meter sub Assy 2611652605 1 34 Water Tank 20186565 1 35 Water Tank Cover 22246534 1 36 Tieline of Power ...

Page 25: ...ice Manual 55 Capacitor CBB61S 3301074702 1 56 Capacitor CBB65 33000081 1 57 Capacitor Clamp 02141381 1 58 Main Board 30131489 1 59 Electric Box Cover Sub Assy 00001300016 1 Above data is subject to change without notice ...

Page 26: ...24 Maintenance Service Manual GDN40AW K3EBA1A The component picture is only for reference please refer to the actual product ...

Page 27: ... 23 Crank 10582070 1 24 Stepping Motor 1521200601 1 25 Centrifugal Fan 10316074 1 26 Fan Motor 15016072 1 27 Propeller Housing 22206559 1 28 Rear Cover Assy 22206557 1 29 Rear Case 22206560 1 30 Cover of drainage hole 22246533 1 31 Water Tank Assy 20186566 1 32 Float meter Sub Assy 2611652605 1 33 Water Tank 20186565 1 34 Water Tank Cover 22246534 1 35 Tieline of Power Cord 71020001 1 36 Water Tra...

Page 28: ...26 Maintenance Service Manual Above data is subject to change without notice 56 Capacitor CBB65 33000081 1 57 Capacitor CBB61S 3301074702 1 58 Electric Box Cover Sub Assy 00001300016 1 ...

Page 29: ...utwards to let it separate from 4 clasps atboth side and 2 grooves at the bottom and then remove the filter sub assy Hold the holding position at both sides of water tank with both hands to pull it outwards and then remove the water tank holding position water tank clasps of panel handgrips clasps grooves filter sub assy 10 Removal Procedure Warning disconnect power supply before removal discharge...

Page 30: ...sides of rear cover pull it outwards and then remove the rear cover Remove 2 screws on electric box cover and then remove the electric box cover Remove 4 screws on lower sealing plate lift it upwards to let it separate from upper 3 clasps and then remove the lower sealing plate clasps screw screw screw lower sealing plate rear case electric box cover Step Procedure ...

Page 31: ...er tray pull out all wires connecting electric parts inside the electric box and then remove the electric box Remove 2 screws at the front of the front case 2 screws at both sides and 6 screws at the back side to let connection wires of discharge temperature sensor and display board separate from all groves Hold both sides of front case to pull it outwards and then remove the front case display pa...

Page 32: ...s fixing condenser and evaporator lift up the air duct and then remove itDŽ Remove 4 screws fixed on the propeller housing at the back of the cover plate and then remove the cover plate Remove 1 screw fixing grille hold both Side of grille and then pull it outwards to Remove it screw screw screw grille air duct cover plate Step Procedure ...

Page 33: ...hen remove the motor Remove 1 screw fixing the damper plate and then remove the damper plate Remove nut and 2 gasket fixing the blade at the motor shaft terminal take out the blade along the motor shaft and then remove the blade sub assy nut gasket centrifugal blade gasket screw screw motor propeller housing damper plate Step Procedure ...

Page 34: ...a b weld spot condenser and evaporator screw screw support rod clasp water tray sub assy Unsolder the spot weld between suction pipe discharge pipe and evaporator condenser and remove suction pipe and discharge pipe Unsolder the spot weld between capillary sub assy and condenser evaporator and then remove capillary sub assy Note 1 Before unsoldering the spot weld please confirm the refrigerant is ...

Page 35: ...et and discharge outlet of compressor and the remove suction pipe sub assy and discharge pipe sub assy Remove one screw on the damper plate and then remove the damper plate Remove one screw fixing the liquid level switch Loose 4 clasos connecting the water tray and then remove the liquid level switch sub assy clasp screw screw liquid level switch sub assy suction pipe sub assy discharge pipe sub a...

Page 36: ...l 22 Remove compressor and its fittings 23 Remove castor Pull out 4 castors to remove them Remove 2 nuts fixing the compressor lift up the compressor and then remove the compressor nut compressor castor chassis Step Procedure Step ...

Page 37: ...two handgrips on filter sub assy to pull it outwards to let it separate from 5 clasps at both side and 5 grooves at the bottom and then remove the filter sub assy Hold the holding position at both sides of water tank with both hands to pull it outwards and then remove the water tank holding position water tank clasps of panel groove clasps groove filter sub assy handgrip Step Procedure GDN40AW K3E...

Page 38: ... and 4 screws at both sides hold both sides of rear cover pull it outwards and then remove the rear cover Remove the horizontal louver from left to right direction DŽ Remove 4 screws on lower sealing plate lift it upwards to let it separate from upper 3 clasps and then remove the lower sealing plate horizontal louver screw screw lower sealing plate rear case Step Procedure ...

Page 39: ...ature sensor and display board separate from all groves Hold both sides of front case to pull it to the front and then remove the front case Remove 2 screws at the front of the front case pull out 6 screws connecting with support rack sub assy and remove top plate and decorative ring Let the top plate separate from 9 clasps on decorative ring and then separate the top plate from the decorative rin...

Page 40: ... connecting all electric parts inside the electric box and then remove the electric box Remove 2 screws fixing the water tray and 3 screws fixing condenser and evaporator lift up the air duct and then remove it Remove 2 screws at both sides of display board pull out clasps at both sides and then remove the display board clasp screw screw screw electric box air duct Step Procedure ...

Page 41: ...e the guide loop Remove nut and 2 gaskets fixing the Blade at the motor shaft terminal take out the blade along the motor shaft and then remove the blade sub assy Remove one screw fixing the propeller housing pull the grille backwards to let It separate from 2 grooves and then remove the grille grille of panel screw groove screw ⴆᶯ nut gasket centrifugal blade washer Step Procedure ...
Page 42: ...ure Seal the discharge pipe outlet and suction pipe outlet with rubber cork or gummed paper to prevent sundries getting into it Unsolder the spot weld between suction pipe discharge pipe and evaporator condenser and remove suction pipe and discharge pipe Unsolder the spot weld between capillary sub assy and condenser evaporator and then remove capillary sub assy Remove 3 screws fixing the motor an...

Page 43: ... sub assy Unsolder suction pipe and discharge pipe from the welding position of suction outlet and discharge outlet of compressor and the remove suction pipe sub assy and discharge pipe sub assy Remove one screw connecting water tray and chassis loose 5 clasps connecting the chassis and then remove the water tray screw clasp water tray sub assy clasp liquid switch sub assy suction pipe sub assy di...

Page 44: ...fittings Remove 3 nuts fixing the compressor lift up the compressor and then remove the compressor Remove one screw on the damper plate and then remove the damper plate 24 Remove castor Pull out 4 castors to remove them screw damper plate nut compressor castor chassis Step Procedure ...
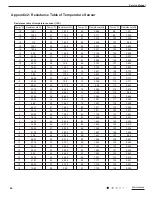
Page 45: ...8 16 84 85 84 2 29 39 40 39 2 4 63 62 6 17 86 87 86 30 41 42 41 5 64 65 64 4 18 88 89 87 8 31 43 44 42 8 6 66 67 66 2 19 90 89 6 32 45 44 6 7 68 69 68 20 91 92 91 4 33 46 47 46 4 8 70 71 69 8 21 93 94 93 2 34 48 49 48 2 9 72 71 6 22 95 96 95 35 50 51 50 10 73 74 73 4 23 97 98 96 8 36 52 53 51 8 11 75 76 75 2 24 99 98 6 37 54 53 6 12 77 78 77 25 Fahrenheit display temperature Fahrenheit Celsius ć F...

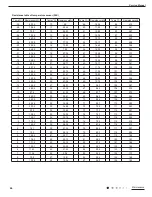
Page 46: ...11 0 737 5 63 46 34 10 2 73 2 358 112 0 717 4 60 23 35 9 779 74 2 28 113 0 697 3 57 18 36 9 382 75 2 206 114 0 678 2 54 31 37 9 003 76 2 133 115 0 66 1 51 59 38 8 642 77 2 064 116 0 642 0 49 02 39 8 297 78 1 997 117 0 625 1 46 6 40 7 967 79 1 933 118 0 608 2 44 31 41 7 653 80 1 871 119 0 592 3 42 14 42 7 352 81 1 811 120 0 577 4 40 09 43 7 065 82 1 754 121 0 561 5 38 15 44 6 791 83 1 699 122 0 547...

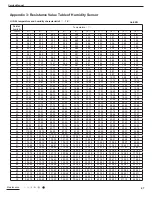
Page 47: ... 73 3 144 112 0 956 4 80 31 35 13 04 74 3 04 113 0 93 3 76 24 36 12 51 75 2 94 114 0 904 2 72 41 37 12 76 2 844 115 0 88 1 68 79 38 11 52 77 2 752 116 0 856 0 65 37 39 11 06 78 2 663 117 0 833 1 62 13 40 10 62 79 2 577 118 0 811 2 59 08 41 10 2 80 2 495 119 0 77 3 56 19 42 9 803 81 2 415 120 0 769 4 53 46 43 9 42 82 2 339 121 0 746 5 50 87 44 9 054 83 2 265 122 0 729 6 48 42 45 8 705 84 2 194 123 ...

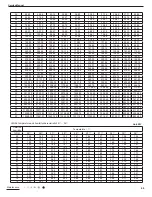
Page 48: ...2 15 362 9 24 51 41 63 10 93 102 3 13 14 342 8 25 49 19 64 10 54 103 3 04 13 323 9 26 47 08 65 10 18 104 2 96 12 306 2 27 45 07 66 9 83 105 2 87 11 289 6 28 43 16 67 9 49 106 2 79 10 274 29 41 34 68 9 17 107 2 72 9 259 3 30 39 61 69 8 85 108 2 64 8 245 6 31 37 96 70 8 56 109 2 57 7 232 6 32 36 38 71 8 27 110 2 50 6 220 5 33 34 88 72 7 99 111 2 43 5 209 34 33 45 73 7 73 112 2 37 4 198 3 35 32 09 74...

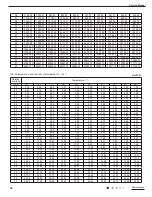
Page 49: ...42 22 65 64 48 75 44 81 41 48 38 59 36 05 33 77 31 24 28 93 26 80 24 83 63 53 64 49 31 45 65 42 48 39 68 37 17 34 34 31 74 29 36 27 15 62 59 14 54 36 50 32 46 82 43 73 40 97 37 83 34 96 32 32 29 87 61 65 31 60 02 55 55 51 68 48 26 45 20 41 70 38 51 35 58 32 86 60 72 27 66 40 61 43 57 13 53 33 49 94 46 07 42 53 39 28 36 27 59 80 13 73 58 68 04 63 25 59 01 55 23 50 94 47 03 43 43 40 10 58 88 92 81 6...

Page 50: ... 17 73 16 55 15 42 14 34 61 30 33 28 17 26 14 24 23 22 42 20 71 19 37 18 10 16 88 15 72 60 33 47 31 05 28 78 26 64 24 62 22 70 21 24 19 84 18 50 17 23 59 37 00 34 31 31 77 29 39 27 13 24 99 23 37 21 83 20 36 18 95 58 41 00 38 00 35 18 32 52 30 00 27 61 25 82 24 11 22 47 20 90 57 45 30 41 99 38 88 35 95 33 18 30 54 28 59 26 72 24 94 23 24 38 1128 50 1033 61 953 39 883 90 822 61 767 78 704 83 647 37...

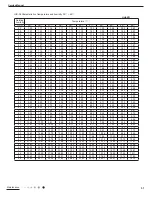
Page 51: ...1058 15 942 75 863 43 787 81 715 55 646 36 30 1906 00 1731 91 1568 38 1414 20 1268 36 1130 00 1034 60 943 64 856 73 773 51 29 2300 00 2089 81 1892 37 1706 22 1530 13 1363 08 1244 55 1131 54 1023 56 920 17 28 2810 00 2550 31 2306 37 2076 38 1858 82 1652 43 1505 84 1366 07 1232 52 1104 65 27 3470 00 3144 23 2838 22 2549 70 2276 79 2017 87 1836 86 1664 27 1499 35 1341 45 26 4290 00 3885 50 3505 53 31...

Page 52: ... 13 68 48 63 03 57 78 52 70 49 02 45 46 42 00 38 65 44 89 00 82 54 76 32 70 33 64 54 58 96 54 75 50 69 46 74 42 92 43 101 00 93 48 86 25 79 28 72 55 66 06 61 28 56 65 52 17 47 82 42 115 00 106 23 97 79 89 66 81 81 74 23 68 69 63 33 58 14 53 10 41 131 00 120 81 111 01 101 56 92 44 83 64 77 33 71 23 65 31 59 57 40 149 90 138 01 126 56 115 53 104 88 94 60 87 37 80 37 73 58 66 99 39 170 00 156 52 143 ...

Page 53: ... 37 3 20 3 07 2 94 2 82 2 70 2 58 68 4 40 4 19 3 99 3 79 3 60 3 41 3 27 3 13 2 99 2 86 2 73 67 4 71 4 49 4 27 4 06 3 85 3 65 3 49 3 34 3 19 3 05 2 90 66 5 08 4 83 4 59 4 36 4 13 3 91 3 74 3 57 3 41 3 25 3 09 65 5 45 5 19 4 93 4 68 4 44 4 20 4 01 3 83 3 65 3 47 3 30 64 5 88 5 59 5 31 5 04 4 78 4 52 4 31 4 11 3 91 3 72 3 53 63 6 31 6 00 5 70 5 41 5 13 4 85 4 63 4 41 4 20 4 00 3 80 62 6 84 6 50 6 17 ...

Page 54: ...148 50 135 08 122 00 114 10 106 40 98 87 91 52 84 34 31 227 00 209 28 192 04 175 27 158 93 143 00 133 62 124 46 115 52 106 79 98 25 30 268 00 247 75 228 05 208 88 190 20 172 00 160 04 148 37 136 97 125 83 114 95 29 315 00 291 16 267 97 245 41 223 43 202 00 187 96 174 26 160 88 147 81 135 03 28 372 00 342 25 313 32 285 16 257 73 231 00 215 94 201 25 186 90 172 88 159 17 27 441 00 404 50 369 01 334 ...

Page 55: ...Qianshan Zhuhai Guangdong China 519070 Tel 86 756 8522218 Fax 86 756 8669426 E mail gree gree com cn Http www gree com Add West Jinji Rd Qianshan Zhuhai Guangdong China 519070 Tel 86 756 8522218 Fax 86 756 8669426 E mail gree gree com cn Http www gree com HONG KONG GREE ELECTRIC APPLIANCES SALES LIMITED GREE ELECTRIC APPLIANCES INC OF ZHUHAI ...

Reviews: