background image

GMV5 HR Heat Recovery Cooling and Heating Mode Exchanger


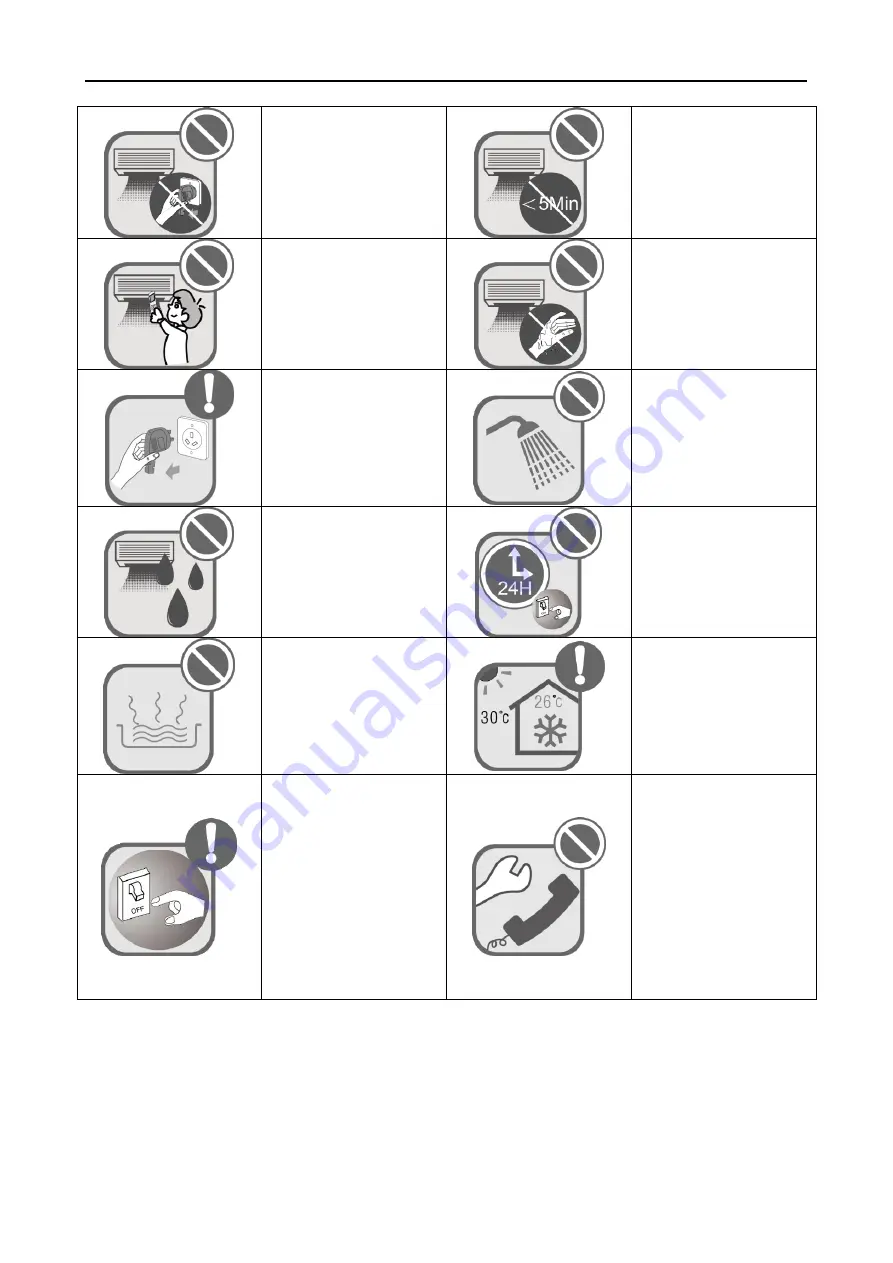
Do not operate or stop the 
unit by inserting or pulling 
out the power plug.


Do not turn off the unit until 
it runs for at least 5 minutes. 
Otherwise, oil return of the 
compressor will be affected.


Children are not allowed to 
operate the air conditioner.


Do not operate the air 
conditioner with wet hands.


Please  turn  off  and  unplug 
your  air  conditioner  before 
cleaning. Otherwise, electric 
shock  or  personal  injury 
may occur.


Do  not  spray  water  on  the 
air  conditioner  or  clean  it 
with 

water, 

otherwise 

malfunction 

or 

electric 

shock may occur.


Do  not  expose  the  air 
conditioner  directly  under 
damp 

or 

corrosive 

surroundings.


Connect  power  8  hours 
before  operation.  Do  not 
disconnect power when you 
want  to  stop  the  unit  in  a 
short  period  of  time,  e.g.  in 
one  night.  (This  is  for 
protecting the compressor.)


Volatile liquid like thinner or 
gasoline will damage the 
appearance of air 
conditioner. (Please use 
soft dry cloth and wet cloth 
with mild detergent to clean 
unit’s outer case.)


Under cool mode, do not set 
the  indoor  temperature  too 
low.  Keep  the  difference 
between  indoor  temp  and 
outdoor temp within 5

.


If abnormal condition occurs 
(e.g. unpleasant smell), 
please turn off the unit at 
once and disconnect power 
supply. Then contact Gree 
authorized service center. If 
the air conditioner continues 
to operate despite of 
abnormal condition, it may 
be damaged and cause 
electric shock or fire 
hazard.)


Do not repair the air 
conditioner by yourself. 
Improper repair will cause 
electric shock or fire hazard. 
Please contact Gree 
authorized service center 
and ask professional 
personnel to repair it.


Gree  Electric  Appliances,  Inc.  of  Zhuhai  will  not  assume  responsibility  for  any  personal  injury  or 

property  loss  caused  by  improper  installation,  improper  test  running,  and  unnecessary  repair  or  not 

following the instructions of this manual.


Summary of Contents for NCHS1B

Page 1: ... the Owner s Manual please contact the local agent or visit www gree com or send email to global gree com cn or electronic version GREE reserves the right to interpret this manual which will be subject to any change due to product improvement without further notice GREE Electric Appliances Inc of Zhuhai reserves the final right to interpret this manual GMV5 HR Heat Recovery Cooling and Heating Mod...

Page 2: ...r reference Manufacturer reserves the right for changes in terms of sales or production at any time and without prior notice 8 Under the standby status the unit will consume a little power for ensuring reliability of the complete unit maintaining normal communication and preheating refrigerant When the unit won t be used for a long time please cut off the power of the complete unit However please ...

Page 3: ...alignment 13 4 2 Pipe Connection 14 4 2 1 Precautions for the Installation of Connection Pipe 14 4 2 2 Selection of Y type branch 15 4 2 3 Thermal insulation for pipeline 16 4 2 4 Support and protection of pipeline 16 4 3 Installation and Test for Drainage Hose 19 4 3 1 Precaustions for the Installation of Drainage Hose 19 4 3 2 Installation of Drainage Hose 19 4 3 3 Drainage System Test 21 5 Cabl...

Page 4: ... Otherwise it may result in water leakage electric shock or fire hazard R410A refrigerant can produce poisonous gas once it meets fire so please ventilate the room immediately if refrigerant leaks out during installation Diameter of power cord must be large enough Damaged power cord or connecting wire must be replaced by specialized electric cable After the power cord is connected please install t...

Page 5: ...g the compressor Volatile liquid like thinner or gasoline will damage the appearance of air conditioner Please use soft dry cloth and wet cloth with mild detergent to clean unit s outer case Under cool mode do not set the indoor temperature too low Keep the difference between indoor temp and outdoor temp within 5 If abnormal condition occurs e g unpleasant smell please turn off the unit at once an...

Page 6: ... Mode Exchanger 3 2 Product Introduction 2 1 Names of Main Parts One to one Cooling and Heating Mode Exchanger One to more Cooling and Heating Mode Exchanger No Name Connection pipe of outdoor unit Drainage pipe Connection pipe of indoor unit ...

Page 7: ... 8 Max total capacity of connecting indoor unit for each branch kW 14 14 14 Total capacity of connecting indoor unit for mode convertor kW 14 45 68 Size of high pressure gas pipe mode convertor connects outdoor unit mm 16 22 22 Size of low pressure gas pipe mode convertor connects outdoor unit mm 22 28 28 Size of liquid pipe mode convertor connects outdoor unit mm 9 52 12 16 Size of liquid pipe mo...

Page 8: ...ing The packed attachments should be subject to actual objects If there are any alterations there will be no further notice 3 2 Installation Site 1 Make sure the hanging parts can hold the weight of unit 2 Water can be drained out from the drainage hose conveniently 3 No obstacles at outlet and inlets Keep the air ventilation in good condition 4 for indoor unit as shown in below fig and the space ...

Page 9: ...alled and debugged by professional installer The unit can be put through power only after all installation work is finished 3 3 Selection Requirement for Communication Wire Caution If the unit is installed at the place where there s strong electromagnetic interference the communication wire between indoor unit and wired controller must adopt shield wire and the communication wire between indoor un...

Page 10: ...sheathed cord 60227 IEC 52 60227 IEC 53 L 1000 2 0 75 IEC 60227 5 2007 1 if the wire diameter is enlarged to 2 1mm2 the total communication length can reach 1500m 2 The cord shall be circular cord the cores shall be twisted together Communication wire can be longer if wire diameter is 2 1mm2 But the total length cannot exceed 1500m 3 If unit is installed in places with intense magnetic field or st...

Page 11: ...s based on the working condition where ambient temperature is 40 and multi core copper cable working temperature is 90 e g power cable with YJV cross linked copper insulated PE and PVC sheath is lying on the surface of slot If working condition changes please adjust the specification according to national standard Specification of circuit breaker is based on the working condition where ambient tem...

Page 12: ...d be reserved at the electric box side of unit for maintenance The position of maintenance port should be lower than the lower size of unit The mode exchanger shall be installed near the maintenance port or air return of indoor unit Note if it is installed near the air return please make sure not to affect air return and maintenance The following pictures detailedly describe the installation of ma...

Page 13: ... Recovery Cooling and Heating Mode Exchanger 10 Fig 4 1 3 Due to the structure of installation space the mode exchanger needs a maintenance port Please reserve another maintenance port for mode exchanger Fig 4 1 4 ...

Page 14: ...Recovery Cooling and Heating Mode Exchanger 11 Unit outline dimension NCHS1B outline and installation dimension Fig 4 1 5 NCHS4B outline and installation dimension Fig 4 1 6 NCHS8B outline and installation dimension ...

Page 15: ...postion basing on the installation template As shown in fig 4 1 8 Please refer to the diameter of expansion bolt for the diameter of hole with depth of 60 70mm As shown in fig 4 1 9 Fig 4 1 8 Fig 4 1 9 2 Insert M10 expansion bolt into hole and then set the iron nail into bolt As shown in fig 4 1 10 Caution The length of bolt should be selection according to the height of room Bolt should be purcha...

Page 16: ... bracket 4 1 4 Horizontal alignment When indoor unit is intalled please perform horizontal inspection for the complete unit The front side and back side of the unit must be places horozntally The left side and right side of the unit should along water drainage direction with 1 gradient See fig 4 1 12 Fig 4 1 12 Cautions for Installation 1 The mode exchanger must be installed by using hanger rod Du...

Page 17: ...lding Please strictly follow the requirements for welding process Rosin joints weak joints or pin holes are not allowed 3 When laying the pipe be careful not to distort it Radius of bending parts must be over 200mm Please do not bend or stretch the pipes frequently otherwise the pipes will become hard A pipe shall not be bent or stretched for more than 3 times at the same position 4 Please use mom...

Page 18: ... will lead to leakage 4 2 2 Selection of Y type branch If connect outdoor unit to multiple mode exchanger the Y type branch should be adopted 1 Y type branch Fig 4 2 2 2 Y type branch has several pipe sections with different size which facilitates to match with various copper pipes Use pipe cutter to cut in the middle of the pipe section that is of proper size and remove burrs as well See the foll...

Page 19: ...r 120 or above For cooling only unit both liquid pipe and gas pipe should bear 70 or above Example Polyethylene foam bear 120 or above foaming polyethylene bear 100 or above 3 Joints of indoor and outdoor unit should be wrapped with insulating material and leave no gap to surfaces of indoor unit and outdoor unit See Fig 4 2 4 Fig 4 2 4 4 Thermal insulating material of branches should be the same a...

Page 20: ...ion 4 2 5 Connection of indoor unit 4 2 5 1 Connection for single indoor unit with capacity of less than 14kw Each branch is to connect to a set of indoor units with the same mode For the branch does not connect to indoor unit make sure that the welding is reliable without leaking of refrigerant ...

Page 21: ...o otherwise connect Note that after the connection manually set the SA2 dial code of corresponding mainboard and dial the code in the first place to number end Connecting method is as shown in the picture 4 2 5 3 Branch selection of indoor unit of mode exchanger C1 R410A refrigerant system capacity of downsteam indoor units X kW Model Y type branch 14 0 X 28 0 FQ01B A 4 2 5 4 Piping size between m...

Page 22: ...inage pipeline Insert the end part of PVC pipe into the drainage hole and then tighten it with drainage hose and tieline Do not use adhesive glue to connect drainage hole and drainage hose When the pipeline is used for multiple units the position for the commoon pipelie should be lower than the drain outlet of every unit 100m In this case thick pipes should be adopted Fig 4 3 1 Fig 4 3 2 4 3 2 Ins...

Page 23: ...g 4 3 5 Install the U trap as shown in fig 4 3 6 One U trap should be installed for every unit Convenient clean should be considered when installing U trap Fig 4 3 6 Horizontal pipe can t be connected to the vertical pipe at the same horizontal height Please see below fig for the connection method NO1 Three way connection of drainage hose joint as shown in fig 4 3 7 NO2 Downelbow connection as sho...

Page 24: ... 1500mm Fig 4 3 11 4 3 3 Drainage System Test Models without water pump Fill the water tray of indoor unit with some water The method is as below 1 Connect the drainage hose to the other drainage connection pipe of water tray of indoor unit and then use plastic bottle and other containers to inject 1L water see fig 4 3 12 After test is finished move the temporary driange hose and then stuff the ch...

Page 25: ...d or L or N and the fix the earthing wire tightly After that install the electric box cover After putting through the power for about 60s indoor uit will alarm CO communication malfunction Meanwhile the water pump will operate automatically for 10min and then stop operation When drainage system test is finished please cut off the power and remove the power cord and then install the electric box co...

Page 26: ...ance with national wiring regulation If the supply cord is damaged it must be replaced by the manufacturer or its service agent or a similarly qualified person in order to avoid a hazard 5 1 Connection of Cable and Terminal of Wiring Board Connect single wire as shown in fig 5 1 1 1 Peel the insulation layer at the end of the single wire about 25mm with wire stripper to expose the single core wire...

Page 27: ...de Exchanger 24 5 2 Connect Power Cord Caution The mode exchanger in the same system must be supplied power uniformly Fig 5 2 Remark The maximum quantity n of indoor unit is decided by the capacity of indoor unit please refer to capacity of unit ...

Page 28: ...D D1 D2 of outdoor unit of mode exchanger 4 Connect communication wire lead from D1and D2 terminal of 4 bit wiring board of indoor unit to wiring board ID1 1D1 1D2 of indoor unit of mode exchanger ID2 2D1 2D2 ID n nD1 nD2 n 8 As shown in fig 5 3 1 Fig 5 3 1 Fig 5 3 2 5 Fix the communication wire with wire fixing clamp 6 In order to ensure the reliability of communication between indoor unit and ou...

Page 29: ...ove to clean the surface of air conditioner Otherwise it may cause discolor or deformation Do not dry the filte on fire Otherwise the filter may catch fire or be deformed Volatile liquid such as thinner or gasoline may damage the air conditioner Only use soft dry cloth or wet cloth dipped with neutral detergent to clean the filter of air conditioner If there s abnormal phenomenon please contact af...

Page 30: ...erate but it will stop operate after for a while There s obstable in front of condenser Control loop is abnormal Turn on the cooling mode when the outdoor ambinet temperature is more than 43 Cooling effect is bad Air filter is dirty or blocked There are heat source or too many people in the room Door or winder is open There re obstacles at air inlet and air otulet Set temperature is too high or re...

Page 31: ...GREE ELECTRIC APPLIANCES INC OF ZHUHAI Add West Jinji Rd Qianshan Zhuhai Guangdong China 519070 Tel 86 756 8522218 Fax 86 756 8669426 E mail gree gree com cn www gree com ...

Reviews: