6
trap, which should be emptied every few weeks by undoing the cap, letting the water drain out and re-
attaching the cap.
5.
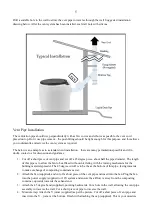
Attach a length of vent pipe to the house wall using pipe fasteners. Add additional vent pipes, joiners
and pipe fasteners (from your local plumbing store) as required. Cap with the (supplied) vent cowl. The
vent cowl should be 60 cm above the roof line. Congratulations, you are done!
There is also a 75mm joiner supplied, so the vent pipe can traverse the wall perpendicularly, allowing the
Scandi-Pod to be installed as close to the wall as possible. In this case the 45 degree angle and fan should
be situated as close to the outside wall as practicable. However please note that the fan is not waterproof
and a suitable position or covering needs to be selected.
2.
BEFORE USE
Before putting the system into use, line the bin with the Geotech bin liner and fill the composting chamber with
a 2 - 3 cm layer of peat. Also, after every emptying, remember to repeat this before use. Instead of the bin liners
you can also use 2 - 3 cm of pine bark chips. When emptying the container, rinse the inside and ensure the
drainage holes aren’t blocked.
3.
USE OF THE SCANDI POD
The Scandi Pod System can be used almost like any normal water toilet. Toilet paper can be thrown into the
toilet, as it composts together with the waste. However, any items containing plastic, e.g. sanitary towels should
be placed into a separate bin. A handful of covering material (peat, 1 cup) should be added after each bowel
movement.


