background image

FumeJet

®

 Fume Exhaust Fans

10

®

Belt Drive Maintenance

V-belt drives must be checked on a regular basis 
for wear, tension, alignment and dirt accumulation. 
Premature or frequent belt failures can be caused by 
improper belt tension (either too loose or too tight) 
or misaligned sheaves. Abnormally high belt tension 
or drive misalignment will cause excessive bearing 
loads and may result in failure of the fan and/or motor 
bearings. Conversely, loose belts will cause squealing 
on start-up, excessive belt flutter, slippage and 
overheated sheaves. Either excessively loose or tight 
belts may cause fan vibration.
When replacing V-belts on multiple groove drives all 
belts should be changed to provide uniform drive 
loading. Use a set of matched belts whenever possible. 
Do not pry belts on or off the sheave. Loosen belt 
tension until belts can be removed by simply lifting the 
belts off the sheaves. After replacing belts, ensure that 
slack in each belt is on the same side of the drive. Belt 
dressing should never be used.
Do not install new belts on worn sheaves. If the sheaves 
have grooves worn in them, they must be replaced 
before new belts are installed.
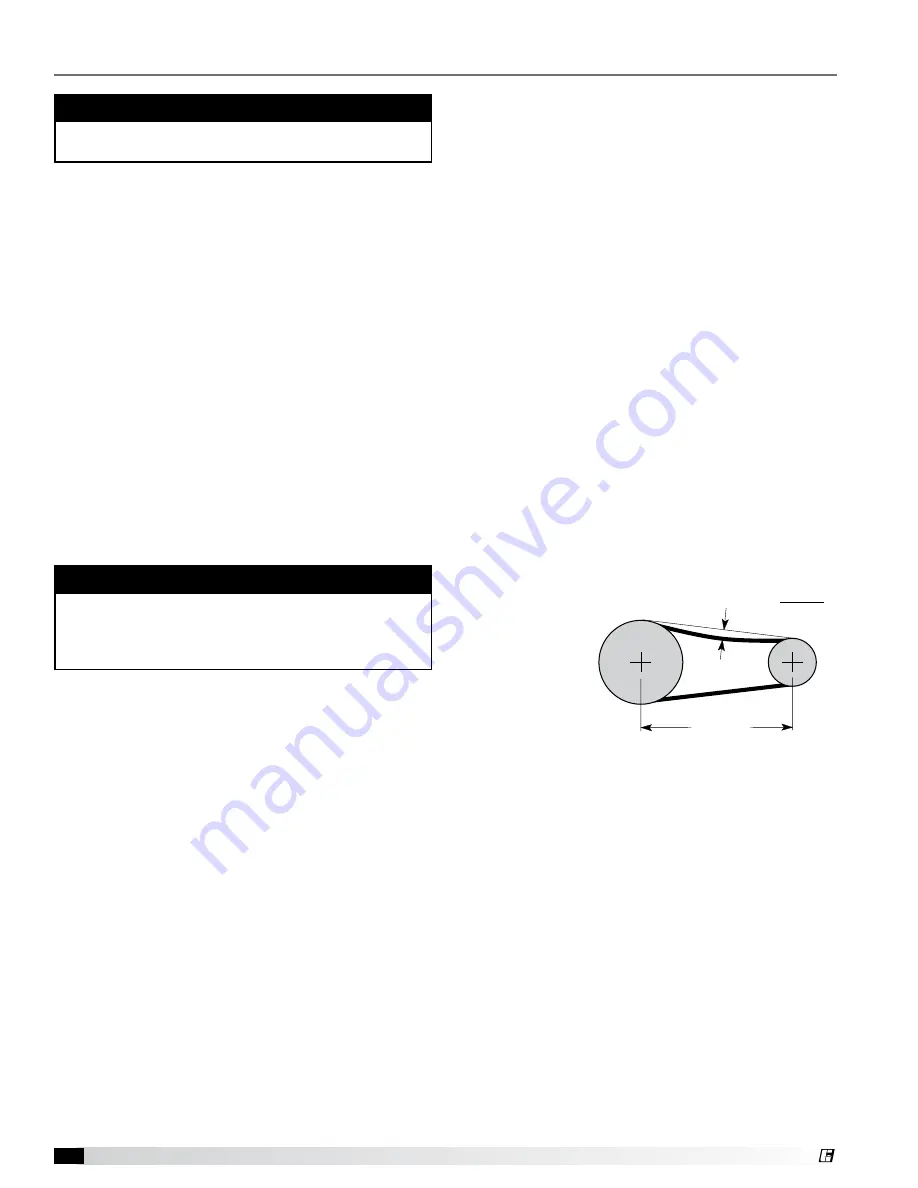
The proper tension for operating a V-belt drive is 
the lowest tension at which the belts will not slip at 
peak load conditions. Belts are adjusted by raising or 
lowering the motor 
pivot plate. For 
initial tensioning, 
the proper 
belt deflection 
halfway between 
sheave centers is 
1/64-inch for each 
inch of belt span. 

Check belt tension two times during the first 
24 hours of operation and periodically thereafter.

Belt Span

Deflection = Belt Span

64

Once the unit has been put into operation, a routine 
maintenance schedule should be set up to accomplish 
the following:
1.  Lubrication of bearings and motor.
2.  Wheel, housing, bolts and set screws on the entire 

fan should be checked for tightness.

3.  Any dirt accumulation on the wheel or in the housing 

should be removed to prevent unbalance and 
possible damage.

4. Inspect fan impeller and housing looking for fatigue, 

corrosion, or wear.

Fan Operation

All fans should be run every thirty (30) days, or at least 
“bumped” every thirty days. It is preferred that each 
fan is run as this causes all electrical and mechanical 
components to get up to temperature, displacing any 
formed condensation, redistributes load on bearings, 
and redistributes grease in the bearings (motor and 
shaft bearings).

IMPORTANT

When operating conditions of the fan are to be 
changed (speed, pressure, temperature, etc.), consult 
manufacturer to determine if the unit can operate 
safely at the new condition.

Motors

Motor maintenance is generally limited to cleaning 
and lubrication. Cleaning should be limited to exterior 
surfaces only. Removing dust and grease buildup on 
the motor housing assists proper motor cooling. Never 
wash-down motor with high pressure spray.
Greasing of motors is only intended when fittings are 
provided. Many fractional motors are permanently 
lubricated for life and require no further lubrication. 
Motors supplied with grease fittings should be 
greased in accordance with the manufacturer’s 
recommendations. When motor temperature does not 
exceed 104ºF 

(40ºC)

, the grease should be replaced 

after 2000 hours of running time.

Routine Maintenance and Operation

WARNING

Before taking any corrective action, make certain unit 
is not capable of operation during repairs. 

Summary of Contents for FumeJet FJ-M

Page 1: ...2 The rotation of the wheel is critical It must be free to rotate without striking or rubbing any stationary objects 3 Motor must be securely and adequately grounded 4 Do not spin fan wheel faster th...

Page 2: ...rage These suggestions are provided solely as a convenience to the user INDOOR The ideal environment for the storage of fans and accessories is indoors above grade in a low humidity atmosphere which i...

Page 3: ...ent goes into operation Prior to assembly and installation of the unit and system components inspect the fan assembly to make sure it is in working order 1 Check all fasteners set screws on the fan wh...

Page 4: ...n if all electrical power has been disconnected Before the initial start up or any restart check the following items to make sure that they are installed and secure Do not spin fan wheel faster than t...

Page 5: ...er has been disconnected Before the initial start up or any restart check the guards motor cover and weatherhood and check the access doors to ensure that they are installed and secure Ducted Outlet I...

Page 6: ...n appropriate sealant or tape Stack Installation NOTE Fans should never be lifted by the shaft motor motor cover or accessories Equipment Supports Model GESS equipment supports are designed for use on...

Page 7: ...sure H 2 H 2 H 1 25 inch 31 75mm minimum N FAN ON FAN OFF POSITIVE PRESSURE TRAP Connect this end to fan drain ERS DRAIN SUBMITTAL To avoid motor overheating and possible burnout motor load amperes sh...

Page 8: ...dial Gap and Alignment Efficient fan performance can be maintained by having the correct radial gap overlap and wheel alignment These items should be checked after the fan has been in operation for 24...

Page 9: ...wheel in the wrong direction This is especially true with 3 phase installations where the motor will run in either direction depending on how it has been wired To reverse rotation of a 3 phase motor...

Page 10: ...Deflection Belt Span 64 Once the unit has been put into operation a routine maintenance schedule should be set up to accomplish the following 1 Lubrication of bearings and motor 2 Wheel housing bolts...

Page 11: ...t Fasteners attaching the bearings to the drive frame should also be checked Wheel and Fastener Maintenance Wheels require very little attention when exhausting clean air however air heavily laden wit...

Page 12: ...dures for removal and installation 3 Before removing the bearing bolts make sure the shaft is supported slightly Remember to consider the wheel weight on the shaft 4 Remove both bearings from the shaf...

Page 13: ...Resize ductwork Clean filters coils Change fan speed High Motor Amp Draw Fan Check rotation of wheel Reduce fan speed Duct System Resize ductwork Check proper operation of isolation and bypass damper...

Page 14: ...________________________ ________________________________________________ ________________________________________________ Date________________ Time________________ AM PM Notes _______________________...

Page 15: ...________________________ ________________________________________________ ________________________________________________ Date________________ Time________________ AM PM Notes _______________________...

Page 16: ...________________________ ________________________________________________ ________________________________________________ ________________________________________________ Date________________ Time___...

Reviews: