background image

35

Maintenance Instructions:

Furnace

Combustion Blower Motor

Motor maintenance is generally limited to cleaning. Cleaning should be limited to exterior surfaces only.
Removing dust and grease build-up on the motor housing assures proper motor cooling. Use caution and do not
allow water or solvents to enter the motor or bearings. Under no circumstances should motors or bearings be
sprayed with steam, water or solvents.  The motor bearings are pre-lubricated and sealed, requiring no further
lubrication. 

Burners and Orifices

Before each heating season, examine the burners and gas orifices to make sure they are clear of any debris such
as spider webs, etc. Clean burner as follows:

• Turn off both electrical and gas supplies to the unit.
• Disconnect union between manifold and gas valve.
• Remove manifold and burner assembly.
• Inspect and clean orifices and burners as necessary. Avoid using any hard or sharp instruments which

could cause damage to the orifices or burners.

- Remove any soot deposits from the burner with a wire brush.
- Clean the ports with an aerosol degreaser or compressed air.
- Wipe the inside of the burner clean. Cleaning the burner with a degreaser will slow the future buildup

of dirt.

• Before reinstalling the burner assembly, look down the heat exchanger tubes to make sure they are 

clear of any debris.

• Reinstall manifold and burner assembly, reconnect wire leads, and gas supply piping.
• Turn on the electrical power and gas supply.
• Follow the start-up procedure (page 25) to light the burners and verify proper operation.

Heat Exchanger

The heat exchanger should be checked annually for cracks. If a crack is detected, the heat exchanger should be
replaced before the unit is put back into operation. Also, airflow across the heat exchanger should be checked to
make sure the blower is operating properly.

Flue Collector Box

The flue passageway and flue collector box should be inspected prior to each heating season and cleared of any
debris.

Electrical Wiring

The electrical wiring should be checked annually for loose connections or deterioration.

Replacement Parts

When ordering replacement parts, include the complete unit model number and serial number listed on the unit
rating plate.

CAUTION!!!

Turn off all gas and electrical power to the unit before
performing any maintenance or service operations to this unit.

Summary of Contents for IGX

Page 1: ...Unit is approved for installation downstream from refrigeration units In these conditions condensate could form in the duct furnace and provision must be made to dispose of the condensate WARNING Impr...

Page 2: ...tal and Downblast Discharge with Optional Mixing Box 5 Downblast Discharge Optional with Combination Extension 6 7 Venting for Indoor units 8 17 Control Center Layout 18 Start Up Electrical 19 Mixing...

Page 3: ...ed by others Figure 1 Step 3 Install Venting Ductwork The instructions for the indoor venting are listed on the following pages Refer to your unit submittal to determine the correct venting option ins...

Page 4: ...B The use of a duct adapter is recommended on a downblast arrangement to properly align the ductwork with the supply unit The duct adapter is only a guide and is not intended to be used as support for...

Page 5: ...equipment support s Installation Instructions for Roof Mounted with Optional Mixing Box Arrangements HZ and DB Step 5 Assemble and Attach Weatherhood The weatherhood can now be assembled and attached...

Page 6: ...e equipment support s to the roof remove metal cover flash to wooden nailer and reinstall cover Step 2 Install Combination Extension Install combination extension over curb use wood screws to lag in p...

Page 7: ...bar hooked to the factory lifting lugs as shown in the diagram to lift and center the unit on the curb equipment support s NOTE THE USE OF ALL LIFTING LUGS IS MANDATORY WHEN LIFTING UNIT Use self tapp...

Page 8: ...l clearance of 4 feet from electric meters gas meters regulators and relief equipment In Canada the minimum clearance is 6 feet 5 Local codes may supercede any of the above provisions 6 Be sure that t...

Page 9: ...s recommended at the flue outlet before any elbows 7 Avoid venting through unheated spaces if possible To minimize condensation insulate any vent runs greater than 5 feet that must pass through an unh...

Page 10: ...tion air from the outside The rule of thumb is that an opening of one square inch should be provided for every 1000 BTU per hour of input rating Vent Construction To vent using this method the vent te...

Page 11: ...tical Venting A1 A 12 inch minimum A1 12 inch minimum but should size according to expected snow depth Standard Indoor Venting EXHAUST Exhaust Vent Terminal Air Inlet Building Roof Venting Instruction...

Page 12: ...of the box Make sure to add the thickness of the wall or roof and the length of the mounting brackets Attach the proper length of pipe to the CVA using three corrosion resistant sheet metal screws and...

Page 13: ...Side Air Inlet Concentric Side CVA Flue Outlet Non Concentric Side Air Inlet Non Concentric Side Flue Outlet Concentric Side Air Inlet Concentric Side Flue Outlet Non Concentric Side Air Inlet Non Con...

Page 14: ...stallation of the combustion air intake guard 3 Caulk between the wall and the air intake pipe 4 Maintain 12 inches from the combustion air inlet guard to the back of the vent terminal 5 Now attach th...

Page 15: ...6 Caulk the gap between the combustion air cap and the vent pipe with silicone sealant or other appropriate sealants suitable for metal to metal contact and temperatures of 350 degrees F Vertical Ven...

Page 16: ...e as shown below Horizontal Venting Exterior Wall B A EXHAUST COMBUSTION AIR Pitch vent pipe downward from furnace 25 inches per foot C Field Supplied Support Brackets The venting parts listed above a...

Page 17: ...ing A A A B C A1 A 12 inch minimum A1 12 inch minimum but should size according to expected snow depth B 24 inch minimum C 12 inch minimum EXHAUST COMBUSTION AIR Tee with drip leg and cleanout cap Com...

Page 18: ...nal Exhaust Starter and Fusing Shown 6 Terminal Strip 24 Volt power at strip for control wiring Note This is a typical control center an exact wiring diagram is shipped with the unit Control Center La...

Page 19: ...ad for CUBE exhaust fan through side breather tube The power lead should be of sufficient length as to allow the CUBE fan to hinge open and to allow service of the burner controls NOTE Any wiring runn...

Page 20: ...the customer to program occupied and unoccupied operation periods Building Pressure Control requires field wiring from the unit to the factory provided remote control panel This option enables outdoor...

Page 21: ...to measure the air volume is by using the pitot traverse method in the ductwork away from the blower Other methods can be used but should be proven and accurate To adjust the air volume change the fa...

Page 22: ...8 988 926 871 823 780 741 1 PVF 150 150 120 4444 3704 3175 2778 2469 2222 2020 1852 1709 1587 1481 1389 1307 1235 1170 1111 1 PVF 200 200 160 5926 4938 4233 3704 3292 2963 2694 2469 2279 2116 1975 185...

Page 23: ...ncy shut off and easy servicing of the controls 5 A 1 8 inch NPT plugged tap shall be installed immediately ahead of the gas supply connection to the furnace 6 After gas piping is completed carefully...

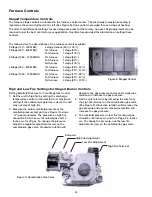
Page 24: ...gnites burner by sparking 13 Flame Sensor Ensures that each burner has ignited Furnace Control Center Layout Figure 7 Furnace Control Center 1 2 3 4 5 6 7 10 11 12 13 8 9 WARNING Disconnect power supp...

Page 25: ...fied the combination gas valve is de energized and the combustion blower shuts off following a 30 second post purge period Recovery from Lockout The ignition control will automatically reset after 1 h...

Page 26: ...the pressure use the low fire adjustment screw on the combination gas valve High Fire Adjustment Low Fire Adjustment Solenoid Staged Temperature Controls The furnace stage controls are located in the...

Page 27: ...ure for each furnace at the pressure test port see Figure 7 using a high quality manometer that can measure low gas pressures The pressure at high fire should be 3 5 in wc for natural gas and 10 0 in...

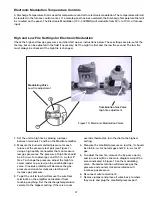
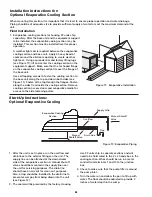
Page 28: ...per operation and water drainage Piping should be of adequate size to provide sufficient supply of water to meet the maximum demand of the unit Installation Instructions for Optional Evaporative Cooli...

Page 29: ...a without any air flow through the unit A jumper wire is required on the terminal strip to provide power to the evaporative cooler pump See the wiring diagram for the proper location This saturation p...

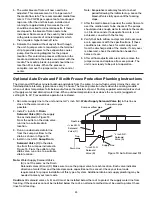
Page 30: ...ULATION THROUGH THE COIL AT ALL TIMES IS HIGHLY RECOMMENDED 5 Pipe sizes for the system must be selected on the basis of the head pressure available from the circulation pump Piping should be in accor...

Page 31: ...eck for correct drives and rpm with catalog data Dampers or registers closed Open and adjust Dirty or clogged filters Clean or replace Leaks in ductwork Repair Elbows or other obstructions Correct or...

Page 32: ...airflow fault will be declared If proper airflow is detected at any time a normal ignition sequence will begin Once proper airflow is detected the normal Sequence Of Operation for ignition will follo...

Page 33: ...uble flush and clean the system more frequently C If this condition persists chemicals may need to be added Water pH should be maintained between 6 and 8 A Irregular water distribution on face of medi...

Page 34: ...hesive spray can be applied to increase filter efficiency If disposable filters are installed check by holding up to a light source If light cannot pass through the filter it should be replaced Replac...

Page 35: ...easer or compressed air Wipe the inside of the burner clean Cleaning the burner with a degreaser will slow the future buildup of dirt Before reinstalling the burner assembly look down the heat exchang...

Page 36: ...hould be shut off and all the lines drained when the temperature drops below 50 F 4 When the evaporative cooler is going to be used for the first time each season it is recommended that the media be f...

Page 37: ...his build up from plugging the drain and causing the drain pan to overflow Inspect twice a year to avoid the possibility of overflow Also drain pans should be kept clean to prevent the spread of disea...

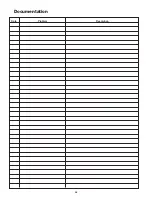
Page 38: ...38 Documentation Date Problem Resolution...

Page 39: ..._______________ Fax ___________________ Work Done By ___________________________________ Name Plate Information Model ________________________________________ Volts ___________ Hertz __________ Phase...

Page 40: ...o the nearest authorized motor service station Greenheck will not be responsible for any removal or installation costs Due to continuing research Greenheck reserves the right to change specifications...

Reviews:

Related manuals for IGX