33
You are about to begin glazing your greenhouse.
It is vital that you take as many safety precautions as
possible, especially when handling glass. When glazing the roof we recommend that one individual stands
on some ladders inside the greenhouse (It is important that this person is not directly underneath the glass, it
is best to stand to one side and help guide the glass in with one hand), while someone else passes the
panes up from the outside. When handling glass, you should always wear long sleeves, gloves and
goggles.
Important,
when glazing any structure it is likely to take you several hours to complete the process. You
should leave yourself enough time or get yourself help to do the job in one session. Before you begin the
process carefully separate your glass into groups of similar panes being very carefully to measure and
separate different types as some are quite similar. When moving the glass please be very careful and put
down wooden bearers and cardboard to protect the glass from any hard ground or wall surfaces and to help
keep the glass clean.
Glass separators (610mm black plastic strips) go on your front and rear gables and sides allowing one pane
to sit directly on the pane below.
The ideal recommended glazing procedure
in our opinion should go as follows;
Start by glazing two roof sections, standing in the doorway looking into the greenhouse the far left roof
section and the front right. By doing these two sections first you will be able to establish the squareness of
your structure. If you are having difficultly fitting these panes squarely into the structure then you need to
check that the internal corner to corner measurements of the frame are equal in both directions.
If you are still having difficulty then it may be due to the frame not being perfectly vertical. By moving the
ridge backwards and forwards while you are up your supported
ladders you will be able to alter the vertical aspect of your structure
(you can also place a spirit level against the gables and the sides to
assess this). Leave the rest of the roof glazing at this stage and move
to glazing the rear and front gables (see previous page for order and
fittings), this will confirm that the structure is vertical.
Once you have glazed the rear of the greenhouse you need to glaze
the front. Start by glazing the sections either side of the door, once
you have done this the door has to be installed (see page 35 for the
door installation).
When the door is in place you can fit the glass above the door (Part
Name CC). Push the pane to the top of the apex and slide in the glass
jack (557) which will then sit on the main door track support. It is also
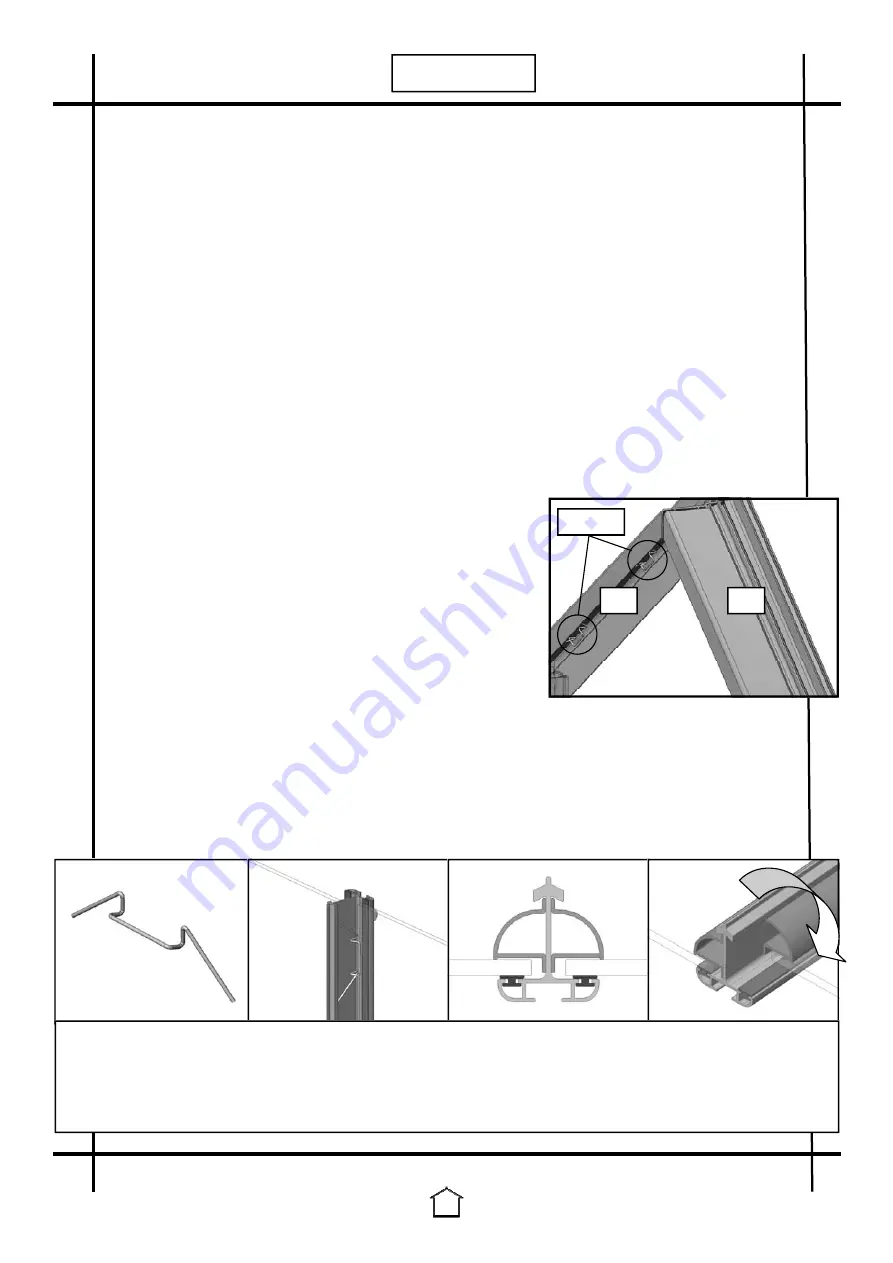
necessary to place two ‘W’ clips on the top edge of each of the angled
panes (shown in the diagram to the right).
You can now glaze the sides, and then the rest of the roof. Note, that when you are glazing the roof you
should leave glass out of the roof where you wish the roof vents to be situated (these should be fitted along
with the doors after glazing.
Please note that the order
with which you glaze your building is largely effected by your individual situation,
i.e. If your greenhouse is to be situated tight up against a shed and a wall then those sides may need to be
glazed first and then the whole building very carefully moved into position using as many helping hands as
you can muster.
GLAZING
‘W’ clips
415
409
There are 2 glazing systems used, ‘W’ clips (used on the angled panes in the gables), and full length bar capping.
One end of the glazing clip hooks under the lip of the glazing bar. The bottom edge of the clip fits round the face of
the glass. The final end of the clip is also hooked under the lip of the glazing bar.
The bar capping runs the full length of each pane. It is inserted by hooking the top edge under the lip of the glazing
bar and sliding the flat face across the face of the glass.


