background image

GREENLEE

FAIRMONT

HG3558B/42307 Portable Power Unit

Greenlee Textron / Subsidiary of Textron Inc.

9

4455 Boeing Dr., Rockford, IL 61109-2988 815/397-7070

4

5

2

3

6

1

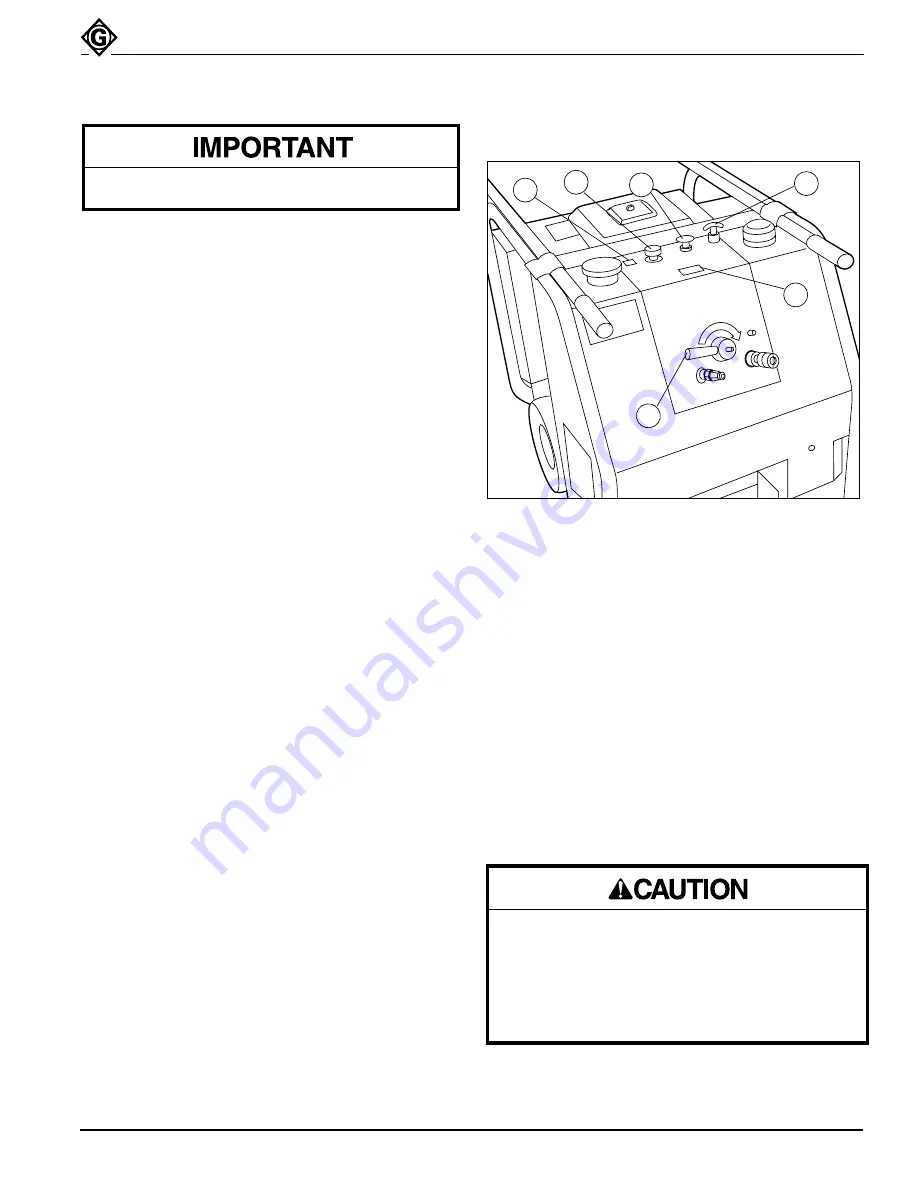
Figure 4

Power Unit Controls

Position the power unit on firm level ground.

Operation (cont’d)

Use appropriate lifting equipment. Make sure all
components used to lift this power unit are rated for
300 lbs (135 kg) and are securely attached between
the power unit and lifting equipment. Inadequate
components may fail and cause the power unit to
fall, resulting in injury or property damage.

Pre-Start

1.

Check engine oil level. Refer to engine Operating
and Maintenance Instructions for correct oil type
and checking instructions.

2.

Check fuel level. Refer to engine Operating and
Maintenance Instructions for fuel recommendations.

3.

Check hydraulic reservoir oil level. Fill to FULL mark
on dipstick. See Maintenance. See Recommended
Hydraulic Fluids for correct hydraulic fluid.

4.

Verify that all current maintenance has been per-
formed on the power unit. See Maintenance.

5.

Connect the tool hoses and tool to the power unit.
See Hose Connections.

Starting the Power Unit  (See Figure 4)

1.

Move the flow ON / OFF lever (1) to the OFF
position.

2.

Pull out the choke knob (2).

Note: A warm engine requires less choking than a cold

engine.

3.

Pull throttle T-handle (3) out to the fully open posi-
tion.  Rotate T-handle clockwise to lock in position
and counterclockwise to unlock from position.

4.

Move switch (4) to the ON position.

5.

Depress starter button (5) to start engine.

Note: The best starter life is provided by using short

starting cycles of several seconds. Prolonged
cranking, more than 15 seconds per minute, can
damage the starter motor.

6.

After the engine has started, reduce engine RPM.
Slowly open choke.

7.

Move flow ON / OFF lever (1) to the ON position.

8.

It is recommended that the power unit be allowed to
run (idle) for a few minutes to warm the hydraulic
reservoir fluid. Actuating the tool intermittently will
reduce the time required to warm the fluid to an
efficient operating temperature.

9.

Using the engine throttle T-handle (1), adjust the
engine RPM to obtain the rated hydraulic oil flow,
5 to 8 GPM. See flow meter (6). Lock the T-handle
throttle in position. DO NOT EXCEED THE MAXI-
MUM ALLOWABLE FLOW RATE FOR THE TOOL
BEING USED WITH THE POWER UNIT. Exceeding
the tool’s maximum flow rate could cause tool
failure and personal injury. See your tool operator’s
manual for proper flow rate.

Stopping the Power Unit  (See Figure 4)

1.

Move the flow ON/OFF lever (1) to the OFF
position. Idle the power unit engine for a few
moments. Move switch (4) to the OFF position.

2.

Disconnect the tool hoses from the power unit.
See Hose Connections.

Retractable Handles

The handles on the power unit can be extended when
transporting the power unit or retracted for convenience
when connecting/disconnecting tool hoses, starting
power unit, etc. To use the handles in the extended
position for transport, pull the handles fully out. Rotate
the handles, locking the pins on the handles into the
slots in the cover of the power unit.

Lifting the Power Unit

Stop the power unit engine before lifting. Take care
when attaching the lifting device (chain, strap, etc.) so
as not to damage the power unit.

Summary of Contents for Fairmont 42307

Page 1: ...72 1997 Greenlee Textron Inc 6 97 PORTABLE POWER UNIT HG3558B 42307 GREENLEE FAIRMONT Read and understand this material before operating or servicing this power unit Failure to understand how to safel...

Page 2: ...ing individual parts Prior arrangements must be made before returning a tool for warranty service To insure correct and prompt shipment of parts always provide the following information when ordering...

Page 3: ...or fittings while the power unit is running or if the hydraulic fluid is hot Exposure to hot hydraulic fluid can cause serious burns Failure to observe these warnings could result in severe bodily in...

Page 4: ...ne hour meter and pneumatic tires SAVE THESE INSTRUCTIONS Inspect the hydraulic hoses and couplings every operating day Repair or replace if leakage cracking wear or damage is evident Damaged hoses or...

Page 5: ...arts of the HG3558B Portable Power Unit 1 Flow Motor Tachometer 7 Oil Cooler 2 Gasoline Engine 8 Control Panel 3 Retractable Handles 9 Flow ON OFF Handle 4 Hydraulic Oil Filter 10 Tool Connection Pres...

Page 6: ...600 RPM Bore 3 44 in 87 3 mm Stroke 2 28 in 57 9 mm Displacement 42 33 cu in 694 0 cc Recommended Hydraulic Fluids Electrical Shock Hazard When utilizing this tool near energized electrical lines sele...

Page 7: ...nnection to prevent pressure buildup inside the tool 3 Connect the pressure supply hose from the power unit pressure port to the tool pressure port P Disconnecting Hoses See Figures 1 2 and 3 1 Stop t...

Page 8: ...hot Use caution when working around power unit Hot surfaces can cause serious burns Do not let the power unit engine run unattended The engine must be monitored so that it can be shut down immediatel...

Page 9: ...ne Note The best starter life is provided by using short starting cycles of several seconds Prolonged cranking more than 15 seconds per minute can damage the starter motor 6 After the engine has start...

Page 10: ...eath If injured seek medical help immediately to remove oil Do not use fingers or hands to check for leaks Depressurize hydraulic system before servicing Stop engine before filling fuel tank Do not fi...

Page 11: ...grease dirt and foreign material 2 Inspect the hydraulic system hoses and fittings for signs of leaks cracks wear or damage Replace if necessary Every 25 Hours 1 Service engine air cleaner pre cleane...

Page 12: ...result in severe injury or death Pneumatic Tires Inflate power unit tires to the recommended pressure printed on the sidewalls of the tires Do not exceed tire manufacturer s recommended maximum pressu...

Page 13: ...he Problem Area 1 Stop the power unit hydraulic oil flow Disconnect the existing tool from the hoses and power unit 2 Connect a known working tool to the hoses and power unit See the tool s operator s...

Page 14: ...sition position Electrical short broken wire or loose Check wires and connections connection Repair or replace See engine operator s manual Engine lacks power runs rough See engine operator s manual b...

Page 15: ...for tool being used Hydraulic filter needs service Replace hydraulic filter Power unit components pump valve Repair or replace components etc worn or damaged Engine output insufficient Engine See engi...

Page 16: ...Boeing Dr Rockford IL 61109 2988 815 397 7070 HG3558B 42307 Power Unit 31 32 33 34 2b 2a 30 55 29 56 25 40 41 39 26 38 36 35 25 26 28 37 59 27 57 24 25 26 28 17 18 19 20 21 22 23 9 10 11 12 13 2 7 6...

Page 17: ...244 F001025 SAE Lock Washer 3 8 2 23 41915 F009681 Washer 3 8 2 24 43623 F021992 Roll Pin 1 4 x 1 1 4 2 25 F024672 Cap Screw 1 4 x 1 1 2 Button Skt Hd 15 26 41431 F013588 Light Hex Stop Nut 1 4 21 27...

Page 18: ...2307 Portable Power Unit 4455 Boeing Dr Rockford IL 61109 2988 815 397 7070 HG3558B 42307 Power Unit Hydraulic Components and Piping OIL COOLER 11 20 27 2 4 USE SILICON SEALER 3 1 26 12 16 5 6 17 24 2...

Page 19: ...4 4 10 F015627 Hose Clip 4 11 F012147 Hose Clamp 4 12 F022988 Hose Clamp 2 13 41989 F022687 Relief Valve 1 14 F024695 90 Elbow 3 4 M NPT x 3 4 ID Hose 2 15 F024676 90 Elbow 1 2 F NPT x 7 8 M STR 1 16...

Page 20: ...3 41291 F007022 Hex Nut 1 4 2 4 156754 Wire Assembly 1 5 156654 Wire Assembly 1 6 155785 Wire Assembly 1 7 41790 F020627 Battery Hold Down 1 9 F030028 Machine Screw 8 x 1 1 4 2 10 F030029 Lock Washer...

Page 21: ...ssur ized fluid varies with pressure and rate of flow The size of the components must be adequate to keep pressure losses to a minimum and avoid damage to the hose due to heat generation or excessive...

Page 22: ...are corrected or eliminated 3 8 System Check Out After completing the installation all air entrapment must be eliminated and the system pressurized to the maximum system pressure and checked for prop...

Reviews: