background image

EK22GL Battery-powered, High-speed Crimping Tool

Greenlee / A Textron Company

7

4455 Boeing Dr. • Rockford, IL 61109-2988 USA • 815-397-7070

Operation (cont’d)

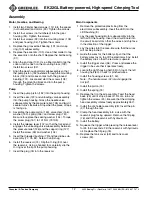
Preparing Cable

Follow the lug manufacturer’s instructions for appropriate
cable strip length.

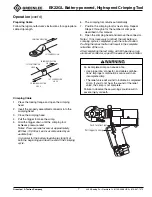
CRIMPING DIRECTION

1ST COMPRESSION

CRIMPING DIRECTION

SIDE A

CRIMPING DIRECTION

SIDE B

1ST COMPRESSION

SIDE A

1ST COMPRESSION

SIDE B

Crimping Cable

1.

Press the locking flange and open the crimping
head.

2.

Insert the properly assembled connector into the
crimping head.

3.

Close the crimping head.

4.

Pull the trigger to make the crimp.

5.

Hold the trigger down until the crimping tool
achieves pressure relief.
Notes: Pressure relief occurs at approximately
690 bar (10,000 psi) and is accompanied by an
audible “pop”.

It is normal for the battery load display to light at
both the beginning and near the end of the crimping
cycle.

An incomplete crimp can cause a fire.

• Use proper die, connector, and cable combina-

tions. Improper combinations can result in an
incomplete crimp.

• The relief valve will sound to indicate a completed

crimp. If you do not hear the sound of the relief
valve, the crimp is not complete.

Failure to observe these warnings could result in
severe injury or death.

6.

The crimping tool returns automatically.

7.

Position the crimping tool for next crimp. Repeat
Steps 4 through 6 for the number of crimps as
described in this manual.

8.

Open the crimping head and remove the connector.

Notes: If it is necessary to retract the ram before a
crimping cycle is completed, push the retract button.
Pushing the retract button will result in the complete
retraction of the ram.

After completing the last crimp with W-type dies on an
aluminum connector, wipe off the excess oxide inhibitor.

Pull trigger to crimp

Push to retract ram

Summary of Contents for GATOR EK22GL

Page 1: ...Greenlee Textron Inc IM 1552 REV 8 5 05 Read and understand all of the instructions and safety information in this manual before operating or servicing this tool GATOR Plus EK22GL Battery powered Hig...

Page 2: ...Identification 5 Specifications 5 Operation 6 7 Die Selection 8 Connector Selection 8 Maintenance 9 Troubleshooting 10 Disassembly 11 Assembly 12 Illustrations 13 15 Parts List 16 18 Description The...

Page 3: ...or death Skin injection hazard Do not use hands to check for oil leaks High pressure oil easily punctures skin causing serious injury gangrene or death If injured seek medical help immediately to remo...

Page 4: ...ve these precautions may result in injury or property damage Do not store the battery at more than 60 C 140 F Damage to the battery can result Do not use another manufacturer s charger Other manufactu...

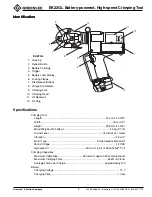
Page 5: ...Crimping Head 11 Oil Reservoir 12 Oil Plug Crimping Tool Length 314 mm 12 3 8 Width 76 mm 3 Height 298 mm 11 3 4 Mass Weight with battery 4 4 kg 9 7 lb Sound Level 75 dB A at 1 meter Vibration 2 5 m s...

Page 6: ...he crimping tool from rain and moisture Water will damage the crimping tool and battery Use this tool for the manufacturer s intended purpose only Failure to observe these precautions may result in in...

Page 7: ...oad display to light at both the beginning and near the end of the crimping cycle An incomplete crimp can cause a fire Use proper die connector and cable combina tions Improper combinations can result...

Page 8: ...AWG Orange KC22 4 0 03087 4 0 AWG Purple KC22 250 03088 250 kcmil Yellow KC22 300 03089 300 kcmil White KC22 350 03090 350 kcmil Red KC22 400 03091 400 kcmil Blue KC22 500 03092 500 kcmil Brown KC22...

Page 9: ...tool body Solvents could ignite causing serious injury or property damage After use 1 Wipe all tool surfaces clean with a damp cloth and mild detergent 2 Fully retract the ram Place the tool in the ca...

Page 10: ...authorized Greenlee service center Dies stop during operation Oil level is low Check oil level Refill reservoir Air in hydraulic system Pull trigger and hold retract button simultaneously Hold for ap...

Page 11: ...mp housing Pump 1 Use a hooked tool to remove the reservoir O ring 80 Gently tug it over the reservoir 2 Remove the reservoir 74 3 Remove the pump piston 152 4 Remove the screw plug 151 washer 153 pum...

Page 12: ...Install the screw 99 and washer 104 5 Insert the threaded bushing 79 and feed tube sub assembly 77 78 82 Screw in until snug 6 Install the reservoir 74 Slip the O ring 80 over the reservoir Using a h...

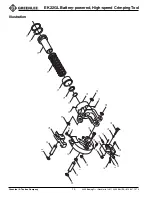
Page 13: ...EK22GL Battery powered High speed Crimping Tool Greenlee A Textron Company 13 4455 Boeing Dr Rockford IL 61109 2988 USA 815 397 7070 Illustration 57 51 56 53 7 10 53 59 52 8 60 9 11 58 53...

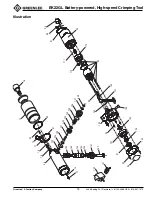
Page 14: ...speed Crimping Tool Greenlee A Textron Company 14 4455 Boeing Dr Rockford IL 61109 2988 USA 815 397 7070 Illustration 13 12 15 18 14 16 17 25 29 24 29 23 34 30 22 23 31 32 33 35 37 30 28 34 33 19 20...

Page 15: ...pany 15 4455 Boeing Dr Rockford IL 61109 2988 USA 815 397 7070 Illustration 72 73 83 79 81 80 76 74 82 75 77 78 155 156 150 153 152 151 154 140 141 128 129 122 123 124 120 121 130 125 126 127 96 92 91...

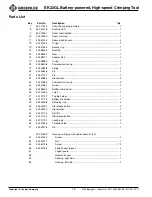
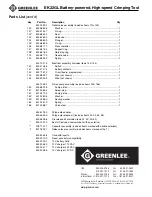
Page 16: ...83 8 Spring 2 20 500 4384 6 Pin 1 21 500 4179 7 Pin 1 22 500 4385 4 Die retainer 2 23 500 4396 0 Compression spring 4 24 500 4168 1 Screw 2 25 500 5830 4 Bottom crimp head 1 26 501 2169 3 Latch 1 27 5...

Page 17: ...hing 1 80 500 5886 0 O ring 1 81 500 5829 0 Attachment ring 1 82 500 5898 3 Magnet 1 83 500 1355 6 Pump housing 1 500 1349 1 Motor assembly includes items 90 112 90 500 4132 0 Motor 1 91 500 4138 0 Ba...

Page 18: ...91 6 Pump piston 1 151 501 0365 2 Screw plug 1 152 501 0370 9 Pump piston 1 153 501 0369 5 Washer 1 154 501 0366 0 Sealing washer 1 155 501 0367 9 Spring 1 156 501 0368 7 Valve stem 1 500 4292 0 W typ...

Reviews: