
ESG50GL Battery-powered, High-speed Cable Cutter
Greenlee / A Textron Company
4455 Boeing Dr. • Rockford, IL 61109-2988 USA • 815-397-7070
9
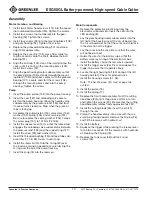
Disassembly
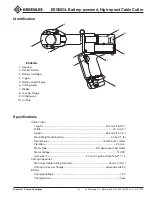
Main Components
1. Remove the battery.
2. Remove the pin (19). Remove the cutting blade (26).
3. Loosen two screws (29).
4. Unscrew and remove the head assembly.
5. Remove the spring (17) and piston (18). Replace the
piston O-ring (15) and piston backup ring (16).
6. Unscrew two tank cover screws (53) and remove
the tank cover (58).
7. Remove the hydraulic reservoir plug (76) and drain
the hydraulic fluid.
8. Reinstall the plug.
9. Remove the remaining housing screws (51, 53).
10. Remove the right housing half (59).
11. Remove the trigger cover (56).
12. Lift the pump/motor assembly and circuit card
from the left housing half (60). Lift the LED from its
housing (8).
13. Slide a plastic bag over the circuit card and elec-
tronic subassemblies. Tape the bag shut to protect
the subassemblies from hydraulic oil and other
contamination.
14. Unscrew the shoulder bolt (99) and remove the
release lever (107).
15. Remove screws (108) and separate the gear
housing/motor subassembly from the pump
housing.
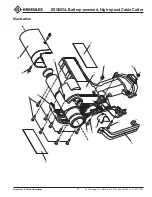
Pump
1. Use a hooked tool to remove the reservoir O-ring
(80). Gently tug it over the reservoir.
2. Remove the reservoir (74).
3. Remove the pump piston (152).
4. Remove the screw plug (151), washer (153), pump
piston (150), valve stem (156), and spring (155).
Replace the sealing washer (154).
5. Use a piece of tape to mark the side of the relief
that is facing up. (This is a reference point for reas
-
sembly). Remove the unloading valve by unscrewing
the plug (126).
6. Remove the feeder tube subassembly by unscrew-
ing the feeder tube (78). Replace the oil filter (77).
Remove metal chips from the magnet (82).
7. Remove the threaded bushing (72) and replace the
O-ring (73).
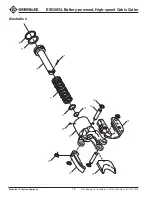
Motor, Gearbox, and Bearing
1. Remove the tamper-proof paper seal (96).
2. Remove two screws (92). Remove the end cap
(102).
3. Apply pressure evenly at three points around the
ball bearing (91) and gently pry the bearing up to
remove it.
4. Remove the eccentric (103), grooved ball bearing
(101), and snap ring (100) subassembly from the
shaft.
5. Remove four screws (93). Remove the mounting
block (109) from the gear housing (94).
6. Use a snap-ring removal tool to remove the snap
ring (100).
7. Unscrew four bolts (not numbered) from the gear
housing (94). Separate the gear housing from
the spacer (not numbered). Unscrew two Fillister
head screws (112) to separate the spacer from the
motor (90).


