Greenlee / A Textron Company
2
4455 Boeing Dr. • Rockford, IL 61109-2988 USA • 815-397-7070
SF-420AC
KEEP THIS MANUAL
IMPORTANT SAFETY INFORMATION
Installing the Battery
Note: Do not loosen or remove the screw on the back of the unit.
1. Squeeze the sides of the clip to help release the clip end, and push down on
the tab to remove the battery cap.
2. Slide a 9-volt battery into the compartment, terminal side first, matching (+)
and (–) terminals from battery to case.
3. Replace the clip. The battery will last approximately two years under normal
conditions.
Calibration and Scanning in Stud Scan
or DeepScan Modes
Notes:
• The unit calibrates on each use.
• Use Stud Scan mode for depths to about 19 mm (3/4") and DeepScan for
depths up to 38 mm (1-1/2") or double layers.
• Keep the unit flat against the wall. Do not lift or tilt the unit during calibration
or scanning.
All specifications are nominal and may change as design improvements occur. Greenlee
Textron Inc. shall not be liable for damages resulting from misapplication or misuse of its
products.
® Registered: The color green for electrical test instruments is a registered trademark of
Greenlee Textron Inc.
WireWarning is a trademark and DeepScan, SpotLite, and TruCal are registered trademarks
of Zircon Corporation.
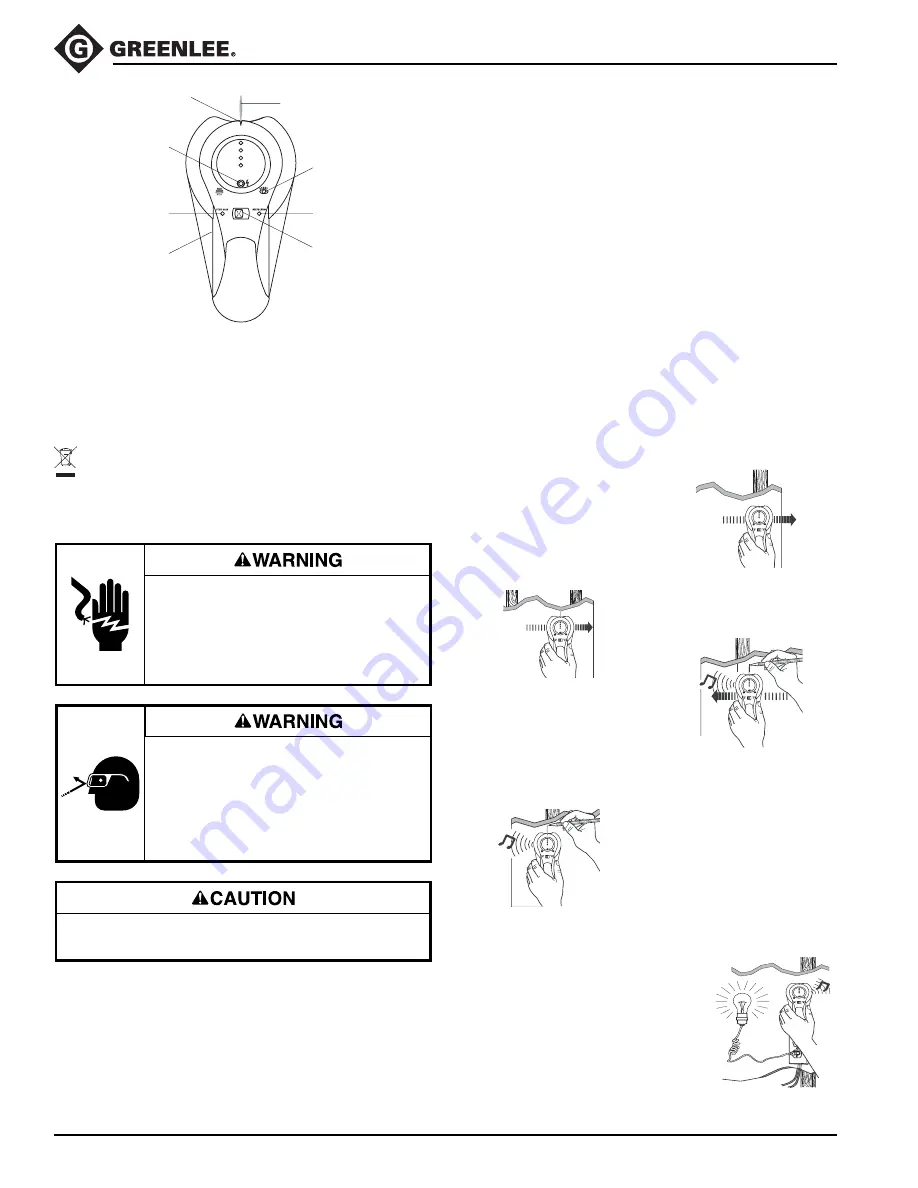
Stud Edge
Groove
TruCal
®
LED
SpotLite
®
Pointing System
Stud
DeepScan
®
Mode LED
Stud Scan
Mode LED
AC
WireWarning™
On/Off
Button
Mode
Selector
Switch
Remember that studs or joists are normally spaced 406 mm (16") or
610 mm (24") apart and are 38 mm (1-1/2") in width. Anything closer
together or a different width may not be a stud, joist, or firebreak.
Eye injury hazard:
Depending on the proximity of electrical wiring or pipes
to the wall surface, this tool may detect them in the
same manner as studs. Always use caution and wear eye
protection when nailing, cutting, or drilling in walls,
floors, and ceilings that may contain these items.
Failure to wear eye protection could result in serious eye
injury from flying debris.
Electric shock hazard:
This tool will not detect hot wires inside metal pipe or
conduit, behind metallic wall covering, or behind some
plywood or other dense materials. Always turn off power
when nailing, cutting, or drilling near electrical wires.
Contact with live circuits could result in severe injury or
death.
1. Slide the Mode Selector switch to
the desired scanning mode. The
mode can be selected with the unit
on or off.
2. With the unit turned off, position it
flat against the wall.
3. Without moving the unit, squeeze
and hold the On/Off button. Wait
for the TruCal LED to light.
4. Continue to hold in the On/Off
button, and then slowly slide the
unit horizontally across the wall,
right or left.
5. As you begin to approach a stud,
the red LEDs will light succes-
sively, from bottom to top.
6. When the top green LED is lit, a
steady tone sounds, and the
SpotLite shines, you have located
the edge of the stud. Mark this
spot.
7. Continue scanning beyond the
marked spot until the green LED
goes out. Slide the unit in reverse
direction to locate the other edge
of the stud.
8. Mark this second spot. The middle
of the stud is centered between the
two marks.
Continuous AC Voltage Detection
(WireWarning)
The SF-420AC detects from 90 V to 250 V at 50 Hz
to 60 Hz AC in a hot electrical wire. The voltage
detection feature works continuously in both Stud
Scan and DeepScan modes. When sensing voltage,
the small AC light comes on.
Introduction
The Greenlee SF-420AC AC Stud Sensor detects wood and metal studs and
joists in walls, floors, and ceilings. It features two scanning modes, recessed
LEDs, a durable high-impact case, and the patented SpotLite Pointing System.
It also has WireWarning to continuously detect hot AC voltage in both modes.
Do not discard this product or throw away!
For recycling information, go to www.greenlee.com.


