background image

22

OPERATING YOUR LAWNMOWER

W A R N I N G

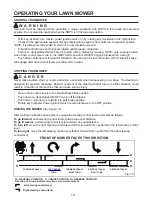
The  unit’s  steering  control  levers  are  very  responsive:  For  smooth  operation,  move  lever

s

  slowly, 

avoid

ing


sudden  movement

s

.  Skill  and  ease  of  operation  come  with  practice  and  experience.  The 

machine can spin very rapidly. Use caution when making turns and slow down before making sharp turns.

Inexperienced  operators  may  have  a  tendency  to  oversteer  and  lose  control.  Slow-moving 

practice  maneuvers  are  recommended  to  become  familiar  with  these  characteristics  before 

attempting normal

-

speed operation.

W A R N I N G

Sharp depressions or raised obstacles (such as gutters or curbs) should not be directly approached at high 

speed in an attempt to “jump” them as the operator could be thrown from the equipment. Approach at a 

slow speed and angle one drive wheel at the obstruction. Continue at an angle until the wheel clears and 

then pivot the opposite wheel around.

When turning on soft

,

 wet turf, keep both wheels rolling either forward or backward. Pivoting on 

one 

stopped wheel can damage turf. This is especially important when mowing.

Keep blades sharp. 

Many professional mowing companies have additional sets of blades and change 

blades twice a day: once in the morning and again at noon. Many problems with incorrect cutting patterns 

are due to dull blades or blades which have been sharpened incorrectly. Information on sharpening 

blades is listed in this manual’s maintenance section. In addition, most communities have individuals 

or 

companies 

that

 specialize in sharpening mower blades. Blade sharpness should be checked daily.

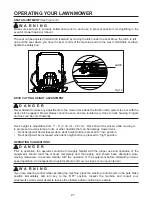
D A N G E R

Never work with blades while key is in the ignition switch. Always place deck clutch switch in the 

disengaged position, place steering control levers in the park brake position and turn key to the OFF 

position  and  remove  key  from  switch.  Block  up  mower  when  you  must  work  under  it.  Wear  gloves 

when 

handling blades. Always check for blade damage if mower strikes a rock, branch

,

 or another foreign 

object 

during mowing!

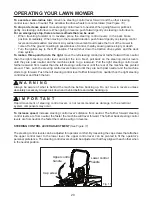
Direct grass discharge to right,

 away from unmown area. Select a mowing pattern that directs grass 

discharge towards the outside

 the 

mowing area. Generally, this means using a pattern utilizing left turns 

because side discharge is to 

the 

right. In any case, avoid throwing grass discharge onto


unmowed area 

because grass is then mowed “twice

.

” Mowing twice puts an unnecessary load on the 

unit and 

reduces mowing efficiency.

When mowing a lawn for the first time

cut grass slightly longer than normal to avoid scalping uneven 

terrain. When possible, it is best to use the cutting height that was used in the past. When cutting grass 

taller than six inches, you may want to mow the lawn twice to achieve a better quality of cut.

During normal mowing

,

 cut only about 1/3 of the grass blade. 

Cutting more than that is not 

recommended unless grass is sparse or it is the end of the mowing season.

Alternate mowing direction 

to keep the grass growing straight and better dispersion of the clippings.


Remember, grass grows at different rates 

at different time of the year. Mow more often in the early 

spring to maintain the same cutting height. As the growth rate slows in mid summer, mow less frequently. 

If you cannot mow at a regular interval, mow at a high cutting height

 at first, 

then mow again two days 

later at a 

lower cutting height.

Raise the cutting height of the mower

 if the cutting width of the mower is wider than the previous 

mower. This ensures that uneven turf is not cut too short.

Raise the cutting height of the mower

 if the grass if slightly taller than normal or if it contains a high 

degree of moisture. Then mow it again with the cutting height set lower.

If the machine’s forward motion must be stopped while mowing, a clump of grass clippings may drop 

onto your lawn. To avoid this, move onto a previously cut area with the blades engaged.

Charge the battery immediately. 

If battery percentage is higher than 

2% and less than 5%

,  the 

maximum drive speed will be 5 mph and the unit will in low blade mode. If battery percentage is less than 

2%

, the working blade will stop automatically.

 The unit should immediately be returned to the battery 

Summary of Contents for 2508902

Page 1: ...Zero Turn Mower 2508902 Model No GZM60R Read all safety rules and instructions carefully before operating this tool Owner s Manual TOLL FREE HELPLINE 1 855 470 4267 www GreenworksCommercial com...

Page 2: ...ety start interlock system 15 ROPS Rollover Protective Structure 15 Work light 16 Anti scalp wheels 17 Operation 18 Driving the mower 18 Steering control lever adjustment 18 Seat adjustment 18 Startin...

Page 3: ...ery maintenance 43 Lithium energy module maintenance 44 Service 44 Environmentally safe battery disposal 46 Troubleshooting 47 Troubleshooting 47 Deck System Resistance Test Procedure 48 Limited warra...

Page 4: ...therwise stated Photographs and illustrations used were current at the time of printing but subsequent production changes may cause your machine to vary slightly in detail Greenworks Commercial Produc...

Page 5: ...and will follow the warnings and instructions that are printed in this manual and on the mower W A R N I N G Carefully read all instructions on the mower and in the manual before attempting to assembl...

Page 6: ...rts MOWING AREA Before mowing any area thoroughly inspect the area for any hazards Walk the area to ensure there is adequate traction and no holes drop offs or hidden objects that could cause issues C...

Page 7: ...under blade guard Keep hands feet nd lothing way from rotating blades To reduce risk of injury to persons remove battery pack when not in use To reduce personal risk and damage to the never clean with...

Page 8: ...s and proceed slowly straight down the slope Keep all movement on slopes slow and gradual Do not make sudden changes in speed or direction which could cause the machine to roll over Use extra care whi...

Page 9: ...others in or on towed equipment On slopes the weight of the towed equipment may cause loss of traction and loss of control Travel slowly and allow extra distance to stop BATTERY CHARGER C A U T I O N...

Page 10: ...te of California to cause cancer and reproductive harm Wash hands after handling Charge batteries in an open well ventilated area away from spark and flames Unplug charger before connecting or disconn...

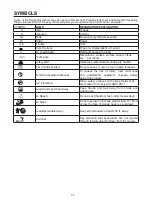
Page 11: ...ates a potential personal injury hazard Wet Conditions Alert Do not expose to rain or use in damp locations Read the Operator s Manual To reduce the risk of injury user must read and understand operat...

Page 12: ...we suggest you return the product to your nearest AUTHORIZED SERVICE CENTER for repair When servicing use only identical replacement parts W A R N I N G To avoid serious personal injury do not attemp...

Page 13: ...Protective Structure 7 Anti scalp wheels 2 Steering control levers 8 Front wheel 3 Safety belt 9 Drive wheel 4 Left control panel 10 Key of battery pack protection 5 Right control panel 11 Battery pac...

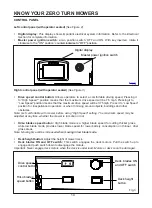
Page 14: ...Press it to Low Speed position for inexperienced operators or when trimming around objects buildings and other obstacles Note Get comfortable with mower before using High Speed setting The maximum sp...

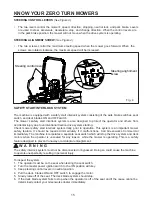
Page 15: ...ng Check mower safety start interlock system daily prior to operation This system is an important mower safety feature It should be repaired immediately if it malfunctions Call Greenworks Commercial i...

Page 16: ...lt should never be worn W A R N I N G To minimize chance of injury or death from rollover Keep ROPS in the raised and locked position and use the seat belt Never operate machine on a slope with the RO...

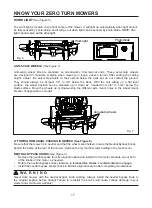
Page 17: ...the blade surface Move the wheels up or down using the different axle mount holes in the wheel mount bracket if applicable on model Anti scalp wheels IF TOWING OR MANUAL PUSHING IS NEEDED See Figure...

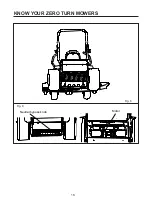
Page 18: ...18 Neutral bypass knob Motor KNOW YOUR ZERO TURN MOWERS Fig 8 Fig 9...

Page 19: ...signed for sensitive response Rapid movement of the steering control levers in either direction could result in a reaction of the machine that can cause serious injury Return drive control levers to t...

Page 20: ...rd Pull the right steering control lever farther rearward from neutral than the left steering control lever until the rear of the machine has pivoted around Then push the steering control levers forwa...

Page 21: ...ck should be raised while mowing is in progress to avoid stumps rocks or other obstacle that can be damage mower deck Deck height will be decreased when deck height button is pressed to low position D...

Page 22: ...foreign object during mowing Direct grass discharge to right away from unmown area Select a mowing pattern that directs grass discharge towards the outside the mowing area Generally this means using...

Page 23: ...of hazards to avoid a wheel dropping over the edge or the ground breaking away This will reduce the risk of the machine suddenly rolling over which could cause either serious injury or death Use a wa...

Page 24: ...of what is located at the bottom of the slope This will reduce the risk of the machine suddenly rolling over causing serious injury or death Extreme caution should be used when there is a hazard locat...

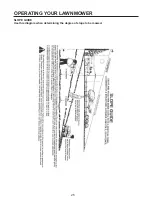
Page 25: ...25 OPERATING YOUR LAWNMOWER SLOPE GUIDE Use this diagram when determining the degree of slope to be mowed...

Page 26: ...ire codes and ordinances to avoid fire hazards Proper ventilation is required to remove hydrogen gas from the area during battery charging Never allow flames sparks or smoking near batteries Keep batt...

Page 27: ...e stop Remove the dust cap from the battery charging port on the mower and plug charger into the port NOTE Plug will only fit one way into the port Make sure it is properly aligned before inserting Pl...

Page 28: ...only be operated by distributor Open battery compartment and lift up battery cover to expose Lithium Modules Grasp RED BATTERY QUICK DISCONNECT HANDLE by wall of mower Pull INWARD on lever until disen...

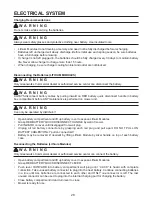
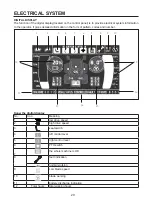
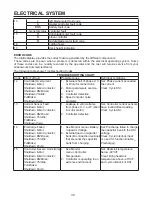
Page 29: ...tern codes and number 1 2 3 4 5 8 9 10 11 12 13 14 15 16 17 Konw the digital display No Icon Meaning 1 low drive speed 2 high drive speed 3 seat switch 4 left control lever 5 right control lever 6 PTO...

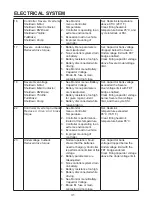
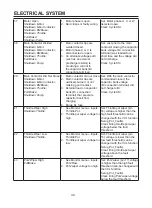
Page 30: ...4 Speed encoder noise problems Set Phase current exceeded the current Clear Cycle KSI 13 Current Sensor Fault Shutdown Motor Shutdown Main Contactor Shutdown EM Brake Shutdown Throttle FullBrake Shut...

Page 31: ...parameters are misadjusted 3 Battery resistance too high for given regen current 4 Battery disconnected while regen braking Set Capacitor bank voltage exceeded the Severe Overvoltage limit with FET b...

Page 32: ...Open Short Digital Output 6 driver will not turn on 1 External load impedance on Digital Output 6 driver pin 19 is too low Set Digital Output 6 pin 19 current exceeded 15 mA Clear Remedy the overcurr...

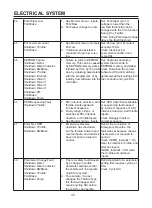
Page 33: ...onnector pins 3 Bad crimps or faulty wiring Set Driver 2 pin 5 is either open or shorted This fault can be set only when EM Brake Type 0 Clear Correct open or short and cycle driver 32 EMBrake Open Sh...

Page 34: ...act 3 External load on capacitor bank B connection terminal that prevents capacitor bank from charging 4 Blown B fuse Set With the main contactor commanded closed the capacitor bank voltage B connecti...

Page 35: ...e KSI 47 HPD Sequencing Fault ShutdownThrottle 1 KSI interlock direction and throttle inputs applied in incorrect sequence 2 Faulty wiring crimps or switches at KSI interlock direction or throttle inp...

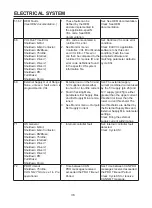
Page 36: ...External load on the 5V and 12V supplies draws either too much or too little current 2 Fault Checking Menu parameters Ext Supply Max and Ext Supply Min are mis tuned 3 See Monitor menu Outputs Ext Su...

Page 37: ...Interlock Shutdown Driver1 Shutdown Driver2 Shutdown Driver3 Shutdown Driver4 Shutdown PD Full Brake Shutdown Pump 1 The Supervisor has detected a mismatch in redundant readings 2 Internal damage to...

Page 38: ...on range Set Motor characterization failed during the motor characterization process Clear Correct fault cycle KSI 88 Encoder Pulse Error Shutdown Motor Shutdown Main Contactor Shutdown EMBrake Shutdo...

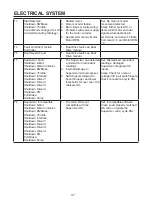
Page 39: ...Bad crimps or faulty wiring 4 Vehicle is stalled Set Encoder Fault Code 36 or Stall Detect Fault Code 73 was activated and Brake or Interlock has been applied to activate LOS control mode allowing lim...

Page 40: ...Temperature setting 1 2 Battery temperature is at or below the programmed Low Alarming Temperature setting 1 3 The difference value between the highest temperature and the lowest temperature is at or...

Page 41: ...unication Fault ShutdownMower 1 Time between CAN PDO messages between Master controller and Mowers received exceeded the PDO Timeout Period Set Time between CAN PDO messages between Master controller...

Page 42: ...ulti purpose grease MOWER BLADE MAINTENANCE Check the mower blades daily They are the key to power efficiency and well groomed turf Keep them sharp a dull blade will tear rather than cut the grass lea...

Page 43: ...ch or 1 2 bolt Blade should not lean or tilt While spinning the blade slowly it should not wobble If blade is out of balance true it up before reinstalling Lay the blade on a flat surface and check fo...

Page 44: ...ove or alter any of the ROPS parts Do not attempt to weld or straighten ROPS Failure to adhere to these instructions could result in severe injury or death CLEANING THE MOWER W A R N I N G In order to...

Page 45: ...vers and review safety precautions listed in this manual Check and inflate tires to 20 PSI Attach the tractor harness to the charging port and the batteries per the Charging Adapter portion in the Ele...

Page 46: ...State of Charge or Voltage Different SOC means different voltage and may charge discharge to each other 5 If the battery module will not be used for a long time several days or weeks please disconnec...

Page 47: ...move when the traction drive system is running and the drive wheels are rotating Use only certified jack stands Use only appropriate jack stands with a minimum weight rating of 2000 pounds 907 2 kg t...

Page 48: ...R N I N G If the battery pack cracks or breaks with or without leaks do not recharge or use the battery Dispose of it and replace with a new battery pack DO NOT ATTEMPT TO REPAIR IT To avoid injury an...

Page 49: ...height adjustment section of the parts manual An anti scalp wheel is not set correctly Adjust the height of the anti scalp wheel The underside of the deck is dirty Clean the underside of the deck Tir...

Page 50: ...digital multimeter on the positive battery terminal of the deck controller B Place the positive probe of the digital multimeter on deck controller terminals AR then CR Resistance for each should read...

Page 51: ...of any chemical operation of the battery in an overcharged or the operation of the battery in an uncharged condition a battery charged by systems other than the original equipment type battery charger...

Page 52: ...he determination of Greenworks Commercial which adversely affects the operation performance or durability of the equipment Mowers that have had their serial number removed or made illegible Depreciati...

Page 53: ...cribed in your owner s manual Such routine maintenance whether performed by a dealer or by you is at your expense This machine like any other powered equipment is potentially dangerous unless properly...

Page 54: ...54 EXPLODED VIEW...

Page 55: ...55 PARTS LIST...

Page 56: ...Greenworks Tools PO Box 1238 Mooresville NC 28115 TOLL FREE HELPLINE 1 855 470 4267 Rev 00 08 18 2017 Printed in China on 100 Recycled Paper...

Reviews: