background image

13

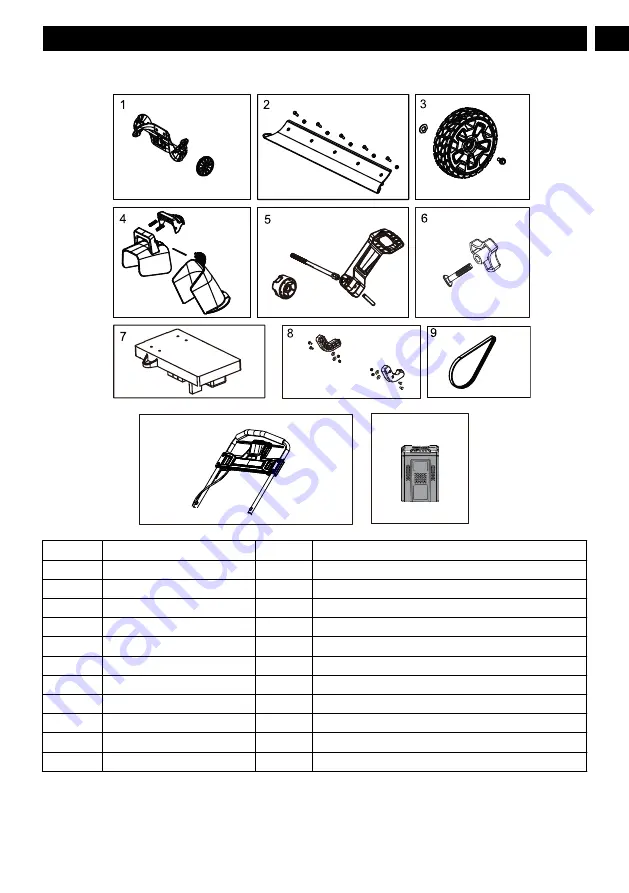
EXPLODED VIEW

No.

Part No.

Qty

Description

1

xxxxxx

1

Impeller assembly

2

xxxxxx

1

Scraper Kit

3

xxxxxx

1

Wheel Assembly

4

xxxxxx

1

Chute Deflector Assembly

5

xxxxxx

1

Quick-Release Lever Assembly

6

xxxxxx

1

Cam Lock assembly

7

xxxxxx

1

PCB board

8

xxxxxx

1

Skid plates

9

xxxxxx

1

Belt

10

xxxxxx

1

Upper handle assembly

13

English

EN

10

11

11

xxxxxx

1

Battery

Summary of Contents for 2608402CO

Page 1: ...2608402CO SNB404 ...

Page 2: ...andle 6 7 5 Install the chute rotation box 6 7 6 Install the chute deflector 6 7 7 Install the battery pack 7 7 8 Remove the battery pack 7 8 Operation 7 8 1 Cold weather operation 7 8 2 Blue LED light 7 8 3 Start the machine 7 8 4 Stop the machine 8 8 5 LED light 8 8 6 LED light 8 8 7 Adjust the discharge chute 8 8 8 Adjust the chute deflector 9 8 9 Operation tips 9 9 Maintenance 9 9 1 General ma...

Page 3: ...e area of operation clear of all persons particularly small children and pets Exercise caution to avoid slipping or falling especially when operating in reverse Do not use on graveled surfaces Dress Properly Do not wear loose clothing or jewelry They can be caught in moving parts Wear appropriate boots when operating the snow thrower Operation of the snow thrower in the hand held position is unsaf...

Page 4: ...ep a firm hold on the handles Walk never run Clearing a Clogged Discharge Chute Hand contact with the rotating impeller inside the discharge chute is the most common cause of injury associated with snow throwers Never use your hand to clean out the discharge chute To clear the chute 1 SHUT THE ENGINE Motor OFF 2 Wait 10 seconds to be sure the impeller blades have stopped rotating 3 Always use a cl...

Page 5: ...r Stop the motor and remove the bat tery before leaving the product 4 RISK LEVELS The following signal words and meanings are intended to explain the levels of risk associated with this product SYM BOL SIGNAL MEANING DANGER Indicates an imminently haz ardous situation which if not avoided will result in death or serious injury WARNING Indicates a potentially hazard ous situation which if not avoid...

Page 6: ...stalline silica from bricks and cement and other masonry products Arsenic and chromium from chemically treated lumber Your risk of exposure to these chemicals varies depending on how often you do this type of work To reduce your exposure to these chemicals work in a well ventilated area and work with approved safety equipment such as dust masks that are specially designed to filter out microscopic...

Page 7: ...dle knobs 14 onto the bolts 12 4 Do the same operation on the other side 7 5 INSTALL THE CHUTE ROTATION BOX 12 17 18 16 1 Align the holes in the panel of the chute rotation box 18 and the switch box 17 2 Put the chute rotation box screws 21 through the holes 3 Tighten the chute rotation box screw nuts 16 with a wrench not included 7 6 INSTALL THE CHUTE DEFLECTOR 1 Align the grooves 19 of the disch...

Page 8: ...Do not store or charge battery outside Battery must be charged and stored indoors prior to use of the machine If the machine does not start remove the battery pack from the machine charge the battery pack to 15 minutes in warm area or when the charging light turns green Install the battery pack back in the unit 8 2 BLUE LED LIGHT 1 LED light flashes blue if the battery voltage is low Place the bat...

Page 9: ... removal press the light switch 25 2 To turn off the LED lights 33 press the light switch 25 again 8 6 LED LIGHT 1 Press the speed switch 26 towards the rabbit symbol for higher impeller speed and discharge distance in heavy conditions 2 Press the speed switch 26 towards the turtle system to decrease the impeller speed for greater runtime in light conditions 8 7 ADJUST THE DISCHARGE CHUTE You can ...

Page 10: ...CE WARNING Remove the battery pack from the machine before maintenance CAUTION Use only approved replacement parts CAUTION Do not let brake fluids gasoline petroleum based materials touch the plastic parts Chemicals can cause damage to the plastic and make the plastic unserviceable CAUTION Do not use strong solvents or detergents on the plastic housing or components 9 1 GENERAL MAINTENANCE Before ...

Page 11: ... THE SKID PLATES NOTE The range of adjustable height for skid plates is 1 5mm when putting the bolts through the U hole on the skid plates 1 Loosen the 2 sets of bolts 12 spacers 7 and nuts 16 that attach the skid plates 31 to the snow thrower housing 2 Remove the skid plates 31 3 Install the new skid plates 31 4 Do the same operation on the other side 9 6 STORE THE MACHINE Clean the machine befor...

Page 12: ...sible cause Solution The engine is on but the impeller does not turn The belt is dam aged Replace the belt A thin layer of snow stays behind The scraper is damaged Replace the scra per If you cannot find the solution to these problems call 1 855 345 3934 11 TECHNICAL DATA 12 LIMITED WARRANTY M E I L L E U R D A N S SA CATÉGORIE M EJ O R E N C L A S E BEST IN CLASS GARANTIE OUTIL BATTERIE GARANTÍA ...

Page 13: ...ll free helpline at 1 855 345 3934 TRANSPORTATION CHARGES Transportation charges for the movement of any power equipment unit or attachment are the responsibility of the purchaser It is the purchaser s responsibility to pay transportation charges for any part submitted for replacement under this warranty unless such return is requested in writing by Greenworks USA address Canadian address Greenwor...

Page 14: ...xx 1 Scraper Kit 3 xxxxxx 1 Wheel Assembly 4 xxxxxx 1 Chute Deflector Assembly 5 xxxxxx 1 Quick Release Lever Assembly 6 xxxxxx 1 Cam Lock assembly 7 xxxxxx 1 PCB board 8 xxxxxx 1 Skid plates 9 xxxxxx 1 Belt 10 xxxxxx 1 Upper handle assembly 13 English EN 10 11 11 xxxxxx 1 Battery ...

Reviews: