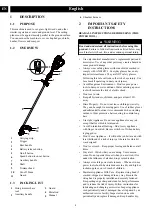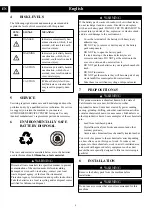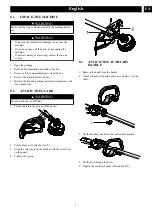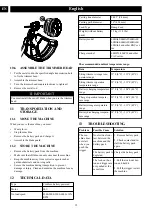
background image

8.4

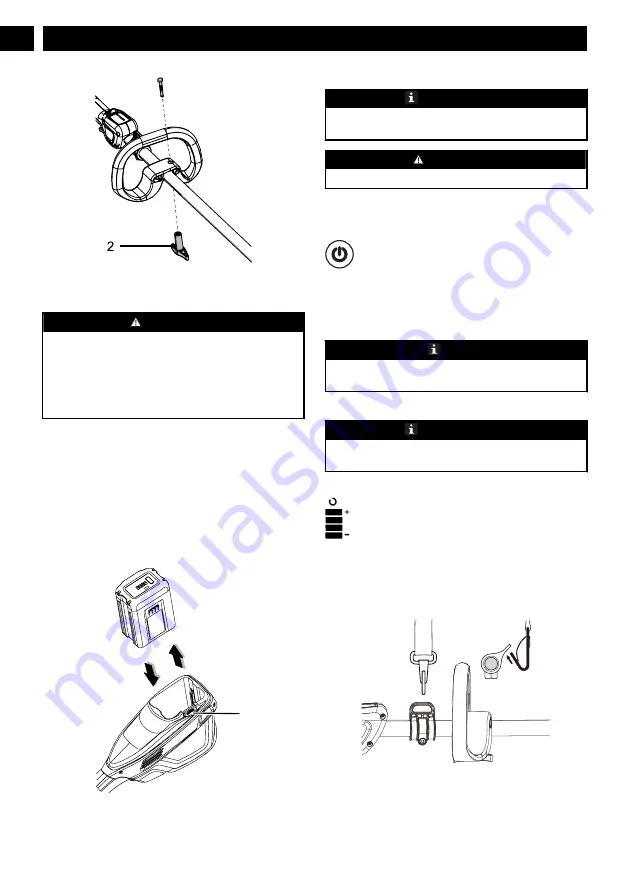
INSTALL THE BATTERY PACK


WARNING

If the battery pack or charger is damaged, replace the
battery pack or the charger.

Stop the machine and wait until the motor stops before
you install or remove the battery pack.

Read, know, and do the instructions in the battery and
charger manual.

1. Align the lift ribs on the battery pack with the grooves in

the battery compartment.

2. Push the battery pack into the battery compartment until

the battery pack locks into place.

3. When you hear a click, the battery pack is installed.

8.5

REMOVE THE BATTERY PACK

1. Push and hold the battery release button (1).
2. Remove the battery pack from the machine.

1

9

OPERATION


IMPORTANT

Before you operate the machine, read and understand the
safety regulations and the operation instructions.


WARNING

Be careful when you operate the machine.

9.1

CONTROLS

9.1.1

ON/OFF BUTTON

Push this button to connect and disconnect the electrical
circuit of the machine.

Green light on (G):

 the electrical circuit of the machine is on

(ON). The machine prepares to operate.


NOTE

If you do not use the machine for more than 30 s, the
machine stops.

Lights off:

 the electrical circuit is off (OFF).


IMPORTANT

Do not keep your finger on the button when you move the
machine to prevent accidental start.

9.1.2

LED INDICATION

1. 4 green lights are on when you start the machine.
2. Push the speed button forward to adjust the speed.

9.2

ATTACH THE SHOULDER STRAP

1. Attach the carabiner to the carrying ring on the drive

tube.

8

English

EN

Summary of Contents for 60T16

Page 1: ...均匀 无连页 5 以封样为准 6 料件需符合格力博HSF文件 编号 GLB CGR146 里关于环保和有害物质的具体要求 1 材质要求 60g双胶纸 常州格力博集团 说明书 杨媛 张君 周艳 王小妮 李海平 21 1 21 版本号 重要度等级 B B B A 日 期 工艺 审核 校对 设计 标记处数 签名 日期 阶段标记 视角标记 重量 比例 批准 审定 标准化 日期 更改文件号 SCALE A5 210mm 145mm GWK 60V String Trimmer 2109302T P0803234 00 ...

Page 2: ...STC460 60T16 www greenworkstools com EN OPERATOR MANUAL STRING TRIMMER ES MANUAL DEL OPERADOR CORTABORDES ...

Page 3: ......

Page 4: ... Controls 8 9 2 Attach the shoulder strap 8 9 3 Start the machine 9 9 4 Stop the machine 9 9 5 Operation tips 9 9 6 Cutting tips 9 9 7 Line cut off blade 10 9 8 Adjust the length of the cutting line 10 10 Maintenance 10 10 1 General information 10 10 2 Clean the machine 10 10 3 Remove the remaining line 10 10 4 Install the cutting line 11 10 5 Remove the trimmer head 11 10 6 Assemble the trimmer h...

Page 5: ...ng a power tool will increase the risk of electric shock Don t use in rain Keep all bystanders children and pets at least 50 ft away Dress Properly Do not wear loose clothing or jewelry They can be caught in moving parts Use of rubber gloves and substantial footwear is recommended when working outdoors Wear protective hair covering to contain long hair Use right Appliance Do not use appliance for ...

Page 6: ...65 F 130 C may cause an explosion Do not dispose of the batteries in a fire The cells may explode Check with local codes for possible special disposal instructions Do not open or mutilate the batteries Released electrolyte is corrosive and may cause damage to the eyes or skin It may be toxic if swallowed Exercise care in handling batteries in order not to short the battery with conducting material...

Page 7: ...do not use Discard it and replace with a new battery pack DO NOT TRY TO REPAIR IT To prevent injury and risk of fire explosion or electric shock and to avoid damage to the environment Cover the terminals of the battery with heavy duty adhesive tape DO NOT try to remove or destroy any of the battery pack components DO NOT try to open the battery pack If a leak develops the released electrolytes are...

Page 8: ...machine from the box 5 Discard the box and packing material in compliance with local regulations 8 2 ATTACH THE GUARD WARNING Do not touch the cut off blade 1 Put the shaft into the groove of the guard 2 Put the bracket 1 into the slot 2 3 Align the screw hole on the bracket with the screw hole on the guard 4 Tighten the screws 8 3 ATTACH THE AUXILIARY HANDLE 1 Remove the knob from the handle 2 At...

Page 9: ... 9 OPERATION IMPORTANT Before you operate the machine read and understand the safety regulations and the operation instructions WARNING Be careful when you operate the machine 9 1 CONTROLS 9 1 1 ON OFF BUTTON Push this button to connect and disconnect the electrical circuit of the machine Green light on G the electrical circuit of the machine is on ON The machine prepares to operate NOTE If you do...

Page 10: ...hen you use the machine Keep the machine connected to the correctly worn harness Keep a firm hold with the two hands on the machine while you operate the machine Cut tall grass from the top down If grass winds around the trimmer head Remove the battery pack Remove the grass 9 6 CUTTING TIPS Tilt the machine toward the area to be cut Use the tip of the cutting line to cut grass Move the machine fro...

Page 11: ...Examine regularly that you install the handles tightly IMPORTANT Use only the replacement parts and accessories of the initial manufacturer 10 1 GENERAL INFORMATION IMPORTANT Only your dealer or approved service center can do the maintenance that is not given in this manual Before the maintenance operations Stop the machine Remove the battery pack Cool the motor Store the machine in cool and dry p...

Page 12: ...hrough the hole Push the cutting line until it exits the opposite hole 4 Pull the cutting line through until there is an equal quantity of cutting line on each side 5 Turn the spool cap clock wise to wind the cutting line into the trimmer head Keep approximately 5 in of cutting line above out of each side of the trimmer head 10 5 REMOVE THE TRIMMER HEAD 1 Put the metal rod in the specified angle t...

Page 13: ...eter 0 095 2 4 mm Cutting path diameter 16 406 mm Feed Type Bump Feed Weight without battery pack 5 1 kg 11 2 lbs Battery model 60BA02 60BA25 60BA03 60BA04 60BA05 60BA06 60BA08 and other BAC ser ies Charger model 60DP10 606P14 and other CAC series The recommended ambient temperature range Item Temperature String trimmer storage tem perature range 32 F 0 C 113 F 45 C String trimmer operation temper...

Page 14: ... to themselves Lubricate with silicone spray Not enough line on spool Install more line Lines are worn too short Advance the cutting line by bumping the trimmer head Lines are tangled on spool 1 Remove the lines from the spool 2 Wind the lines The line keeps breaking The machine is used incorrectly 1 Cut with the tip of the line avoid stones walls and other hard objects 2 Advance the cutting line ...

Page 15: ...maintenance items such as lubricants blade sharpening 5 Normal deterioration of the exterior finish due to use or exposure HELPLINE Warranty service is available by calling our toll free helpline at 1 855 345 3934 TRANSPORTATION CHARGES Transportation charges for the movement of any power equipment unit or attachment are the responsibility of the purchaser It is the purchaser s responsibility to p...

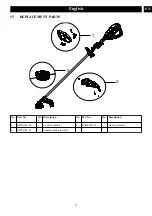
Page 16: ...15 REPLACEMENT PARTS 2 1 3 No Part No Qt y Description No Part No Qty Description 1 R0202616 00 1 Auxiliary handle 3 R0202622 00 1 Guard assembly 2 R0202618 00 1 Trimmer head assembly 15 English EN ...

Page 17: ... 9 2 Fijación de la correa de hombro 22 9 3 Puesta en marcha de la máquina 22 9 4 Detención de la máquina 22 9 5 Consejos de funcionamiento 22 9 6 Consejos de corte 23 9 7 Cuchilla de corte de hilo 23 9 8 Ajuste de la longitud del hilo de corte 23 10 Mantenimiento 23 10 1 Información general 23 10 2 Limpieza de la máquina 24 10 3 Retirada del hilo restante 24 10 4 Instalación del hilo de corte 24 ...

Page 18: ...regla reducirá el riesgo de lesiones oculares Utilice máscara facial si trabaja en espacios de trabajo con polvo Evite los entornos peligrosos No exponga las herramientas eléctricas a condiciones de humedad Si penetra agua en una herramienta eléctrica aumentará el riesgo de descarga eléctrica No utilice bajo la lluvia Mantenga a todos los transeúntes niños y mascotas al menos a 15 m Lleve indument...

Page 19: ...n los ojos acuda también al médico El líquido despedido de la batería puede provocar irritación o quemaduras No utilice una batería o un aparato que haya sufrido daños o modificaciones Las baterías dañadas o modificadas pueden exhibir un comportamiento impredecible que puede dar lugar a un incendio una explosión o un riesgo de lesiones No exponga una batería o un aparato al fuego ni a temperaturas...

Page 20: ...ADO más cercano para su reparación Utilice únicamente accesorios y piezas de repuesto idénticos del fabricante 6 ELIMINACIÓN DE BATERÍA SEGURA PARA EL MEDIO AMBIENTE Los materiales tóxicos y corrosivos que figuran a continuación se encuentran en las baterías utilizadas en esta máquina Ion de litio un material tóxico AVISO Deseche todos los materiales tóxicos de una manera especificada para evitar ...

Page 21: ...rar partículas microscópicas 8 INSTALACIÓN AVISO Retire la batería de la máquina antes de la instalación AVISO No utilice accesorios que no estén recomendados para esta máquina 8 1 DESEMBALAJE DE LA MÁQUINA AVISO Asegúrese de montar correctamente la máquina antes del uso AVISO Si las piezas de la máquina presentan daños no utilice la máquina Si no tiene todas las piezas no utilice la máquina Si fa...

Page 22: ...DA DE LA BATERÍA 1 Pulse y mantenga pulsado el botón de desbloqueo de la batería 1 2 Retire la batería de la máquina 1 9 FUNCIONAMIENTO IMPORTANTE Antes de utilizar la máquina debe leer y entender las normas de seguridad y las instrucciones de funcionamiento AVISO Tenga cuidado cuando utilice la máquina 9 1 CONTROLES 9 1 1 BOTÓN DE ENCENDIDO APAGADO Pulse este botón para conectar y desconectar el ...

Page 23: ...pagado 1 2 Empuje el botón de desbloqueo 2 hacia atrás 3 Apriete el gatillo 3 9 4 DETENCIÓN DE LA MÁQUINA 1 Suelte el gatillo 2 Pulse el botón de encendido apagado de nuevo para apagar la máquina 9 5 CONSEJOS DE FUNCIONAMIENTO AVISO Mantenga un espacio entre el cuerpo y la máquina AVISO No utilice la máquina sin la protección en su posición Le sugerimos lo siguiente cuando utilice la máquina Mante...

Page 24: ...jor rendimiento y mantendrá el hilo el tiempo suficiente para avanzar adecuadamente 9 8 AJUSTE DE LA LONGITUD DEL HILO DE CORTE Mientras utiliza la máquina el hilo de corte se desgasta y se acorta Puede ajustar la longitud del hilo de corte 1 Golpee el cabezal de corte contra el suelo mientras utiliza la máquina 2 El hilo se libera automáticamente y la cuchilla de corte corta la longitud sobrante ...

Page 25: ... los laterales del cabezal de corte al mismo tiempo 2 Tire para retirar la cubierta del carrete 3 Retire el hilo de corte restante 3 4 2 1 4 Ponga la cubierta del carrete en la carcasa del carrete 4 5 Presione las pestañas hasta que la cubierta del carrete encaje en su posición 10 4 INSTALACIÓN DEL HILO DE CORTE NOTA No ponga más de 5 m 15 pies de hilo de corte cada vez 1 Retire el hilo de corte r...

Page 26: ...el cabezal de corte 2 Monte el cabezal de corte 3 Gire el cabezal de corte en sentido antihorario para apretarlo 4 Retire la varilla metálica IMPORTANTE Debe instalar la cuchilla de corte cuando utilice el cabezal de corte 11 TRANSPORTE Y ALMACENAMIENTO 11 1 TRASLADO DE LA MÁQUINA Cuando mueva la máquina debe Llevar guantes Detener la máquina Retirar la batería y cargarla Montar la protección de l...

Page 27: ...ento del corta bordes 32 F 0 C 113 F 45 C Intervalo de temperatura de carga de la batería 39 F 4 C 104 F 40 C Intervalo de temperatura de funcionamiento del cargador 39 F 4 C 104 F 40 C Intervalo de temperatura de almacenamiento de la batería 32 F 0 C 113 F 45 C Intervalo de temperatura de descarga de la batería 32 F 0 C 113 F 45 C 13 SOLUCIÓN DE PROBLEMAS Problema Posible causa Solución La máquin...

Page 28: ...dados Lubrique con espray de silicona No hay suficiente hilo en el carrete Instale más hilo Los hilos se desga stan y son dema siado cortos Avance el hilo de corte golpeando el cabezal de corte Los hilos están en redados en el car rete 1 Retire los hilos del car rete 2 Enrolle los hilos El hilo se rompe con tinuamente La máquina se está utilizando incor rectamente 1 Corte con la punta del hilo evi...

Page 29: ...nuación 4 Artículos de mantenimiento de rutina tales como lubricantes afilado de cuchillas 5 Deterioro normal del acabado exterior debido al uso o la exposición LÍNEA DE ASISTENCIA TELEFÓNICA Puede contactar con el servicio de garantía llamando a nuestra línea de asistencia telefónica gratuita a 1 855 345 3934 COSTES DE TRANSPORTE Los costes de transporte por el desplazamiento de cualquier unidad ...

Page 30: ...ZAS DE REPUESTO 2 1 3 Nº Nº pieza Ca nt Descripción Nº Nº pieza Ca nt Descripción 1 R0202616 00 1 Asa auxiliar 3 R0202622 00 1 Conjunto de protección 2 R0202618 00 1 Conjunto de cabezal de corte 29 Español ES ...

Page 31: ......

Page 32: ......

Page 33: ......

Reviews: