background image

11.1

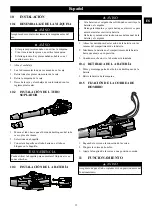
PUESTA EN MARCHA DE LA

MÁQUINA

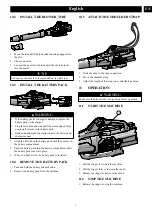
1. Apriete el gatillo (1) para poner en marcha la máquina.
2. Apriete el gatillo a fondo para aumentar la velocidad.
3. Suelte el gatillo para disminuir la velocidad.

11.2

DETENCIÓN DE LA MÁQUINA

1. Suelte el gatillo para detener la máquina.

11.3

PALANCA DE CONTROL DE

CRUCERO

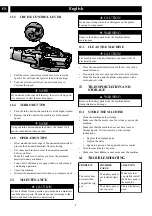
1. Tire de la palanca de control de crucero en sentido

horario para aumentar la velocidad. Esto bloqueará la
velocidad en el ajuste deseado.

2. Empuje la palanca de control de crucero en sentido

antihorario para disminuir la velocidad.


NOTA

Si disminuye la velocidad del todo, la unidad se detendrá y
es necesario volver a poner en marcha la máquina.

11.4

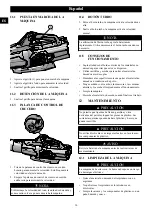
BOTÓN TURBO

1. Pulse el botón turbo, la máquina está a la velocidad más

alta.

2. Suelte el botón turbo, la máquina está a la velocidad

normal.


NOTA

La utilización del botón turbo agota la batería más
rápidamente. Utilice únicamente el botón turbo cuando sea
necesario.

11.5

CONSEJOS DE

FUNCIONAMIENTO

Sople alrededor del borde exterior de los materiales no
deseados para evitar que estos se dispersen.

Utilice rastrillos y escobas para quitar el material no
deseado antes de soplar.

Humedezca las superficies antes de quitar el material no
deseado en condiciones de polvo.

Tenga cuidado con los niños, las mascotas, las ventanas
abiertas y los coches limpios durante el funcionamiento.

Limpie la máquina.

Deseche el material no deseado cuando finalice el trabajo.

12

MANTENIMIENTO


PRECAUCIÓN

No permita que líquidos de frenos, gasolina y otros
derivados del petróleo toquen las piezas de plástico. Las
sustancias químicas pueden dañar el plástico y hacer que
quede inservible.


PRECAUCIÓN

No utilice disolventes o detergentes fuertes en la carcasa o
los componentes de plástico.


AVISO

Retire la batería de la máquina antes de realizar tareas de
mantenimiento.

12.1 LIMPIEZA DE LA MÁQUINA


PRECAUCIÓN

La máquina debe estar seca. La humedad supone un riesgo
de descargas eléctricas.

Quite el material no deseado del respiradero con un
aspirador.

No pulverice el respiradero ni lo introduzca en
disolventes.

Limpie la carcasa y los componentes de plástico con un
paño húmedo y suave.

16

Español

ES

Summary of Contents for BL60L02

Page 1: ...BLC402 BL60L02 BL60L512 www greenworkstools com EN OPERATOR MANUAL BLOWER ES MANUAL DEL OPERADOR SOPLADOR ...

Page 2: ......

Page 3: ...10 1 Unpack the machine 6 10 2 Install the blower tube 7 10 3 Install the battery pack 7 10 4 Remove the battery pack 7 10 5 Attach the shoulder strap 7 11 Operation 7 11 1 Start the machine 7 11 2 Stop the machine 7 11 3 Cruise control lever 8 11 4 Turbo button 8 11 5 Operation tips 8 12 Maintenance 8 12 1 Clean the machine 8 13 Transportation and storage 8 13 1 Store the machine 8 14 Troubleshoo...

Page 4: ...y long pants boots and gloves Avoid loose garments or jewellery that could get caught in moving parts of the machine or its motor Do not force tool Use the correct tool for your application The correct tool will do the job better and safer at the rate for which it is designed Keep firm footing and balance Do not overreach Overreaching can result in loss of balance Do not use the tool if the switch...

Page 5: ...AFETY Tragic accidents can occur if the operator is not aware of the presence of children Keep children out of the working area and under the watchful care of a responsible adult Do not allow children under the age of 14 to operate this machine Children who are 14 years of age and older must read and understand the operating instructions and safety rules in this manual and must be trained and supe...

Page 6: ...gency for information and specific instructions Take the batteries to a local recycling and or disposal center certified for lithium ion disposal WARNING If the battery pack cracks or breaks with or without leaks do not recharge it and do not use Discard it and replace with a new battery pack DO NOT TRY TO REPAIR IT To prevent injury and risk of fire explosion or electric shock and to avoid damage...

Page 7: ...k with the grooves in the battery compartment 2 Push the battery pack into the battery compartment until the battery pack locks into place 3 When you hear a click the battery pack is installed 10 4 REMOVE THE BATTERY PACK 1 Push and hold the battery release button 2 Remove the battery pack from the machine 10 5 ATTACH THE SHOULDER STRAP 1 Hook the strap to the strap connection 2 Put on the shoulde...

Page 8: ...to the plastic and make the plastic unserviceable CAUTION Do not use strong solvents or detergents on the plastic housing or components WARNING Remove the battery pack from the machine before maintenance 12 1 CLEAN THE MACHINE CAUTION The machine must be dry Humidity can cause risks of electrical shocks Clear the unwanted material out of the air vent with a vacuum cleaner Do not spray the air vent...

Page 9: ...rts or workmanship Greenworks at its own discretion will repair or replace any and all parts found to be defective through normal use free of charge to the customer This warranty is valid only for units which have been used for personal use that have not been hired or rented for industrial commercial use and that have been maintained in accordance with the instructions in the owners manual supplie...

Page 10: ...17 EXPLODED VIEW 4 No Part No Qty Description 1 R0201911 00 1 Flat nozzle 2 R0201909 00 1 Concentrator nozzle 3 R0201910 00 1 Blower tube 4 RB37902144 1 Shoulder strap 10 English EN ...

Page 11: ... máquina 15 10 2 Instalación del tubo soplador 15 10 3 Instalación de la batería 15 10 4 Retirada de la batería 15 10 5 Fijación de la correa de hombro 15 11 Funcionamiento 15 11 1 Puesta en marcha de la máquina 16 11 2 Detención de la máquina 16 11 3 Palanca de control de crucero 16 11 4 Botón turbo 16 11 5 Consejos de funcionamiento 16 12 Mantenimiento 16 12 1 Limpieza de la máquina 16 13 Transp...

Page 12: ...puedan inflamarse Las herramientas eléctricas generan chispas que pueden encender el polvo o los gases Nunca permita que los niños utilicen el equipo Nunca permita que utilicen el equipo adultos sin la debida instrucción Lleve pantalones largos y gruesos botas y guantes Evite prendas sueltas o joyas que puedan engancharse en las piezas móviles de la máquina o su motor No fuerce la herramienta Util...

Page 13: ...ique ni intente reparar el aparato o la batería según corresponda excepto lo indicado en las instrucciones de uso y cuidado Siga todas las instrucciones de carga y no cargue la batería o el aparato fuera del intervalo de temperatura especificado en las instrucciones La carga incorrecta o a temperaturas fuera del intervalo especificado puede dañar la batería y aumentar el riesgo de incendio 4 SEGUR...

Page 14: ...UCIÓN Sin símbolo de alerta sobre seguridad Indica una situa ción que puede provocar da ños materiales 9 ELIMINACIÓN DE BATERÍA SEGURA PARA EL MEDIO AMBIENTE Los materiales tóxicos y corrosivos que figuran a continuación se encuentran en las baterías utilizadas en esta máquina Ion de litio un material tóxico AVISO Deseche todos los materiales tóxicos de una manera especificada para evitar la conta...

Page 15: ...entar el flujo de aire en zonas estrechas 10 3 INSTALACIÓN DE LA BATERÍA AVISO Si la batería o el cargador ha sufrido daños sustituya la batería o el cargador Detenga la máquina y espere hasta que el motor se pare antes de instalar o retirar la batería Debe leer y entender las instrucciones del manual de la batería y el cargador 1 Alinee las nervaduras de elevación de la batería con las ranuras de...

Page 16: ...or del borde exterior de los materiales no deseados para evitar que estos se dispersen Utilice rastrillos y escobas para quitar el material no deseado antes de soplar Humedezca las superficies antes de quitar el material no deseado en condiciones de polvo Tenga cuidado con los niños las mascotas las ventanas abiertas y los coches limpios durante el funcionamiento Limpie la máquina Deseche el mater...

Page 17: ...04 LB605 LB606 y otras series BAC Modelo de cargador CAC801 CH60DP01 60DPC10A CH60R00 y otras series CAC El intervalo de temperatura ambiente recomendado Elemento Temperatura Intervalo de temperatura de almacenamiento del soplador 32 F 0 C 113 F 45 C Intervalo de temperatura de funcionamiento del soplador 32 F 0 C 113 F 45 C Intervalo de temperatura de carga de la batería 39 F 4 C 104 F 40 C Inter...

Page 18: ...por el desplazamiento de cualquier unidad o accesorio de equipos eléctricos son responsabilidad del comprador Es responsabilidad del comprador pagar los costes de transporte de cualquier pieza enviada para su sustitución bajo esta garantía a menos que dicha devolución sea solicitada por escrito por Greenworks Dirección en EE UU Greenworks Tools P O Box 1238 Mooresville NC 28115 17 VISTA DESPIEZADA...

Page 19: ......

Page 20: ......

Reviews: