background image

1

DESCRIPTION

1.1

PURPOSE

The machine is used to propel air out of a tube to move
unwanted materials such as leaves in the yard. Some
machines also suck in leaves and small twigs through a
vacuum, and shred them into a bag.

1.2

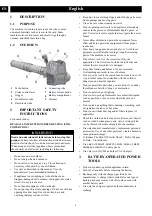
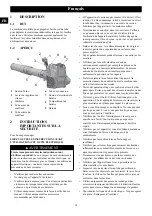
OVERVIEW

1

2

3

4

5

6

7

8

9

1

Turbo button

2

Cruise control lever

3

Trigger

4

Front blower tube

5

Rear blower tube

6

Connecting tube

7

Battery release button

8

Battery compartment

9

Harness

2

IMPORTANT SAFETY

INSTRUCTIONS

For household use.

READ ALL INSTRUCTIONS BEFORE USING (THIS
POWER TOOL)


WARNING

Read and understand all instructions before using this
product.

 Failure to follow all instructions listed below may

result in electric shock, fire, and/or serious personal injury.
When using an electrical appliance, basic precautions
should always be followed, including the following:

Do not use on wet surfaces.

Do not charge the unit outdoors.

Do not allow to be used as a toy. Close attention is
necessary when used by or near children.

Use only as described in this manual. Use only
manufacturer’s recommended attachments.

If appliance is not working as it should, has been
dropped, damaged, left outdoors, or dropped into water,
return it to a service center.

Do not handle appliance with wet hands.

Do not put any object into openings. Do not use with any
opening blocked; keep free of dust, lint, hair, and
anything that may reduce air flow.

Keep hair, loose clothing, fingers and all body parts away
from openings and moving parts.

Use extra care when cleaning on stairs.

Do not operate power tools in an explosive atmosphere,
such as in the presence of flammable liquids, gases, or
dust. Power tools create sparks that may ignite the dust or
fumes.

Never allow children to operate the equipment. Never
allow adults to operate the equipment without proper
instruction.

Wear heavy long pants, boots, and gloves. Avoid loose
garments or jewellery that could get caught in moving
parts of the machine or its motor.

Do not force tool. Use the correct tool for your
application. The correct tool will do the job better and
safer at the rate for which it is designed.

Keep firm footing and balance. Do not overreach.
Overreaching can result in loss of balance.

Do not use the tool if the switch does not turn it on or off.
Any tool that cannot be controlled with the switch is
dangerous, and must be repaired.

Do not operate this unit when you are tired, ill, or under
the influence of alcohol, drugs, or medication.

Do not operate in poor lighting.

Do not use to pick up flammable or combustible liquids,
such as gasoline, or use in areas where they may be
present

Do not pick up anything that is burning or smoking, such
as cigarettes, matches, or hot ashes.

Do not use without dust bag and/or filters in place (if
applicable).

Check the work area before each use. Remove all objects
such as rocks, broken glass, nails, wire, or string which
can be thrown or become entangled in the machine.

Use only identical manufacturer’s replacement parts and
accessories. Use of any other parts may create a hazard or
cause product damage.

To Reduce The Risk Of Electric Shock – Do Not Expose
To Rain – Store Indoors.

Use only with LB602, LB6025, LB603, LB604, LB605,
LB606 and other BAC battery packs.

Use only with CAC801 and other CAC chargers.

3

BATTERY-OPERATED POWER

TOOLS

Do not use battery-operated appliance in rain.

Turn off all controls before removing the battery.

Recharge only with the charger specified by the
manufacturer. A charger that is suitable for one type of
battery pack may create a risk of fire when used with
another battery pack.

Use only the charger supplied by the manufacturer to
recharge.

4

English

EN

Summary of Contents for BLC463

Page 1: ...BLC463 www greenworkstools com EN OPERATOR MANUAL FR MANUEL D OPÉRATEUR BLOWER SOUFFLEUSE ES MANUAL DEL OPERADOR SOPLADOR BPB60L00 ...

Page 2: ......

Page 3: ...ting tube 7 10 4 Install the rear blower tube 7 10 5 Install the front blower tube 8 10 6 Install the battery pack 8 10 7 Remove the battery pack 8 10 8 Adjust the harness 8 10 9 Remove the harness 9 11 Operation 9 11 1 Start the machine 9 11 2 Stop the machine 9 11 3 Cruise control lever 10 11 4 Turbo button 10 11 5 Operation tips 10 12 Maintenance 10 12 1 Clean the machine 10 13 Transportation a...

Page 4: ...the equipment Never allow adults to operate the equipment without proper instruction Wear heavy long pants boots and gloves Avoid loose garments or jewellery that could get caught in moving parts of the machine or its motor Do not force tool Use the correct tool for your application The correct tool will do the job better and safer at the rate for which it is designed Keep firm footing and balance...

Page 5: ... instructions Charging improperly or at temperatures outside of the specified range may damage the battery and increase the risk of fire 4 CHILD SAFETY Tragic accidents can occur if the operator is not aware of the presence of children Keep children out of the working area and under the watchful care of a responsible adult Do not allow children under the age of 14 to operate this machine Children ...

Page 6: ...r local waste disposal agency or the local Environmental Protection Agency for information and specific instructions Take the batteries to a local recycling and or disposal center certified for lithium ion disposal WARNING If the battery pack cracks or breaks with or without leaks do not recharge it and do not use Discard it and replace with a new battery pack DO NOT TRY TO REPAIR IT To prevent in...

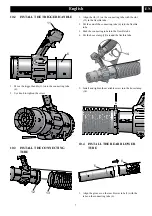
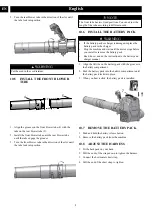
Page 7: ...be with the slot 13 in the flexible tube 2 Put the end of the connecting tube 6 into the flexible tube 3 Push the connecting tube into the flexible tube 4 Put the hose clamp 14 around the flexible tube 14 5 Install and tighten the available screw into the hose clamp 14 10 4 INSTALL THE REAR BLOWER TUBE 5 6 1 Align the grooves on the rear blower tube 5 with the tabs on the connecting tube 6 7 Engli...

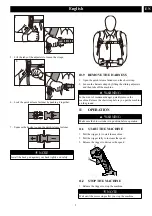
Page 8: ...he battery pack or charger is damaged replace the battery pack or the charger Stop the machine and wait until the motor stops before you install or remove the battery pack Read know and do the instructions in the battery and charger manual 1 Align the lift ribs on the battery pack with the grooves in the battery compartment 2 Push the battery pack into the battery compartment until the battery pac...

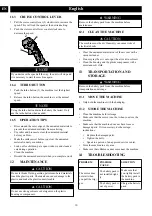
Page 9: ...g the sliding adjusters and then take off the machine WARNING In the event of imminent danger quickly remove the machine Release the chest strap before you put the machine on the ground 11 OPERATION WARNING Make sure the blower tube is in position before operation 11 1 START THE MACHINE 1 Pull the trigger 3 to start the machine 2 Pull the trigger fully to increase the speed 3 Release the trigger t...

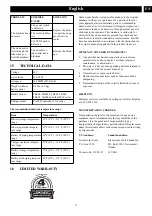
Page 10: ... plastic unserviceable CAUTION Do not use strong solvents or detergents on the plastic housing or components WARNING Remove the battery pack from the machine before maintenance 12 1 CLEAN THE MACHINE CAUTION The machine must be dry Humidity can cause risks of electrical shocks Clear the unwanted material out of the air vent with a vacuum cleaner Do not spray the air vent or put the air vent in sol...

Page 11: ... in materials parts or workmanship Greenworks at its own discretion will repair or replace any and all parts found to be defective through normal use free of charge to the customer This warranty is valid only for units which have been used for personal use that have not been hired or rented for industrial commercial use and that have been maintained in accordance with the instructions in the owner...

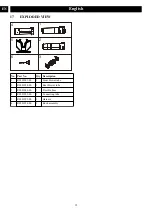
Page 12: ...3 1 No Part No Qty Description 1 R0201983 00 1 Front blower tube 2 R0201984 00 1 Rear blower tube 3 R0201986 00 1 Flexible hose 4 R0201992 00 1 Connecting tube 5 R0201993 00 1 Harness 6 R0201994 00 1 Knob assembly 12 English EN ...

Page 13: ...z le tube de connexion 17 10 4 Installez le tube arrière du souffleur 18 10 5 Installez le tube avant du souffleur 18 10 6 Installer le bloc batterie 19 10 7 Retirer le bloc batterie 19 10 8 Ajustez le harnais 19 10 9 Retirez le harnais 20 11 Utilisation 20 11 1 Démarrer la machine 20 11 2 Arrêter la machine 20 11 3 Levier de régulateur de vitesse 20 11 4 Bouton Turbo 20 11 5 Conseils sur l utilis...

Page 14: ...rtures et des pièces mobiles Soyez particulièrement prudent lorsque vous nettoyez les escaliers N utilisez pas les outils électriques dans un environnement explosif par exemple en présence de liquides gaz ou poussières inflammables La mise en marche de l outil crée des étincelles qui peuvent enflammer la poussière ou les vapeurs Ne laissez jamais les enfants utiliser l appareil Ne permettez jamais...

Page 15: ...rature supérieure à 130 C 265 F peut provoquer une explosion Faites effectuer l entretien par un réparateur qualifié en n utilisant que des pièces de rechange identiques Cela garantira le maintien de la sécurité du produit Ne modifiez pas ou n essayez pas de réparer l appareil ou la batterie selon le cas sauf en conformité avec les instructions d utilisation et d entretien indiquées dans ce manuel...

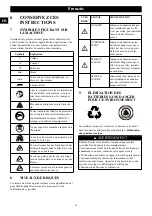
Page 16: ...se en garde suivants et leur signification ont pour but d expliquer les niveaux de risques associés à l utilisation de ce produit SYM BOLE SIGNAL SIGNIFICATION DANGER Indique une situation danger euse imminente qui si elle n est pas évitée peut entraîner la mort ou des blessures graves AVERTISSE MENT Indique une situation poten tiellement dangereuse qui si elle n est pas évitée peut en traîner la ...

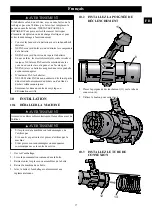
Page 17: ...E LES Mettez PAS dans un endroit où ils feront partie d un site d enfouissement de déchets ou d un flux de déchets solides municipaux Emmenez les dans un centre de recyclage ou d élimination certifié 10 INSTALLATION 10 1 DÉBALLER LA MACHINE AVERTISSEMENT Assurez vous d assembler correctement la machine avant de l utiliser AVERTISSEMENT Si les pièces de la machine sont endommagées ne l utilisez pas...

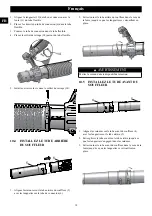
Page 18: ...avec les languettes sur le tube de connexion 6 2 Faites tourner le tube arrière du souffleur dans le sens de la fente jusqu à ce que les languettes se verrouillent en place AVERTISSEMENT Mettez le cordon dans le dispositif de rétention 10 5 INSTALLEZ LE TUBE AVANT DU SOUFFLEUR 4 5 1 Alignez les rainures sur le tube avant du souffleur 4 avec les languettes sur le tube arrière 5 2 Faites glisser le ...

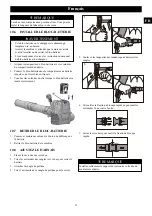
Page 19: ...n encliqueté 3 Vous devriez entendre un clic lorsque le bloc batterie sera inséré correctement 11 10 7 RETIRER LE BLOC BATTERIE 1 Poussez et maintenez enfoncé le bouton de déblocage de la batterie 2 Retirez le bloc batterie de la machine 10 8 AJUSTEZ LE HARNAIS 1 Placez le sac à dos sur votre dos 2 Tirez les extrémités des sangles vers le bas pour serrer le harnais 3 Attachez la sangle de poitrine...

Page 20: ...rouillera la vitesse au réglage désiré 2 Faites tourner le levier de régulateur de vitesse dans le sens contraire des aiguilles d une montre pour augmenter la vitesse 1 2 3 REMARQUE Si vous diminuez la vitesse au minimum l appareil s arrêtera et vous devrez relancer la machine 11 4 BOUTON TURBO 1 Appuyez sur le bouton Turbo 1 pour faire fonctionner la machine à vitesse maximale 2 Relâchez le bouto...

Page 21: ...e d un centre de service certifié Entreposez la machine dans un endroit sec Assurez vous que les enfants ne peuvent pas s approcher de la machine 14 DÉPANNAGE PROBLÈME CAUSE POSSI BLE SOLUTION Le moteur ne dé marre pas lorsque vous appuyez sur la gâchette La batterie n est pas correctement installée Assurez vous que la batterie est cor rectement installée dans la machine Le bloc batterie est décha...

Page 22: ...n entretien inapproprié ou d une modification ou 2 L appareil s il n a pas été utilisé et ou entretenu conformément au manuel du propriétaire ou 3 Usure normale sauf comme indiqué ci dessous 4 Articles d entretien courant tels que lubrifiants affûtage des lames 5 Détérioration normale du fini extérieur due à l utilisation ou à l exposition ASSISTANCE TÉLÉPHONIQUE Le service de garantie est disponi...

Page 23: ...27 10 4 Instalación del tubo soplador trasero 28 10 5 Instalación del tubo soplador delantero 28 10 6 Instalación de la batería 29 10 7 Retirada de la batería 29 10 8 Ajuste del arnés 29 10 9 Retirada del arnés 30 11 Funcionamiento 30 11 1 Puesta en marcha de la máquina 30 11 2 Detención de la máquina 30 11 3 Palanca de control de crucero 30 11 4 Botón turbo 30 11 5 Consejos de funcionamiento 30 1...

Page 24: ...rramientas eléctricas en una atmósfera explosiva como en la presencia de líquidos gases o polvo que puedan inflamarse Las herramientas eléctricas generan chispas que pueden encender el polvo o los gases Nunca permita que los niños utilicen el equipo Nunca permita que utilicen el equipo adultos sin la debida instrucción Lleve pantalones largos y gruesos botas y guantes Evite prendas sueltas o joyas...

Page 25: ...o idénticas Esto garantizará el mantenimiento de la seguridad del producto No modifique ni intente reparar el aparato o la batería según corresponda excepto lo indicado en las instrucciones de uso y cuidado Siga todas las instrucciones de carga y no cargue la batería o el aparato fuera del intervalo de temperatura especificado en las instrucciones La carga incorrecta o a temperaturas fuera del int...

Page 26: ...NDICACIÓN SIGNIFICADO PELIGRO Indica una situación de peli gro inminente que de no evi tarse provocará lesiones graves o incluso la muerte ADVERTEN CIA Indica una situación de peli gro potencial que de no evita rse podría provocar lesiones graves o incluso la muerte SÍMBO LO INDICACIÓN SIGNIFICADO PRECAUCIÓN Indica una situación de peli gro potencial que de no evita rse puede provocar lesiones lev...

Page 27: ...onde formarán parte de vertederos de residuos o flujos de residuos sólidos urbanos Llévelas a un centro de reciclaje o eliminación certificado 10 INSTALACIÓN 10 1 DESEMBALAJE DE LA MÁQUINA AVISO Asegúrese de montar correctamente la máquina antes del uso AVISO Si las piezas de la máquina presentan daños no utilice la máquina Si no tiene todas las piezas no utilice la máquina Si faltan piezas o hay ...

Page 28: ...ras del tubo soplador trasero 5 con las pestañas del tubo de conexión 6 2 Gire el tubo soplador trasero en la dirección de la ranura hasta que las pestañas se bloqueen en posición AVISO Coloque el cable en el soporte del cable 10 5 INSTALACIÓN DEL TUBO SOPLADOR DELANTERO 4 5 1 Alinee las ranuras del tubo soplador delantero 4 con las pestañas del tubo soplador trasero 5 2 Instale el tubo soplador d...

Page 29: ...mento de la batería hasta que encaje en su posición 3 Cuando escuche un clic la batería está instalada 11 10 7 RETIRADA DE LA BATERÍA 1 Pulse y mantenga pulsado el botón de desbloqueo de la batería 2 Retire la batería de la máquina 10 8 AJUSTE DEL ARNÉS 1 Póngase la mochila en la espalda 2 Tire de los extremos de las correas hacia abajo para apretar el arnés 3 Conecte la correa del pecho horizonta...

Page 30: ...rario para aumentar la velocidad Esto bloqueará la velocidad en el ajuste deseado 2 Empuje la palanca de control de crucero en sentido antihorario para disminuir la velocidad 1 2 3 NOTA Si disminuye la velocidad del todo la unidad se detendrá y es necesario volver a poner en marcha la máquina 11 4 BOTÓN TURBO 1 Pulse el botón turbo 1 la máquina está a la velocidad más alta 2 Suelte el botón turbo ...

Page 31: ...cio aprobado Almacene la máquina en una zona seca Asegúrese de que los niños no puedan acercarse a la máquina 14 SOLUCIÓN DE PROBLEMAS PROBLEMA POSIBLE CAU SA SOLUCIÓN El motor no se pone en marcha cuando aprieta el gatillo La batería no se ha instalado bien Asegúrese de que ha instalado bien la batería en la má quina La batería se ha agotado Cargue la batería La máquina no se pone en marcha El in...

Page 32: ...o alteración o 2 La unidad si no ha sido utilizada o mantenida de acuerdo con el manual del propietario o 3 Desgaste normal excepto en lo indicado a continuación 4 Artículos de mantenimiento de rutina tales como lubricantes afilado de cuchillas 5 Deterioro normal del acabado exterior debido al uso o la exposición LÍNEA DE ASISTENCIA TELEFÓNICA Puede contactar con el servicio de garantía llamando a...

Reviews: