background image

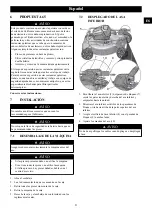
7.6

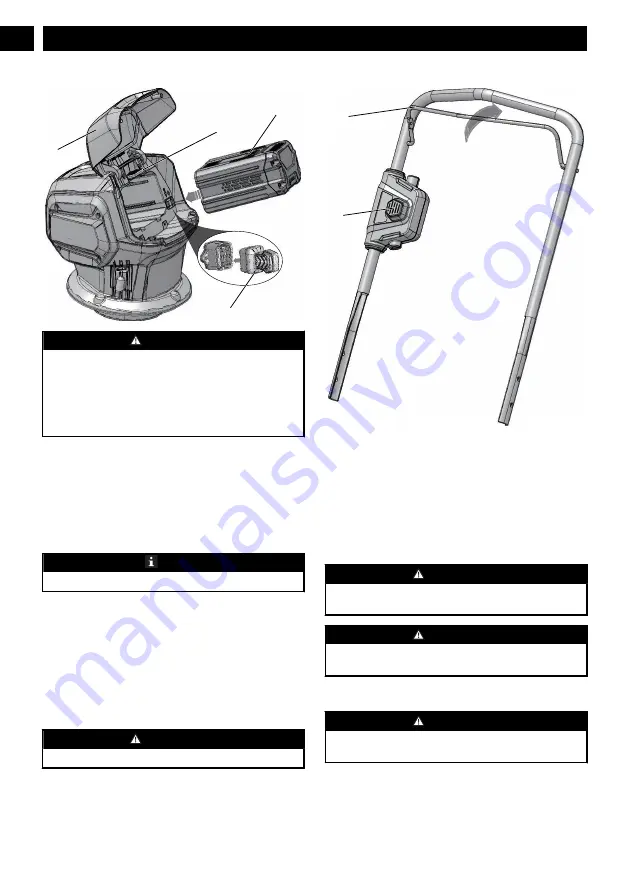
INSTALL THE BATTERY PACK

15

17

16

6


WARNING

If the battery pack or charger is damaged, replace the
battery pack or the charger.

Stop the machine and wait until the motor stops before
you install or remove the battery pack.

Read, know, and follow the instructions in the battery
and charger manual.

1. Open the battery door (6).
2. Align the lift ribs on the battery pack (15) with the

grooves in the battery compartment.

3. Push the battery pack into the battery compartment until

the battery pack locks into place.

4. When you hear a click, the battery pack is installed.
5. Close the battery door.


NOTE

The motor starts only when you put in the safety key (16).

7.7

REMOVE THE BATTERY PACK

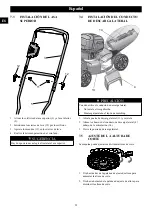
1. Open the battery door (6).
2. Remove the safety key (16).
3. Push and hold the battery release button (17).
4. Remove the battery pack from the machine.

8

OPERATION


WARNING

Wear eye protection during operation.

8.1

START THE MACHINE

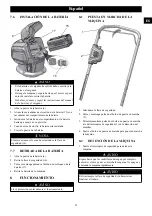
1

2

1. Put in the safety key.
2. Push and hold the start button (2).
3. While you hold the start button, pull the bail switch (1) in

the direction of the handle bar.

4. Release the start button to start the machine.

8.2

STOP THE MACHINE

1. Release the bail switch to stop the machine.


WARNING

Wait until the blades fully stop before you start the machine
again. Do not quickly turn the machine off and on.


WARNING

Always remove the safety key and battery pack after you
complete the work.

8.3

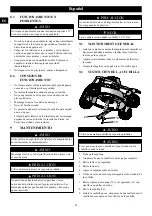
OPERATE ON SLOPES


WARNING

Do not mow on the slopes with incline more than 15°. If
you are not comfortable, do not mow on a slope.

Do not go up and down on a slope, mow across the face
of the slope. Be careful when you change the direction on
a slope.

10

English

EN

Summary of Contents for MO60L08

Page 1: ...LMC416 MO60L08 MO60L518 EN OPERATOR MANUAL LAWN MOWER MANUAL DEL OPERADOR ES CORTACÉSPED www greenworkstools com ...

Page 2: ......

Page 3: ...achine 8 7 2 Unfold the lower handle 8 7 3 Install the upper handle 9 7 4 Install the side discharge chute 9 7 5 Set the cutting height 9 7 6 Install the battery pack 10 7 7 Remove the battery pack 10 8 Operation 10 8 1 Start the machine 10 8 2 Stop the machine 10 8 3 Operate on slopes 10 8 4 Operation tips 11 9 Maintenance 11 9 1 General maintenance 11 9 2 Replace the blade 11 10 Store the machin...

Page 4: ...cts that may obscure your vision of a child or bystander Keep children bystanders helpers and pets at least 100 feet 30m from the mower while it is in operation Stop the machine if anyone enters the area Never allow children under 14 years old to operate a power mower Operators 14 years old and over should fully read and understand the operator s manual and safety rules Only responsible individual...

Page 5: ...cified range may damage the battery and increase the risk of fire If lawn mower strikes a foreign object follow these steps Release the bail switch to disengage the motor Remove the battery Inspect for damage Repair any damaged parts before restarting and operating the lawn mower Have servicing performed by a qualified repair person using only identical replacement parts This will ensure that the ...

Page 6: ...ts or repairs with the motor running Always remove battery pack from mowers before adjusting cleaning or repairing Check grass catcher components and the discharge guard frequently and replace with manufacturer s recommended parts when necessary Sharpen a dull blade equally at each end to maintain the balance Keep guards in place and in working order Mower blades are sharp and can cut Wrap the bla...

Page 7: ...when pull ing back DANGER Keep Hands and Feet Away To reduce the risk of injury keep hands and feet away from rotating parts Do not operate unless discharge cover or grass bag is in its proper place If damaged replace immediately Symbol Name Explanation DANGER Keep By standers Away All visitors should be kept at a distance from work area DANGER Thrown Deb ris Remove objects that can be thrown by t...

Page 8: ...of California to cause cancer birth defects or other reproductive harm Some dust created by power sanding sawing grinding drilling and other construction activities contains chemicals known to cause cancer birth defects or other reproductive harm Some examples of these chemicals are Lead from lead based paints Crystalline silica from bricks and cement and other masonry products Arsenic and chromiu...

Page 9: ...through the holes 3 Tighten the knobs 11 onto the cam locks 4 Do the same operation on the other side TIP There are two positions to choose while installing the upper handle 7 4 INSTALL THE SIDE DISCHARGE CHUTE 4 14 13 CAUTION When you use the side discharge chute Do not install the grass catcher Keep the mulch plug installed 1 Open the side discharge door 13 and hold it 2 Line up the recesses of ...

Page 10: ...afety key 16 3 Push and hold the battery release button 17 4 Remove the battery pack from the machine 8 OPERATION WARNING Wear eye protection during operation 8 1 START THE MACHINE 1 2 1 Put in the safety key 2 Push and hold the start button 2 3 While you hold the start button pull the bail switch 1 in the direction of the handle bar 4 Release the start button to start the machine 8 2 STOP THE MAC...

Page 11: ...rgents on the plastic housing or components NOTE Recommended tightening torque blade 33 37 Nm 9 1 GENERAL MAINTENANCE Before each use examine the machine for damaged missing or loose parts such as screws nuts bolts and caps Tighten correctly all the fasteners and caps Clean the machine with a dry cloth Do not use water 9 2 REPLACE THE BLADE 20 18 19 WARNING Use only approved replacement blades WAR...

Page 12: ...l or the blade height is too low Increase the blade height Problem Possible cause Solution There is a high vi bration in the ma chine The blade is un balanced and worn Replace the blade The motor shaft is bent 1 Stop the mo tor 2 Remove the safety key and battery pack 3 Inspect for damage 4 Repair the ma chine before you start it again The machine stops during mowing The blade height is too low In...

Page 13: ...NTY 1 Any part that has become inoperative due to misuse commercial use abuse neglect accident improper maintenance or alteration or 2 The unit if it has not been operated and or maintained in accordance with the owner s manual or 3 Normal wear except as noted below 4 Routine maintenance items such as lubricants blade sharpening 5 Normal deterioration of the exterior finish due to use or exposure ...

Page 14: ...d knobs for upper handle 2 R0201859 00 1 Lower handle knob 3 R0201860 00 1 Safety key 4 R0201861 00 1 Rear flap 5 R0201862 00 1 Blade assembly 6 R0201863 00 1 Side discharge assembly 7 R0202047 00 1 Wheel assembly 8 R0202048 00 1 Upper control assembly 9 R0202049 00 1 Powerhead 14 English EN ...

Page 15: ...Desplegado del asa inferior 21 7 3 Instalación del asa superior 22 7 4 Instalación del conducto de descarga lateral 22 7 5 Ajuste de la altura de corte 22 7 6 Instalación de la batería 23 7 7 Retirada de la batería 23 8 Funcionamiento 23 8 1 Puesta en marcha de la máquina 23 8 2 Detención de la máquina 23 8 3 Funcionamiento en pendientes 24 8 4 Consejos de funcionamiento 24 9 Mantenimiento 24 9 1 ...

Page 16: ...ga la zona de funcionamiento libre de cualquier persona especialmente niños pequeños y mascotas Tenga mucho cuidado al acercarse a esquinas ciegas portales arbustos árboles u otros objetos que puedan ocultar su visión de un niño o un transeúnte Mantenga a los niños los transeúntes los ayudantes y las mascotas al menos a 100 pies 30m del cortacésped cuando esté en funcionamiento Detenga la máquina ...

Page 17: ...lta la cubierta de descarga o si esta ha sufrido daños puede haber contacto con la cuchilla o lesiones por objetos proyectados Los objetos golpeados por la cuchilla del cortacésped pueden producir lesiones graves a las personas El césped siempre debe examinarse detenidamente y deben eliminarse todos los objetos antes de cada corte Detenga la cuchilla cuando cruce senderos de grava aceras o caminos...

Page 18: ...modificadas pueden exhibir un comportamiento impredecible que puede dar lugar a un incendio una explosión o un riesgo de lesiones 2 3 SERVICIO MANTENIMIENTO Compruebe la cuchilla y los pernos de montaje del motor de la máquina a intervalos frecuentes para verificar que estén bien apretados Sustituya la cuchilla si está doblada o agrietada Una cuchilla desequilibrada provoca vibraciones que podrían...

Page 19: ...e hierba mojada Podría perder el equilibrio y resbalar 3 SÍMBOLOS EN EL PRODUCTO En esta herramienta pueden utilizarse algunos de los siguientes símbolos Le rogamos que los estudie y aprenda su significado La interpretación correcta de estos símbolos le permitirá manejar la herramienta mejor y de manera más segura Símbolo Nombre Explicación V Voltios Tensión A Amperios Corriente Hz Hertzios Frecue...

Page 20: ... encuentran en las baterías utilizadas en esta máquina Ion de litio un material tóxico AVISO Deseche todos los materiales tóxicos de una manera especificada para evitar la contaminación del medio ambiente Antes de desechar una batería de ion de litio dañada o agotada contacte con la agencia local de eliminación de residuos o con la agencia de protección ambiental local para obtener información e i...

Page 21: ...nes 7 INSTALACIÓN AVISO No cambie ni utilice accesorios que no sean los recomendados por el fabricante AVISO No coloque la llave de seguridad ni la batería hasta que no haya montado todas las piezas 7 1 DESEMBALAJE DE LA MÁQUINA AVISO Asegúrese de montar correctamente la máquina antes del uso AVISO Si las piezas presentan daños no utilice la máquina Si no tiene todas las piezas no utilice la máqui...

Page 22: ...3 PRECAUCIÓN Cuando utilice el conducto de descarga lateral No instale el recogehierba Mantenga instalado el tapón de mulching 1 Abra la puerta de descarga lateral 13 y sujétela 2 Alinee los huecos del conducto de descarga lateral 4 debajo de la articulación 14 3 Cierre la puerta de descarga lateral 7 5 AJUSTE DE LA ALTURA DE CORTE La máquina puede ajustarse a distintas alturas de corte 1 Tire hac...

Page 23: ...ATERÍA 1 Abra la puerta de la batería 6 2 Retire la llave de seguridad 16 3 Pulse y mantenga pulsado el botón de desbloqueo de la batería 17 4 Retire la batería de la máquina 8 FUNCIONAMIENTO AVISO Lleve protección ocular durante el funcionamiento 8 1 PUESTA EN MARCHA DE LA MÁQUINA 1 2 1 Introduzca la llave de seguridad 2 Pulse y mantenga pulsado el botón de puesta en marcha 2 3 Mientras mantiene ...

Page 24: ... de mantenimiento AVISO Mantenga el motor y la batería libres de hierba hojas o un exceso de grasa PRECAUCIÓN Utilice únicamente piezas de repuesto aprobadas PRECAUCIÓN No permita que líquidos de frenos gasolina y otros derivados del petróleo toquen las piezas de plástico Las sustancias químicas pueden dañar el plástico y hacer que quede inservible PRECAUCIÓN No utilice disolventes o detergentes f...

Page 25: ...lución El asa no está en posición Los elementos de fijación del asa no se han acoplado correctamente Ajuste la altura del asa y asegúrese de que los elementos de fijación se hay an colocado cor rectamente La máquina no se pone en marcha La capacidad de la batería está baja Cargue la batería El interruptor de seguridad está de fectuoso Sustituya el inter ruptor de seguri dad La llave de la ba tería...

Page 26: ...en ser defectuosas con un uso normal sin coste alguno para el cliente Esta garantía es válida únicamente para unidades que se hayan utilizado para uso personal que no han sido arrendadas o alquiladas para uso industrial comercial y cuyo mantenimiento se ha realizado de acuerdo con las instrucciones del manual del propietario suministrado con el producto nuevo ARTÍCULOS NO CUBIERTOS POR LA GARANTÍA...

Page 27: ...r 2 R0201859 00 1 Mando de asa inferior 3 R0201860 00 1 Llave de seguridad 4 R0201861 00 1 Aleta trasera 5 R0201862 00 1 Conjunto de cuchilla 6 R0201863 00 1 Conjunto de descarga lateral 7 R0202047 00 1 Conjunto de las ruedas 8 R0202048 00 1 Conjunto de control de superior 9 R0202049 00 1 Cabezal de accionamiento 27 Español ES ...

Page 28: ......

Reviews: