background image

16

GARANTÍA LIMITADA

Por la presente Greenworks garantiza este producto, al
comprador original con el comprobante de compra, durante
un periodo de cuatro (4) años frente a defectos en materiales,
piezas o mano de obra. A su entera discreción Greenworks
reparará o sustituirá cualquiera y todas las piezas que resulten
ser defectuosas, con un uso normal, sin coste alguno para el
cliente. Esta garantía es válida únicamente para unidades que
se hayan utilizado para uso personal que no han sido
arrendadas o alquiladas para uso industrial/comercial y cuyo
mantenimiento se ha realizado de acuerdo con las
instrucciones del manual del propietario suministrado con el
producto nuevo.

ARTÍCULOS NO CUBIERTOS POR LA GARANTÍA:

1. Cualquier pieza que no funcione debido a mal uso, uso

comercial, abuso, negligencia, accidente, mantenimiento
inadecuado o alteración; o

2. La unidad, si no ha sido utilizada o mantenida de acuerdo

con el manual del propietario; o

3. Desgaste normal, excepto en lo indicado a continuación;
4. Artículos de mantenimiento de rutina tales como

lubricantes, afilado de cuchillas;

5. Deterioro normal del acabado exterior debido al uso o la

exposición.

LÍNEA DE ASISTENCIA TELEFÓNICA:

Puede contactar con el servicio de garantía llamando a
nuestra línea de asistencia telefónica gratuita, a
1-855-345-3934 .

COSTES DE TRANSPORTE:

Los costes de transporte por el desplazamiento de cualquier
unidad o accesorio de equipos eléctricos son responsabilidad
del comprador. Es responsabilidad del comprador pagar los
costes de transporte de cualquier pieza enviada para su
sustitución bajo esta garantía, a menos que dicha devolución
sea solicitada por escrito por Greenworks.

Dirección en EE.UU.:

Greenworks Tools

P.O. Box 1238

Mooresville, NC 28115

17

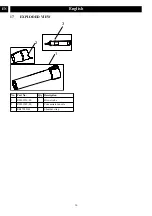
VISTA DESPIEZADA

3

2

1

Nº pieza

Ca
nt.

Descripción

1

R0201910-00

1

Tubo soplador

2

R0201909-00

1

Boquilla concentradora

3

RB37902144

1

Correa de hombro

18

Español

ES

Summary of Contents for ULTRAPOWER 60V PH60L00

Page 1: ...PTC401 www greenworkstools com PH60L210 EN OPERATOR MANUAL POLE HEDGE TRIMMER ES MANUAL DEL OPERADOR CORTASETOS TELESCÓPICO PH60L00 ...

Page 2: ......

Page 3: ...ly safe battery disposal 6 8 Unpack the machine 7 8 1 Install the pivoting head 7 8 2 Remove the pivoting head 7 8 3 Attach the auxiliary handle 8 8 4 Install the battery pack 8 8 5 Remove the battery pack 8 9 Operation 8 9 1 Start the machine 9 9 2 Stop the machine 9 9 3 Adjust the trimmer head angle 9 9 4 Attach machine to shoulder strap 9 9 5 Operation tips 10 10 Maintenance 10 10 1 Clean the m...

Page 4: ...ting power tools may result in serious personal injury Use personal protection Always wear eye protection Protective products such as dust mask non skid safety shoes hard hat or hearing protection used appropriately will reduce personal injuries Prevent unintentional starting Ensure the switch is in the off position before connecting to power source and or battery pack and when picking up or carry...

Page 5: ... power tool always fit the cutting device cover Proper handling of the hedge trimmer will reduce possible personal injury from the cutter blades Hold the power tool by insulated gripping surfaces only because the cutter blade may contact hidden wiring Cutter blades contacting a live wire may make exposed metal parts of the power tool live and could give the operator an electric shock DANGER Keep h...

Page 6: ...t conditions Danger keep hands and feet away from blade Wear head protection 6 RISK LEVELS The following signal words and meanings are intended to explain the levels of risk associated with this product SYM BOL SIGNAL MEANING DANGER Indicates an imminently haz ardous situation which if not avoided will result in death or serious injury WARNING Indicates a potentially hazard ous situation which if ...

Page 7: ...cipal solid waste stream Take them to a certified recycling or disposal center 8 UNPACK THE MACHINE WARNING Make sure that you correctly assemble the machine before use WARNING If parts of the machine are damaged do not use the machine If you do not have all the parts do not operate the machine If parts are damaged or missing contact the service center 1 Open the package 2 Read the documentation p...

Page 8: ...ttery pack locks into place 3 When you hear a click the battery pack is installed 8 5 REMOVE THE BATTERY PACK 1 Push and hold the battery release button 2 Remove the battery pack from the machine 9 OPERATION Do not put your fingers into the notches or in position where they can get cut Do not touch the blade unless you removed the battery pack Do not use the machine if the blade is damaged or bent...

Page 9: ...r to stop the machine 9 3 ADJUST THE TRIMMER HEAD ANGLE The trimmer head can be locked into 7 positions 1 Pull the pivot button and move the head forward or backward to your desired position 2 Release the pivot button 3 Check that the trimmer head locks in place securely 9 4 ATTACH MACHINE TO SHOULDER STRAP 1 Attach the carabiner to the carrying ring on the drive tube 9 English EN ...

Page 10: ...ION Do not let brake fluids gasoline petroleum based materials touch the plastic parts Chemicals can cause damage to the plastic and make the plastic unserviceable CAUTION Do not use strong solvents or detergents on the plastic housing or components WARNING Remove the battery pack from the machine before maintenance 10 1 CLEAN THE MACHINE WARNING Keep the machine and the motor free of leaves branc...

Page 11: ... hereby warranties this product to the original purchaser with proof of purchase for a period of four 4 years against defects in materials parts or workmanship Greenworks at its own discretion will repair or replace any and all parts found to be defective through normal use free of charge to the customer This warranty is valid only for units which have been used for personal use that have not been...

Page 12: ...Mooresville NC 28115 L3Y 8K3 15 EXPLODED VIEW 1 2 3 No Part No Description Qty 1 R0201827 00 Auxiliary handle 1 2 R0202334 00 Knob assembly 1 3 RB37902144C Shoulder strap 1 12 English EN ...

Page 13: ...ón de batería segura para el medio ambiente 17 8 Desembalaje de la máquina 17 8 1 Instalación del cabezal articulado 17 8 2 Retirada del cabezal articulado 18 8 3 Fijación del asa auxiliar 18 8 4 Instalación de la batería 18 8 5 Retirada de la batería 18 9 Funcionamiento 18 9 1 Puesta en marcha de la máquina 19 9 2 Detención de la máquina 19 9 3 Ajuste del ángulo del cabezal de corte 19 9 4 Fijaci...

Page 14: ...a Sujete la herramienta eléctrica con ambas manos para evitar perder el control 2 2 SEGURIDAD ELÉCTRICA No exponga las herramientas eléctricas a la lluvia ni a condiciones de humedad Si penetra agua en una herramienta eléctrica aumentará el riesgo de descarga eléctrica 2 3 SEGURIDAD PERSONAL Manténgase alerta observe lo que está haciendo y emplee el sentido común cuando utilice una herramienta elé...

Page 15: ...aclare con abundante agua y jabón Si el líquido entra en contacto con los ojos acuda al médico inmediatamente El líquido despedido de la batería puede provocar irritación o quemaduras 2 6 SERVICIO Solicite a un técnico de reparación cualificado que realice las tareas de servicio de su herramienta eléctrica utilizando únicamente piezas de repuesto idénticas Esto garantizará el mantenimiento de la s...

Page 16: ...ona entra en la zona de trabajo Tenga mucho cuidado al acercarse a esquinas ciegas portales arbustos árboles u otros objetos que puedan ocultar su visión de un niño que pueda correr hacia el recorrido de la máquina 5 SÍMBOLOS EN EL PRODUCTO En el producto pueden utilizarse algunos de los siguientes símbolos Le rogamos que los estudie y aprenda su significado La interpretación correcta de estos sím...

Page 17: ...mbiente Cubra los terminales de la batería con cinta adhesiva resistente NO intente retirar o destruir ninguno de los componentes de la batería NO intente abrir la batería Si se produce una fuga los electrolitos liberados son corrosivos y tóxicos NO deje que la solución entre en contacto con los ojos o la piel y no la ingiera NO deseche estas baterías con la basura doméstica normal NO incinere NO ...

Page 18: ... retirar la batería Debe leer conocer y seguir las instrucciones del manual de la batería y el cargador 1 Alinee las nervaduras de elevación de la batería con las ranuras del compartimento de la batería 2 Introduzca la batería en el compartimento de la batería hasta que encaje en su posición 3 Cuando escuche un clic la batería está instalada 8 5 RETIRADA DE LA BATERÍA 1 Pulse y mantenga pulsado el...

Page 19: ...tillo 6 AVISO Sujete la máquina con las dos manos durante el funcionamiento 9 2 DETENCIÓN DE LA MÁQUINA 1 Suelte el gatillo para detener la máquina 9 3 AJUSTE DEL ÁNGULO DEL CABEZAL DE CORTE El cabezal de corte puede bloquearse en 7 posiciones 1 Tire del botón de articulación y mueva el cabezal hacia delante o hacia atrás hasta la posición deseada 2 Suelte el botón de articulación 3 Compruebe que ...

Page 20: ...ita que líquidos de frenos gasolina y otros derivados del petróleo toquen las piezas de plástico Las sustancias químicas pueden dañar el plástico y hacer que quede inservible PRECAUCIÓN No utilice disolventes o detergentes fuertes en la carcasa o los componentes de plástico AVISO Retire la batería de la máquina antes de realizar tareas de mantenimiento 10 1 LIMPIEZA DE LA MÁQUINA AVISO Mantenga la...

Page 21: ...ATERÍAS Por la presente Greenworks garantiza este producto al comprador original con el comprobante de compra durante un periodo de cuatro 4 años frente a defectos en materiales piezas o mano de obra A su entera discreción Greenworks reparará o sustituirá cualquiera y todas las piezas que resulten ser defectuosas con un uso normal sin coste alguno para el cliente Esta garantía es válida únicamente...

Page 22: ...works Tools Canada Inc P O Box 1238 P O Box 93095 Newmarket Ontario Mooresville NC 28115 L3Y 8K3 15 VISTA DESPIEZADA 1 2 3 Nº Nº pieza Descripción Cant 1 R0201827 00 Asa auxiliar 1 2 R0202334 00 Conjunto del mando 1 3 RB37902144C Correa de hombro 1 22 Español ES ...

Page 23: ......

Page 24: ......

Page 25: ...BLC402 BL60L01 BL60L251 www greenworkstools com EN OPERATOR MANUAL BLOWER ES MANUAL DEL OPERADOR SOPLADOR ...

Page 26: ......

Page 27: ...10 1 Unpack the machine 6 10 2 Install the blower tube 7 10 3 Install the battery pack 7 10 4 Remove the battery pack 7 10 5 Attach the shoulder strap 7 11 Operation 7 11 1 Start the machine 7 11 2 Stop the machine 8 11 3 Cruise control lever 8 11 4 Turbo button 8 11 5 Operation tips 8 12 Maintenance 8 12 1 Clean the machine 8 13 Transportation and storage 8 13 1 Store the machine 8 14 Troubleshoo...

Page 28: ...pants boots and gloves Avoid loose garments or jewellery that could get caught in moving parts of the machine or its motor Do not force tool Use the correct tool for your application The correct tool will do the job better and safer at the rate for which it is designed Keep firm footing and balance Do not overreach Overreaching can result in loss of balance Do not use the tool if the switch does n...

Page 29: ...AFETY Tragic accidents can occur if the operator is not aware of the presence of children Keep children out of the working area and under the watchful care of a responsible adult Do not allow children under the age of 14 to operate this machine Children who are 14 years of age and older must read and understand the operating instructions and safety rules in this manual and must be trained and supe...

Page 30: ... for information and specific instructions Take the batteries to a local recycling and or disposal center certified for lithium ion disposal WARNING If the battery pack cracks or breaks with or without leaks do not recharge it and do not use Discard it and replace with a new battery pack DO NOT TRY TO REPAIR IT To prevent injury and risk of fire explosion or electric shock and to avoid damage to t...

Page 31: ...nual 1 Align the lift ribs on the battery pack with the grooves in the battery compartment 2 Push the battery pack into the battery compartment until the battery pack locks into place 3 When you hear a click the battery pack is installed 10 4 REMOVE THE BATTERY PACK 1 Push and hold the battery release button 2 Remove the battery pack from the machine 10 5 ATTACH THE SHOULDER STRAP 1 Hook the strap...

Page 32: ...ne Discard the unwanted material when you complete work 12 MAINTENANCE CAUTION Do not let brake fluids gasoline petroleum based materials touch the plastic parts Chemicals can cause damage to the plastic and make the plastic unserviceable CAUTION Do not use strong solvents or detergents on the plastic housing or components WARNING Remove the battery pack from the machine before maintenance 12 1 CL...

Page 33: ...s product to the original purchaser with proof of purchase for a period of four 4 years against defects in materials parts or workmanship Greenworks at its own discretion will repair or replace any and all parts found to be defective through normal use free of charge to the customer This warranty is valid only for units which have been used for personal use that have not been hired or rented for i...

Page 34: ...17 EXPLODED VIEW 3 2 1 No Part No Qty Description 1 R0201910 00 1 Blower tube 2 R0201909 00 1 Concentrator nozzle 3 RB37902144 1 Shoulder strap 10 English EN ...

Page 35: ... máquina 15 10 2 Instalación del tubo soplador 15 10 3 Instalación de la batería 15 10 4 Retirada de la batería 15 10 5 Fijación de la correa de hombro 15 11 Funcionamiento 16 11 1 Puesta en marcha de la máquina 16 11 2 Detención de la máquina 16 11 3 Palanca de control de crucero 16 11 4 Botón turbo 16 11 5 Consejos de funcionamiento 16 12 Mantenimiento 16 12 1 Limpieza de la máquina 17 13 Transp...

Page 36: ...flamarse Las herramientas eléctricas generan chispas que pueden encender el polvo o los gases Nunca permita que los niños utilicen el equipo Nunca permita que utilicen el equipo adultos sin la debida instrucción Lleve pantalones largos y gruesos botas y guantes Evite prendas sueltas o joyas que puedan engancharse en las piezas móviles de la máquina o su motor No fuerce la herramienta Utilice la he...

Page 37: ...ique ni intente reparar el aparato o la batería según corresponda excepto lo indicado en las instrucciones de uso y cuidado Siga todas las instrucciones de carga y no cargue la batería o el aparato fuera del intervalo de temperatura especificado en las instrucciones La carga incorrecta o a temperaturas fuera del intervalo especificado puede dañar la batería y aumentar el riesgo de incendio 4 SEGUR...

Page 38: ...UCIÓN Sin símbolo de alerta sobre seguridad Indica una situa ción que puede provocar da ños materiales 9 ELIMINACIÓN DE BATERÍA SEGURA PARA EL MEDIO AMBIENTE Los materiales tóxicos y corrosivos que figuran a continuación se encuentran en las baterías utilizadas en esta máquina Ion de litio un material tóxico AVISO Deseche todos los materiales tóxicos de una manera especificada para evitar la conta...

Page 39: ...sta que el tubo se bloquee en la boquilla SUGERENCIA Puede utilizar la boquilla para aumentar el flujo de aire en zonas estrechas 10 3 INSTALACIÓN DE LA BATERÍA AVISO Si la batería o el cargador ha sufrido daños sustituya la batería o el cargador Detenga la máquina y espere hasta que el motor se pare antes de instalar o retirar la batería Debe leer y entender las instrucciones del manual de la bat...

Page 40: ...velocidad más alta 2 Suelte el botón turbo la máquina está a la velocidad normal NOTA La utilización del botón turbo agota la batería más rápidamente Utilice únicamente el botón turbo cuando sea necesario 11 5 CONSEJOS DE FUNCIONAMIENTO Sople alrededor del borde exterior de los materiales no deseados para evitar que estos se dispersen Utilice rastrillos y escobas para quitar el material no deseado...

Page 41: ... la batería en la má quina La batería se ha agotado Cargue la batería PROBLEMA POSIBLE CAU SA SOLUCIÓN La máquina no se pone en marcha El interruptor de encendido está de fectuoso Las piezas defec tuosas deben ser sustituidas por un centro de servicio autorizado El motor está de fectuoso La placa de circui tos impresos está defectuosa El aire no fluye por el tubo cuan do pone en marcha la máqui na...

Page 42: ...La unidad si no ha sido utilizada o mantenida de acuerdo con el manual del propietario o 3 Desgaste normal excepto en lo indicado a continuación 4 Artículos de mantenimiento de rutina tales como lubricantes afilado de cuchillas 5 Deterioro normal del acabado exterior debido al uso o la exposición LÍNEA DE ASISTENCIA TELEFÓNICA Puede contactar con el servicio de garantía llamando a nuestra línea de...

Page 43: ......

Page 44: ......

Reviews: